


- Contents
Interaction Connect Help
Configure the web-based phone feature
Requirements: Your CIC administrator must enable this feature and set it up for you. For more information, see Web-based Phone Requirements.
The following list provides an overview of the configuration process for CIC web-based phone:
-
Enroll in Genesys Cloud Communicate through your Genesys Sales representative.
Note:
To configure the Genesys Cloud Edge, create WebRTC phone definitions, define
tie-lines, and assign phones, you must have the Telephony Admin
and admin role in Genesys Cloud.
For more information about Genesys Cloud roles, see Roles
and permissions Overview in the Genesys
Cloud Resource Center.
-
Install and configure the Genesys Cloud Edge.
Note:
The different models of Genesys Cloud Edge have varying capacities, which are affected by the following features and usage scenarios:
• Number of registered stations
• Number of concurrent calls
• Percentage of active calls recorded
• Number of Public Switched Telephone Network (PSTN) calls
To ensure that you have enough Genesys Cloud Edge appliances to facilitate the number of web-based phones that are necessary in your environment, use the Bandwidth calculator.
-
Use Genesys Cloud for PureConnect Administrator's Guide to integrate your CIC system with your Genesys Cloud organization.
-
Ensure each Genesys Cloud Edge device is ready to communicate with CIC:
Note:
By default, Genesys Cloud Edge devices communicate through port/protocol 5061/TLS. You can change the port and protocol but they must match between the Genesys Cloud Edge device and the tie-line.-
Specify a Genesys Cloud trunk as an intermediate proxy.
Note:
Ensure the trunk will allow CIC to send calls to Genesys Cloud. You should also record the port and protocol of the SIP line for use later in this procedure when you configure CIC to communicate with Genesys Cloud. -
Create a Genesys Cloud Edge group that includes a phone trunk.
-
-
In Interaction Administrator, select System Configuration > Genesys Cloud in the left pane.
-
In the right pane, double-click the Configuration entry.
The Genesys Cloud Configuration dialog box appears.
-
Select the Configure CIC web-based phone button.
The first page of the configuration wizard appears. For information on using the first page of the CIC web-based phone wizard, see in Interaction Administrator Help
Each page of the wizard has its own help topic to assist you in configuring CIC web-based phone.
-
Test CIC web-based phones to ensure that they are functioning properly.
-
Open a supported web browser and navigate to the Interaction Connect logon page.
Note:
Ensure that you use https:// as the web protocol in your web browser. -
Select your CIC server.
-
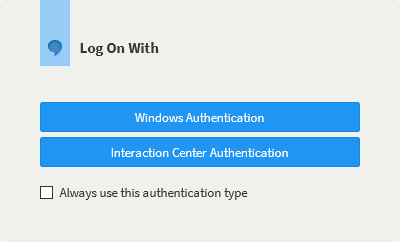
If prompted, log on using Windows Authentication.
-
In the Choose a Station page, select the Another Stationoption.
-
In the Station Type list box, select CIC web-based phone.
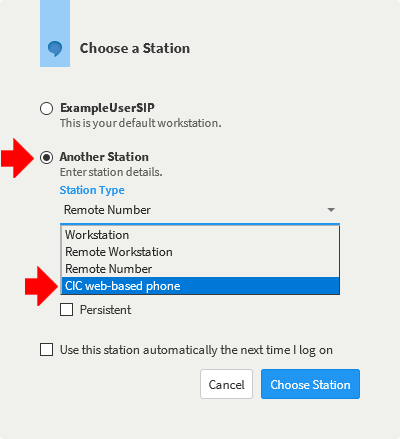
Note:
If you do not see CIC web-based phone in the list box, ensure that you are using the https:// web protocol in your web browser. If you are using the https:// web browser, validate that the configuration settings described in this procedure for both Genesys Cloud and CIC are correct.In the Microphone list box, select the audio input device that you want to use for CIC web-based phone.
-
If the Speaker list box is displayed, select the audio output device that you want to use for CIC web-based phone.
Important!
The Speaker list box is not displayed in the Firefox web browser. -
Select the Choose Station button.
-
Do the following tests and ensure that CIC web-based phone receives each call and the audio functions as expected:
-
Place an outbound call.
-
Call your extension from another telephone.
-
Call your DID telephone number.
-
-