


- Contents
Interaction Dialer Manager Help
Create Database Table wizard
To create a new contact list table in Dialer's database:
-
Open the Contact Lists view in Interaction Dialer Manager.
-
Select a contact list entry. When a new contact list table is created, it will be automatically assigned to this contact list entry.
-
Click the Create Table button.
-
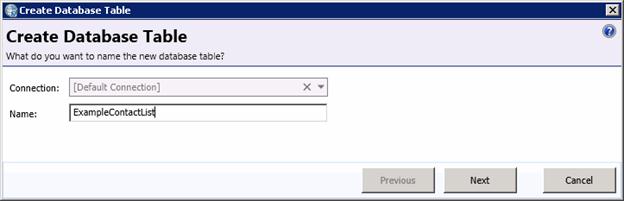
When the Create Database Table wizard appears, select a connection from the Connection drop list, or accept [Default Connection].
-
Type a name for the new table in the Name box. Click Next.
-
Use the Source Type drop list to select a data source for the wizard to use as a template when the new table is created. This also tells the wizard where to acquire contact data. The format of fields in the table to be imported must match the schema of a contact list table. A new table will be created to match the format of the source you select in this step, and records from it will be copied to the new table.
-
Depending on the Source Type you select, you'll need to provide specific items of information. (See Source Type Specifications.)
-
Click Next.
-
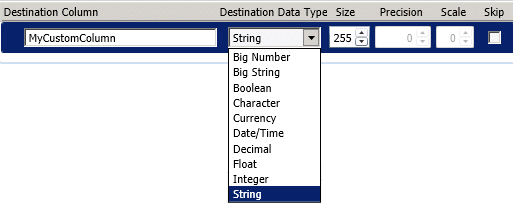
The next screen maps fields in the data source to fields in the destination table. You can add custom columns to the destination table, choose not to import data from source columns, and even remove columns to prevent them from appearing at all in the destination table.
To add a new custom column to the destination table, click the
 button.
This adds a new row at the bottom of the grid. You can give each custom
column a name, and set its destination data type, display size, precision,
and scale.
button.
This adds a new row at the bottom of the grid. You can give each custom
column a name, and set its destination data type, display size, precision,
and scale.on table.
Size—the display size of the column, in characters. When a contact list has multiple contact columns, Interaction Dialer requires all phone number columns to be the same type and size.
Precision—the number of digits in a number.
Scale—the number of digits to the right of the decimal point in a number
 button—removes a selected column from the grid, preventing
that column from being created in the destination table.
button—removes a selected column from the grid, preventing
that column from being created in the destination table.Skip check box—controls whether or not data from a source column is copied to the destination column. When a column is skipped, that column is created in the destination table but no data is copied to the destination column. To create an empty table, skip all columns. Custom columns can be skipped like regular columns.
Note: Starting with Dialer 4.0 SU2, if you are adding more than one custom column to the destination table for contact information, the Destination Data Type for each column must be the same.
-
When you are finished mapping the fields, click Next. You'll see a summary of the selections made, and actions that will be performed is displayed.
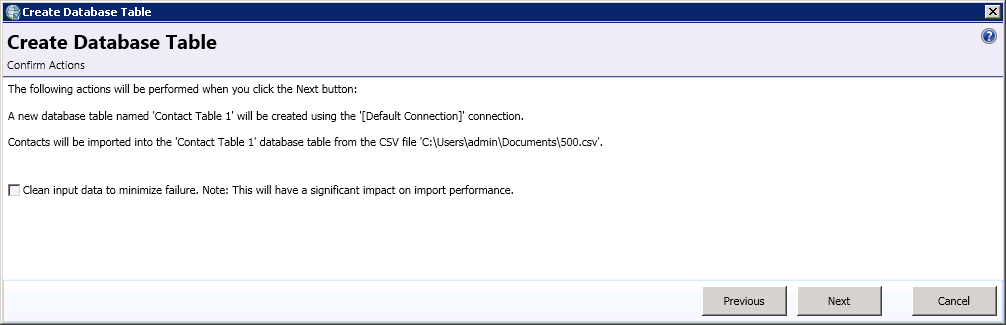
If there are line breaks in the data file that you are importing into the database table, you can select the Clean input data to minimize failure check box to have the Create Database Table wizard remove the line breaks before importing the data file. However, keep in mind that using this feature can be time consuming process and will decrease the performance of the overall import procedure.
-
Click Next to continue. The new table will be created, or an error message will be displayed to indicate what went wrong (e.g. table with same name already exists, an so on.)
-
Click Finish to dismiss the wizard.
Related Topics