


- Contents
Interaction Recorder Client for IC Business Manager Help
Export Multiple Recordings
Export multiple recordings using the Export dialog. Follow these steps to export multiple recordings to a folder.
Note To export recordings in IC Business Manager, a user must have permission for the Security Policy can export/archive recordings.
To export multiple recordings from the Search Results View, Select the recordings to be exported. Right-click the selection, and on the shortcut menu point to Export.
Note Screen recordings are exported during Screen Recording Playback. If a screen recording is included in a recording selection, the Export menu item is not available.
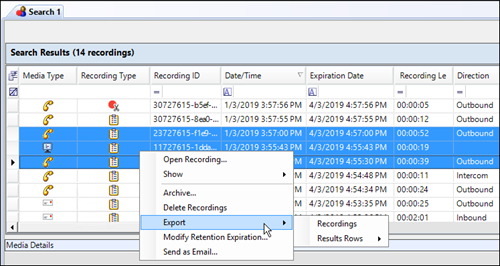
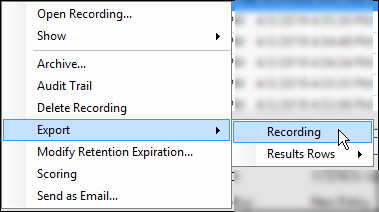
On the submenu, click Recording.
The Export Recordings dialog is displayed.

Use the Export Recordings dialog to specify the folder and the file names when exporting multiple recordings.
Note: When Social Media recordings are exported from Interaction Recorder in IC Business Manager, the files are exported in Zip format and contains the necessary files to view the recording. The playback website is included in the Zip file.
Specify the Folder Structure
First, use Browse to specify an Export Location for the root folder.
Next, select a button to specify one relative location for the exported recordings. The choices are:
- Use default folder structure
- Export files into one directory
- Custom folder structure
Use default folder structure
Select Use default folder structure to export the selected recordings to the specified Export Location. The recordings are saved in a directory structure in the form YYYYMM/DDHH/MM, where:
- YYYYMM is the year and month of the recording
- DDHH is the day and hour of the recording
- MM is the minute of the recording
Export files into one directory
Select Export files into one directory to export the selected recordings to the root folder.
Custom folder structure
Select Custom folder structure to export the selected recordings to directories defined by a directory template. The directory template is created using the properties of the exported recordings.
After you select Custom folder structure, use the default template displayed in the Custom folder structure field, or use the Custom folder structure field to specify a new folder template. Use the Show recording properties supported in custom file or folder names drop-down list to display a description of the Key and Value properties.
The Example field displays an example of the folder structure that is created using the template in the Custom folder structure field.
Specify the file names
After the relative location for the exported recordings is selected and configured, specify how the recordings files are named. The choices are:
- Use default file naming
- Custom file names
Use default file naming
Select Use default file naming to name the recording files by using the default naming convention.
The recordings are named in the form IR[type of interaction]_[interaction ID].wav. For example, IRCall_300144281850130611.wav.
Custom file names
Select Custom file names to name the recording files using a file name template. After you select Custom file names, use the default template displayed in the Custom file names field or use the Custom file names field to specify a new file name template. Use the Show recording properties supported in custom file or folder names drop-down list to display a description of the Key and Value properties.
The Example field displays an example of the file name that is created using the template in the Custom file name field.
Export recordings
When the Export Recordings dialog is complete, click Export to export recordings to the specified directory.