


- Contents
Interaction Optimizer Help
Add days to a forecast
Note: AI-powered forecasting determines the source data to use for a forecast. Therefore, the ability to add days to a forecast is unavailable for an AI-powered forecast.
You can create a new volume forecasts for a designated week. Volume Forecasts uses historical ACD data (and optionally, Day Selection and Weighting) to calculate or "forecast" the interaction volume for the next time period. ACD data is based on Route Group.
Note: Before you configure settings, select the appropriate scheduling unit from the Interaction Optimizer Home page Scheduling unit drop-down list.
Creating multiple volume forecasts enables multiple schedule scenarios, which assists in determining the most appropriate schedule to publish. Having multiple scenarios allows you to select which scenario makes the most sense in terms of such factors as service level, average speed of answer, schedule efficiency, etc.
Add days to a forecast
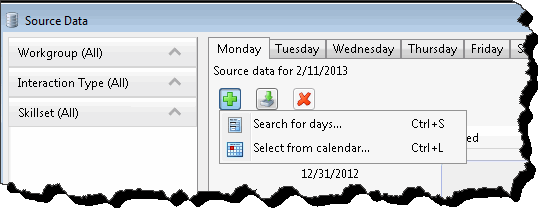
This topic assumes you chose to create a new forecast or have opened an existing forecast from the Interaction Optimizer Home page. You can add days to the forecast from the Source Data dialog box.
-
To open the Source Data dialog box do one of the following:
-
On the toolbar, click the Source Data button.
-
Open the Interaction Optimizer menu and select Source Data.
-
From the Source Data dialog, click the Add button and select one of the following:
-
Search for days
-
Select from calendar
Add days to a forecast using the Search for days feature
If you chose Search for days, the Add Days for dialog box opens:
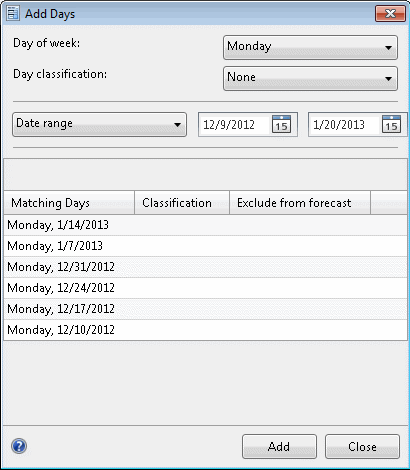
Note: The Add Days for dialog box allows you to add additional days but will not remove existing days. For example, if you create a forecast based on the past 6 weeks and then use the Add Days feature to select a number of days from the same week last year, Interaction Optimizer includes both sets of days in the forecast.
-
To search for a specific day of the week, click the arrow at the end of the Day of week drop-down list and select the days you want to add to the forecast.
-
To search for a specific day classification, click the arrow at the end of the Day classification drop-down list and select the day classifications you want to include in the forecast.
-
Click the arrow at the end of the Date Range drop-down list and choose to select from a range of dates, a number of weeks, or a number of occurrences.
-
Depending on your selection in step 3, do one of the following:
-
If you chose Date Range, select the start and end dates from the calendar boxes.
-
If you chose Number of weeks, use the up or down arrows to choose the number of weeks on which to pick additional days for the forecast.
-
If you chose Number of occurrences, use the up or down arrows to choose the number of occurrences on which to pick additional days for the forecast.
-
Click Add.
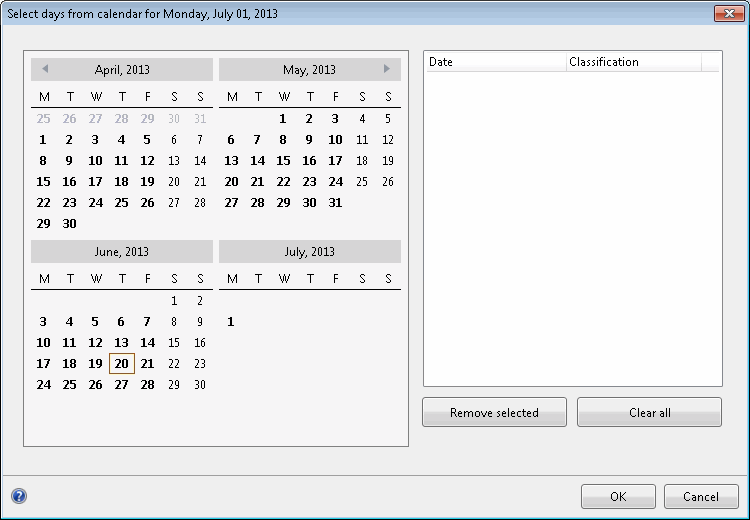
Add days to a forecast using the Select from calendar feature
If you chose Select from calendar, the Select days from calendar dialog box opens. Click to add or remove any days and click OK.
Note: If you select a date that contains no data, Interaction Optimizer does not include it in the Source Data list.
Import days to or delete days from a forecast
-
To import data from an Excel spreadsheet, click the Import source Data button.
-
To remove a day from the forecast, select it and click the Delete button.
