- Contents
Portfolio Manager Help
Define an Import File Layout
Use the Define Import Layout window to define the layout for an import file. For more information about defining a file layout, see the Exchange documentation.
To define an import file layout
-
On the Import File Configuration tab, in the File Type section, click Flat File Source.

-
In the File Configuration section, click Modify Import Definition.

-
To create an Excel file layout, do the following:
-
In the toolbar, click View Excel Sample.
-
Save the file to any location and then modify it to reflect the model for the import file.
-
Delete unused worksheets and save the Excel file.
-
Do the next step to import the file layout.
-
To specify a pre-defined import file layout (such as the one you created in the previous step), do the following:
-
In the toolbar, click Import.
-
Click the file that contains the import file layout and then click Open.
-
To create the file layout (instead of using a pre-existing layout), do the following:
-
In the toolbar, click Add Record Type.
-
In the New Record Table Name dialog box, type the name of the record (without spaces.) The record name appears as a tab in the Define Import Layout window.

Name: Name that identifies the field.
Type: Type of data the field can contain. Valid values are:
String: Text or numeric characters.
Integer: Numbers.
Decimal: Decimal field. Two decimal places accepted by default.
DateTime: Date, time, or both.
Format: Used to format DateTime and Decimal field types only.
DateTime – Format to use other than the standard (M/D/YYYY).
M=month, D=day, Y=year, H=hour, M=minute, S=second (for example, DDMMYYYY)
Decimal – If the file includes a decimal or the last 2 integers are decimal places, skip this box. Otherwise:
nodecimalpoint = No decimal used.
signedascii = Signed ASCII RMS format used.
nodecimalpointwithsign = Plus or minus sign used at end of integer.
Note: Some input strings that need complicated alteration or parsing before import could require custom programming.
Width: Maximum length of the data in the field.
-
In the data grid, click in the Name column of the blank row and then complete the information for the first field in the record.
-
Press Tab to create a blank row for the next field in the record and complete the information. Repeat as necessary.
-
To specify the general properties for the file layout, do the following:
-
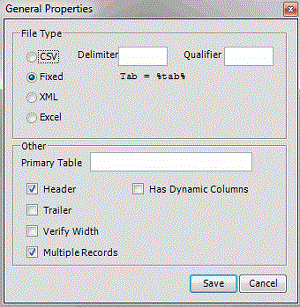
In the toolbar, click General Properties.

CSV: (Comma-Separated Value.) If selected, the file is a delimited (separated) file. Specify the delimiter and qualifier.
Delimiter: Delimiter used to separate records (for example, comma, dash).
Qualifier: Qualifier used to specify strings that could have the delimiter contained within (for example, 1234, "Smith, John", ABC).
Fixed: If selected, the file is a fixed-length file.
XML: If selected, the file is an XML file. Use only with assistance from Latitude by Genesys Support.
Excel: If selected, the file is a Microsoft Excel file.
Primary Table: Name of the primary table (record). This record is equivalent to a Latitude master record. The system assumes that records between each primary table in the file are dependent records (for example, notes, payment, bankruptcy).
Header: If selected, indicates that the file includes a header record.
Trailer: If selected, indicates that the file includes a trailer record.
Verify Width: If selected, checks to see whether the file width matches the layout width defined.
Multiple Records: If selected, indicates that the file contains more than one record type (such as dependent records, header records, trailer records).
Has Dynamic Columns: If selected, the file could contain unmapped columns. The system stores extra columns as miscellaneous extra data.
-
Complete the information and then click Save.
-
In the Define Import Layout window, in the toolbar, click Save.


