- Contents
Modify the Properties of an Export File
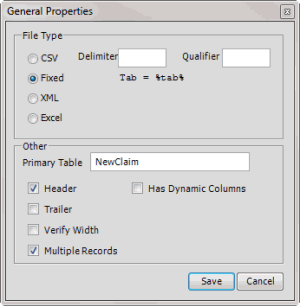
Use the General Properties dialog box to modify the properties of an export file.
To modify the properties of an export file
-
In the menu bar, click Tools and then click Export Layout Definer.
-
Click YGC Standard Layout and then click the file layout to define (for example, Bankruptcy, Deceased, Demographics). The Define Export Definition window appears.
-
Click General Properties. The General Properties dialog box appears.

File Type
CSV: (Comma-Separated Value.) If selected, AIM uses a delimiter to separate fields when it exports the file.
Delimiter: Character to use to separate fields in a CSV file.
Qualifier: Character to use to flag strings that could contain the character specified as the delimiter. For example, if the delimiter is a comma and a name field contains last name and first name separated by a comma, you can set a qualifier, such as quotes, to flag those strings. The exported file would show, for example, 1234,"Smith, John",ABC. The quotes indicate that the last name and first name are a single field, not two separate ones.
Fixed: If selected, the file has a fixed width. Specify the width in the Width box in the Define Export Definition window.
XML: If selected, AIM exports the file in XML format. For more information, contact Latitude by Genesys Support.
Excel: If selected, AIM exports the file in Excel format.
Other
Primary Table: Name of the primary table (record). This record is equivalent to a Latitude master record and must match the unique account criteria for the client.
Header: If selected, the file contains a header record.
Trailer: If selected, the file contains a trailer record.
Verify Width: If selected, the system verifies whether the file width matches the value specified in the Width box in the Define Export Definition window.
Multiple Records: If selected, the file contains more than one record type.
Has Dynamic Columns: If selected, the file could have unmapped columns.
-
Complete the information and then click Save.


