- Contents
Job Manager Help
Create a Transfer Configuration
Use the Transfer - [Transfer Configuration Name] tab to create a transfer configuration that specifies how to send and retrieves files.
To create a transfer configuration
-
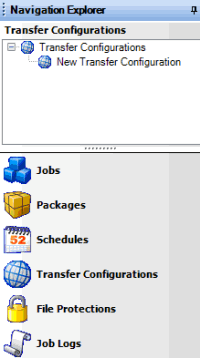
In the Navigation Explorer pane, click Transfer Configurations. The Transfer Configurations panel appears.

-
To create a folder for the new transfer configuration, do the following:
-
Right-click Transfer Configurations, click Add, and then click Add Folder.
-
Type a name for the folder and then press Enter.
-
Right-click the folder where you want to add the transfer configuration, click Add, and then click Add Transfer Configuration.
-
Type a name for the transfer configuration and then press Enter.
-
Do one of the following:
-
Right-click the transfer configuration and then click Transfer Configuration Properties.
-
Double-click the transfer configuration.
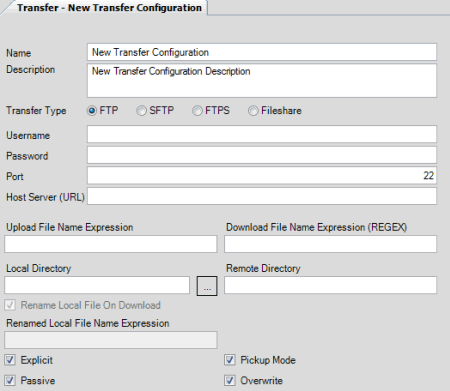
The Transfer - [Transfer Configuration Name] tab appears. Job Manager includes the name of the transfer configuration in the tab name.

Name: Name of the transfer configuration as specified in the Transfer Configurations panel. To modify the name, rename it in the Transfer Configurations panel.
Description: Description of the transfer configuration.
Transfer Type: Type of file transfer. Valid values are:
FTP: File Transfer Protocol. Job Manager transfers files without encryption.
SFTP: Secure File Transfer Protocol. Job Manager transfer files securely in specially formatted packets using a single connection and an agreed-upon encryption cipher.
FTPS: File Transfer Protocol Secure. Job Manager transfers files securely using SSL encryption.
Fileshare: Job Manager retrieves files from and saves files to a shared drive. If the remote directory is the C: drive, it must be a shared drive.
Username: User name for logging on to the transfer site.
Password: Password for logging on to the transfer site.
Port: FTP port on the recipient's side to store the files that Job Manager sends and retrieves.
Host Server (URL): Address of the host server for the transfer site or file share.
Upload File Name Expression: Naming convention for the file that Job Manager creates and uploads. Include the following expressions as needed (for example, CA_@DateTime(yyMMddss):
@DayCounter(2)
- Creates a numeric counter. The
(2) variable inserts a number between 0-99, in sequence for each sent
file.
@DateTime(yyyyMMddssmm)
- Inserts the date and time stamp as part of the file name. Job Manager
modifies the (yyyyMMddssmm) variable to
use the date stamp differently (for example, MMddss).
Download File Name Expression (REGEX): Syntax used to retrieve the file, with the following recognized regular expressions (for example, ^CA_[0-9][0-9] [0-9][0-9] [0-9][0-9] [0-9][0-9].done):
^ -
Start at the beginning of the file name
[0-9] -
Represents any number
*.* -
Represents any file name, any extension
Local Directory: Location on the local computer or network to store the files. Job Manager retrieves import files from this directory and saves export files to this directory.
Remote Directory: Remote location to store files (for example, the FTP site or file share).
Rename Local File on Download: Not used.
Renamed Local File Name Expression: Not used.
Explicit: If selected, Job Manager uses explicit mode for FTPS providers. For more information, contact your network administrator or outside collection agency or attorney.
Passive: If selected, Job Manager uses passive mode for FTP providers. For more information, contact your network administrator or outside collection agency or attorney.
Pickup Mode: If selected, Job Manager deletes files from the remote site after retrieval. If you don't have the permissions to delete files from the remote site, clear this check box.
Overwrite: If selected, Job Manager overwrites files with the same name on the remote and local sites.
-
Complete the information and then, in the toolbar, click Save.
Note: To test the transfer configuration, see Test a Transfer Configuration.
Related Topics


