- Contents
Add Debtor Information
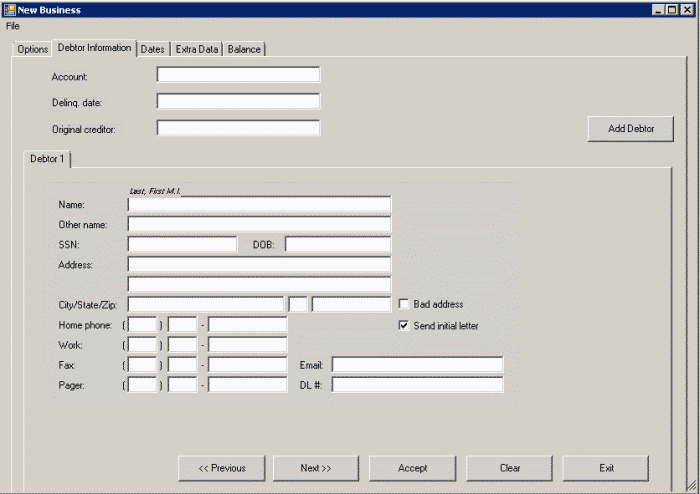
Use the Debtor Information tab to specify debtor information.
To add debtor information
-
In the Main Menu window, from the Data Entry menu, click New Business. The New Business window appears.
-
Click the Debtor Information tab.

Account: Customer's account (reference) number for the debtor account.
Delinq. date: Date you first noted the debtor account as delinquent (from customer).
Original Creditor: (optional) First customer for the account. This information displays at the top of the Work Form beneath the customer name.
Debtor 1 tab: This tab is for the primary debtor on the account. If you didn't select an option on the Options tab, that option isn't available on this tab.
Name: Debtor's name. For an individual, the debtor name format is last name, first name, and middle initial (for example, Doe, John J). For a business, use the standard format (for example, ABC Bicycles).
Other name: Any other name the debtor uses.
SSN: The debtor's nine-digit Social Security Number, formatted as 999999999.
DOB: The debtor's date of birth, formatted as MM/DD/CCYY.
Address: The debtor's house number and street. The second line is for information such as an apartment or P.O. box number.
City/State/Zip: The debtor's city, state, and ZIP Code. If you selected Auto zipcode on the Options tab, the City and State boxes are unavailable. When you specify a ZIP Code, Latitude populates the City and State boxes for you.
Bad address: If selected, the debtor's address is invalid.
Home phone: The debtor's home phone number.
Work: The debtor's work phone number.
Fax: The debtor's fax number.
Email: The debtor's email address.
Pager: The debtor's pager number.
DL #: The debtor's driver's license number.
-
Complete the information.
-
To add another debtor to the account, click Add Debtor. The Debtor2 tab appears. Complete the information as indicated for the Debtor 1 tab. Add more debtors as needed.
-
When finished with this tab, do one of the following:
-
To save the information and display the next tab, click Next>>.
-
To save the information and close the New Business window, click Accept.
Related Topics
Balance


