- Contents
Create a Batch
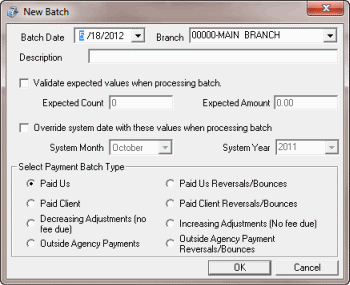
Use the New Batch dialog box to create a payment batch. Each batch can only have one payment type. If you have multiple payment types to enter, create a separate batch for each.
To create a batch
-
In the Main Menu window, from the Data Entry menu, click Debtor Payments. The Payment Entry window appears.
-
On the Batch tab, click New, or from the Batch menu, select New Batch. The New Batch dialog box appears.

Batch Date: Current date. To change the date, click the arrow and select a date from the calendar.
Branch: If your agency consists of more than one branch, click to select the branch to which to apply payments.
Description: Information to help identify the contents of the batch.
Validate expected values when processing batch: If selected, the system validates the transactions in the batch to the transaction count and transaction amount you specify.
Expected Count: Total number of transactions expected in the batch. Provide this number if you already counted and totaled the transactions, and you want the system to verify the batch count with this number when processing the batch.
Expected Amount: Total dollar amount expected in the batch. Provide this amount if you already counted and totaled the transactions, and you want the system to verify the batch amount with this amount when processing the batch.
Override system date with these values when processing batch: If selected, the System Month and System Year boxes are available to allow you to override the system values.
System Month: Current processing month for Latitude. To create a batch to apply to a prior or later system month, click the Override system date with these values when processing batch check box and, in the System Month box, select the month.
System Year: Current processing year for Latitude. To create a batch to apply to a prior or later system year, click the Override system date with these values when processing batch check box and, in the System Year box, select the year.
Note: The administrator sets the system month and year on the Settings tab of the Latitude - Control File Properties window. For more information, see Maintain System Settings.
Paid Us: (PU) Debtor payments sent directly to your agency.
Paid Client: (PC) Debtor payments paid to your customer, where your agency holds the account.
Decreasing Adjustment (no fee due): (DA) Changes to an account that decrease the balance on the debtor’s account. The system doesn't calculate fees for your agency against this amount and doesn't reflect it on invoices.
Outside Agency Payments: (PA) Payments made to an outside (subcontracted) agency collecting debtor account money for your agency.
Paid Us Reversals/Bounces: (PUR) Debtor payments sent directly to your agency where the check did not clear.
Paid Client Reversals/Bounces: (PCR) Debtor payments paid to your customer, where your agency holds the account and the check did not clear.
Increasing Adjustments (No fee due): (DAR) Changes to an account that increase the balance on the debtor’s account. The system doesn't calculate fees for your agency against this amount and doesn't reflect it on invoices.
Outside Agency Payment Reversals/Bounces: (PAR) Payments made to an outside (subcontracted) agency collecting debtor account money for your agency where the check did not clear.
-
In the Select Payment Batch Type section, select an option to indicate the type of payments, adjustments, or reversals you are adding to the batch.
-
Complete the remaining information and then click OK. The Account tab appears.


