- Contents
WorkFlow Designer Help
Check Counter
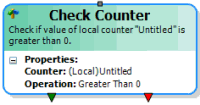
Use the Edit Check Counter Activity dialog box to specify the criteria for determining whether a counter is greater than or less than a specific value during a specified time period. You can use this activity to create loops within a workflow, or as a flag to note that something has happened already.
To modify a Check Counter activity
-
Create or open a workflow with a Check Counter activity. For more information, see Create a Workflow or Modify a Workflow.

-
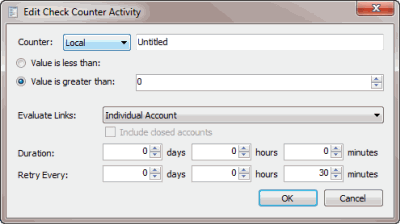
On the workflow tab, double-click the Check Counter activity. The Edit Check Counter Activity dialog box appears.

Counter: Type of counter to use for accounts flowing through this activity.
Local: Local counters exist for the account as it runs through the current instance of a workflow. If the WorkFlow Engine started the account in another workflow instance, or even the same workflow, the instances don't share counters and the WorkFlow Engine can modify and compare them separately. These counters are useful as looping constructs where the WorkFlow Engine sets a counter to a specific value and then increments or decrements the counter until it reaches a certain value.
Work Flow: Workflow counters exist for the account for all instances of execution in the current workflow. If the WorkFlow Engine started the account in another instance of the same workflow, the account shares this value with both instances. These counters are useful as flags within the workflow to indicate that an action occurred (for example), so the WorkFlow Engine doesn't repeat it.
Account: Account counters exist for the account for all instances across all workflows. Any workflow running on the account shares this value. These counters are also useful as flags that the WorkFlow Engine can affect in multiple workflows.
Note: You can create a counter for each counter type, specify a numeric value, and save the counter with a name you choose. There is no limit to the number of counters you can create. Counter names are not case-sensitive. However, two counters with the same name, but of a different type, refer to different counters. For example, a local counter named "mycounter" and a workflow counter named "mycounter" are separate counters, and track different values. Best practice recommends that you choose unique and descriptive counter names for ease of identification and management.
Name: Name to assign to the counter.
Value is less than: If selected, the WorkFlow Engine evaluates the counter value to determine whether it's less than the specified value.
Value is greater than: If selected, the WorkFlow Engine evaluates the counter value to determine whether it's greater than the specified value.
Value: Number to compare the counter value to.
Evaluate Links: Indicates whether to evaluate the condition against all linked accounts or just specific accounts.
Individual Account: Evaluates the account that is moving through the workflow only.
Link Driver: Evaluates the link driver account only, even if the account that is moving through the workflow is not the link driver account.
Custom Group: Evaluates all linked accounts within the specified custom customer group.
Customer: Evaluates all linked accounts belonging to the same customer as the account moving through the workflow.
Class of Business: Evaluates all linked accounts belonging to the same class of business as the account moving through the workflow.
Branch: Evaluates all linked accounts belonging to the same branch as the account moving through the workflow.
Department: Evaluates all linked accounts belonging to a desk within the same department as the account moving through the workflow.
Team: Evaluates all linked accounts belonging to a desk within the same team as the account moving through the workflow.
Desk: Evaluates all linked accounts belonging to the same desk as the account moving through the workflow.
All Accounts: Evaluates all linked accounts.
Include closed accounts: If selected, evaluates accounts that fit the link criteria, even if they are in a 998 or 999 queue level (closed status).
Duration: Amount of time for the account to wait in this activity if the account evaluates as false when it enters this activity. If the duration expires and the account doesn't evaluate as true, the account moves to the activity connected to the false (red) endpoint. If you didn't connect an activity to this endpoint, the account stops processing.
Days: Number of days to wait in this activity.
Hours: Number of hours to wait in this activity.
Minutes: Number of minutes to wait in this activity.
Retry Every: Frequency in which to reevaluate the account to determine whether it meets the condition. The WorkFlow Engine reevaluates the account as many times as the retry setting fits within the duration.
Days: Number of days to wait before re-evaluating.
Hours: Number of hours to wait before re-evaluating.
Minutes: Number of minutes to wait before re-evaluating.
-
In the Counter list box, click the type of counter to use.
-
In the Name box, type a name for the counter.
-
Do one of the following:
-
To evaluate whether the counter value is less than the specified value, click Value is less than.
-
To evaluate whether the counter value is greater than the specified value, click Value is greater than.
-
In the Value box, type the value to compare the counter value to.
-
In the Evaluate Links list box, click the evaluation method for linked accounts. If you selected Custom Group, do the following:
-
Click the Search icon next to the Evaluate Links list box. The Select Custom Customer Group dialog box appears.
-
Click the custom group and then click Open. WorkFlow Designer populates the Custom Group box in the Edit Check Counter Activity dialog box with the specified custom group.
-
To include closed accounts in the evaluation, select Include closed accounts.
-
In the Duration section, do the following:
-
To wait a specific number of days, in the days box, type or use the arrows to specify the number of days to wait.
-
To wait a specific number of hours, in the hours box, type or use the arrows to specify the number of hours to wait.
-
To wait a specific number of minutes, in the minutes box, type or use the arrows to specify the number of minutes to wait.
-
In the Retry Every section, do the following:
-
To retry for a specific number of days, in the days box, type or use the arrows to specify the number of days to wait.
-
To retry for a specific number of hours, in the hours box, type or use the arrows to specify the number of hours to wait.
-
To retry for a specific number of minutes, in the minutes box, type or use the arrows to specify the number of minutes to wait.
Note: You can use a combination of days, hours, and minutes for the duration and retry settings.
-
Click OK. WorkFlow Designer updates the Check Counter activity in the workflow.


