


- Contents
Interaction Dialer Manager Help
Email (HTML) behavior type
This behavior sends a formatted, HTML-based email message to one or more recipients. It runs on all Outbound Dialer servers participating in the campaign. The message includes a subject and body. Unlike the text-based email behavior, this one contains a separate editor you can use to create email templates containing formatted text and images.
This behavior is useful in many situations. For example, an agent could decide during the PreCall stage not to call a customer, but to send an email instead. The agent would be able to trigger that disposition and then move on to their next customer.
Note: Genesys recommends that you test your email templates before using them in production. This includes checking for formatting errors, macro errors, and other potential errors.
Note: Genesys recommends that you be careful to set up your emails in a way that doesn't overload your servers.
Note: You can use the DigitalHistory table to audit template activity. However, Genesys recommends that you use unique template names to ensure a clean audit trail.
- Name
-
Type a name for the new behavior in the Name field. This can be anything you like, so long as it is unique within the policy. Try to use a name that describes what this behavior does when its condition is true.
- Behavior Type
-
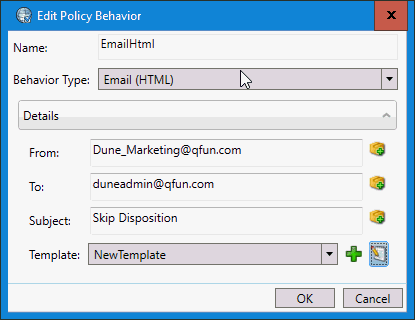
Select "Email (HTML)" to display the options for configuring a formatted email template.
Details
- From
-
The email address of the sender. Click the (
 )
icon to insert a macro.
)
icon to insert a macro. - To
-
The email address of the recipient. Use semicolons to separate multiple recipients. Click the (
) icon to
insert a macro. - Subject
-
The subject of the message. Click the (
)
icon to insert a macro. - Template
-
The email template to use for the body of the message. To create a new template, click the Plus (
 ) button.
This opens the template editor, which
you can use to write an email template that can include formatted
text and images.
) button.
This opens the template editor, which
you can use to write an email template that can include formatted
text and images.
Template Editor
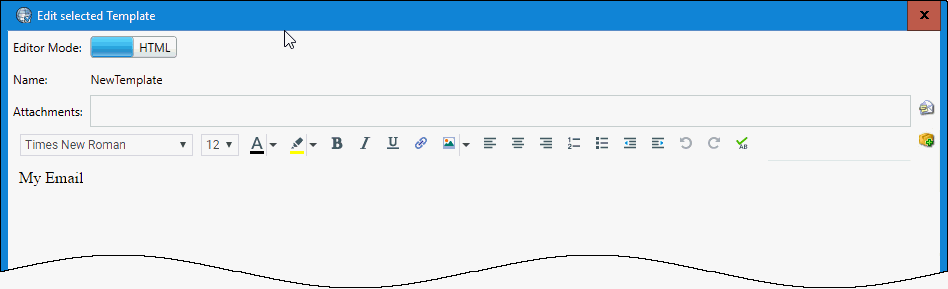
Use the template editor to create a formatted email template that:
- Accepts attachments, which you can delete by selecting the attachment
and backspacing. Your administrator can also set the “Dialer Send
Email Attachments” server parameter to False in order to block attachments
from being sent via a Policy Behavior email. Click the (
 ) button to browse for an
attachment.
) button to browse for an
attachment. - Supports formatted text and image, which you can work with by using the formatting toolbar, as shown below

|
1 |
Font |
Use the font controls to bold, underline or italicize selected text. You can also select text color, highlight color, font and size. |
|
2 |
Insert Link |
Use the hyperlink control to create a working hyperlink in your email reply. |
|
3 |
Upload Image |
Use the image control to insert a picture in your email reply. You can insert an image from your local drive or insert a URL pointing to the image's location. You can also drag and drop images. Note: You cannot move an image within the edit window. To place an image in a new location, you must re-insert it using either the image control or drag and drop. |
|
4 |
Paragraph |
Use the paragraph controls to set left, right, or centered text alignment. You can also create bulleted or numbered lists. |
|
5 |
Text Indent |
Use text indent controls to increase or decrease the space between the selected text and the left margin. |
|
6 |
Undo and Redo |
Use the Undo and Redo controls to reverse the last change you made to your reply or to reverse an Undo action. |
|
7 |
Check Spelling |
Use the Check Spelling control to check the spelling in your email. |
Click the () icon to insert
a macro.
You can also toggle the Editor Mode control to move between the source and HTML views:
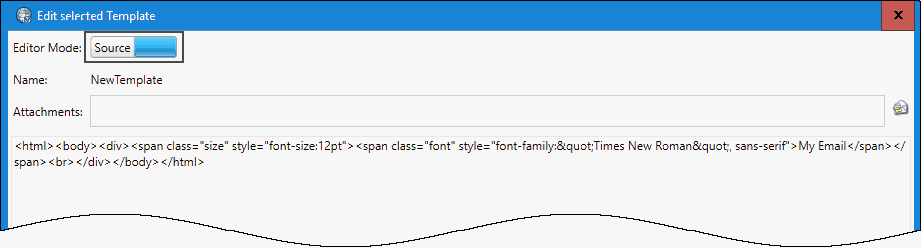
Note: When using the Source view, make sure to test your changes—especially if you modify the source and then later make changes in the HTML view. Some tags can be changed as part of the changes that occur in the HTML view.