- Contents
Interaction Attendant Help
Voicebot
The Voicebot allows integration with bots like Google Dialogflow via Genesys Cloud. After an Attendant flow routes to the bot, the bot takes over and captures the caller intent and fills the output slots.
For example, the bot matches the caller spoken responses with the intent schedule an appointment and a filled slot.
When the bot completes, the call routes back into the Attendant flow, the intent and slot values are captured into call attributes, and Attendant's existing capabilities then allow the flow to operate based on the filled intent and slot data.
Run Voicebot
This operation allows integration with bots like Google Dialogflow via Genesys Cloud. After an Attendant flow routes to the bot, the bot takes over and captures the caller intent and filled slots. For example, the bot matches the caller's spoken responses with the intent Schedule an Appointment and a filled slot of 10:00am for the time.
When the bot completes, the call routes back into the Attendant flow, then the intent and slot values are captured in the call attributes and Attendant's existing flow. Then the Voicebot allows the flow to operate based on the filled intent and slot data.
Add Run Voicebot to Attendant
To add Run Voicebot operation, follow these steps:
-
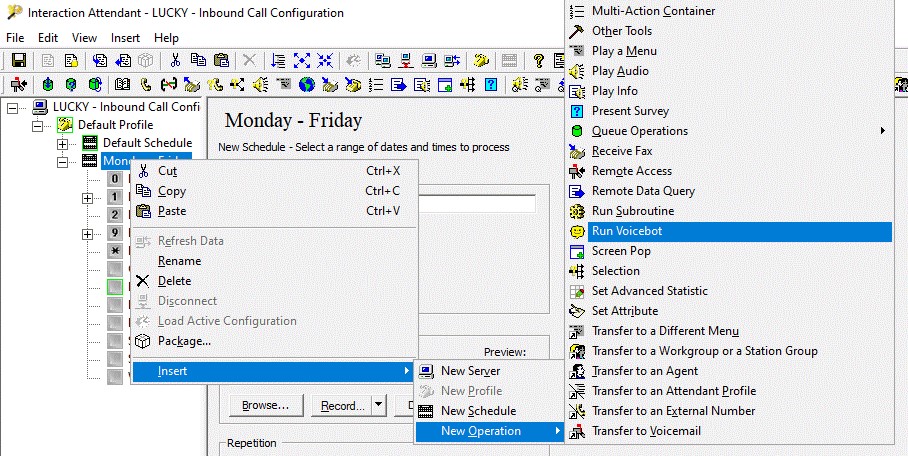
Select the node in the tree that you want to add the Run Voicebot operation.
-
Press the Menu toolbar button (
 ), or pull down the
Insert menu,
select New Operation,
and finally select Run Voicebot.

- To the selected menu node tree, Voicebot is added.

Voicebot
A new Interaction Attendant operation Voicebot is introduced, which allows integration with the bots like Google Dialogflow via Genesys Cloud.
After an Attendant flow routes to the bot, the bot takes over and captures the caller intent and fills the output slots. For example, the bot matches the caller spoken responses with the intent schedule an appointment and a filled slot of 10:00 am for the time.
When the bot completes the interaction, the call continues in the Interaction Attendant flow, the intent, and slot values are captured into call attributes, which Interaction Attendant’s existing capabilities can be used to control it is based on the filled intent and slot data.
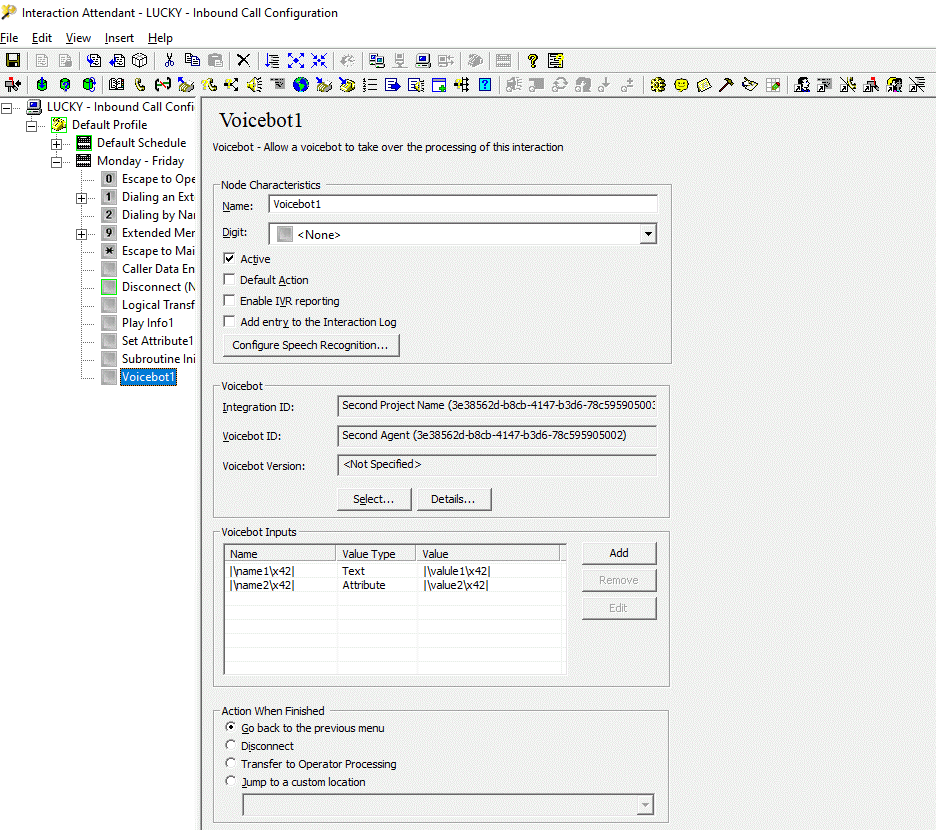
Node Characteristics frame
Options in this frame name the node, assign the digit used to select it, and establish whether it is active or not, used by default, logged, or tracked for reporting purposes.
Name field
The label you enter here becomes the name of the node in the tree structure.
Digit list box
Use this list to select the key that callers press to enter a caller data entry operation. When you assign a digit, the list displays only available digits that are not already in use at this level of the tree. If no digit is assigned, callers cannot invoke the operation directly. It is possible to create menu options that are invoked by a routing process, rather than by a user selection.
Active check box
By default, the forms are on, or active, which means that the Interaction Attendant processes them. If you uncheck a form's Active check box, the name of the node turns gray in the tree to indicate that the form is inactive. Interaction Attendant and its handlers will ignore the form and its children. Use this feature to save a configuration that you are testing. Inactive forms are invisible to callers. When a node is inactive, it appears gray in the tree view.
Default Action check box
At any given "level" in the tree structure, one node can be marked as the default action. The operation defined by the default node is performed if the caller does not press a key within the timeout period specified by that menu. The icon for default forms has a green border in the tree structure. Any node below a menu or schedule can be marked as the default action, by checking the form's default action check box.
Enable IVR Reporting
This option determines whether reporting data is collected or not when control passes through this node. Several IVR Reports summarize this information. IVR Reporting is disabled by default. Enable it to capture the date, time, and duration of time that the call remained in the node and its children. This option is hidden when the Attendant is connected to a server that does not have reporting installed.
Add entry to the Interaction Log
When this option is enabled, information about this node is appended to the call's Interaction Log when the call enters this node. This helps track the path that a call took through the Attendant. The Interaction Log is maintained for reporting purposes.
Configure Speech Recognition... button
Select this button to configure words or phrases that can be associated with menu options. Callers can verbally indicate the options that they want in the IVR instead of pressing a digit on the phone. You can enter multiple words and phrases for each menu item, just as callers may phrase the same request in different ways. For example, transfer funds or funds transfer.
Voicebot input values
When the bot completes the interaction, the call continues in the Interaction Attendant flow, the intent, and slot values are captured into call attributes, which Interaction Attendant’s existing capabilities can be used to control it is based on the filled intent and slot data.
Node Characteristics frameOptions in this frame name the node, assign the digit used to select it, and establish whether it is active or not, used by default, logged, or tracked for reporting purposes.
Name field
The label you enter here becomes the name of the node in the tree structure.
Digit list box
Use this list to select the key that callers press to enter a caller data entry operation. When you assign a digit, the list displays only available digits that are not already in use at this level of the tree. If no digit is assigned, callers cannot invoke the operation directly. It is possible to create menu options that are invoked by a routing process, rather than by a user selection.
Active check box
By default, the forms are on, or active, which means that the Interaction Attendant processes them. If you uncheck a form's Active check box, the name of the node turns gray in the tree to indicate that the form is inactive. Interaction Attendant and its handlers ignore the form and its children. Use this feature to save a configuration that you are testing. Inactive forms are invisible to callers.
Default Action check box
At any given "level" in the tree structure, one node can be selected as the default action. The operation defined by the default node is performed if the caller does not press a key within the timeout period specified by that menu. The icon for default forms has a green border in the tree structure. Any node below a menu or schedule can be selected as the default action, by checking the form's default action check box.
Enable IVR Reporting
This option determines whether reporting data is collected or not when control passes through this node. Several IVR Reports summarize this information. IVR Reporting is inactive by default. Enable it to capture the date, time, and duration of time that the call remained in the node and its children. This option is hidden when the Attendant is connected to a server that does not have reporting installed.
Add entry to the Interaction Log
When this option is enabled, information about this node is appended to the call's Interaction Log when the call enters this node.
Configure Speech Recognition... button
Select this button to configure words or phrases that can be associated with menu options. Callers can verbally indicate the options that they want in the IVR instead of pressing a digit on the phone. You can enter multiple words and phrases for each menu item, just as callers may phrase the same request in different ways. For example, transfer funds or funds transfer.
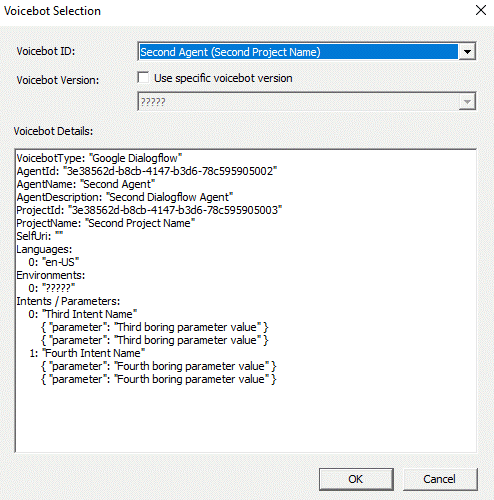
Voicebot selection
From Voicebot selection dialog page Agent can select the Project Name and voicebot version.
Voicebot input values
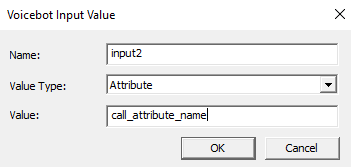
Voicebot Input Value Allows specification of a list of input name/value pairs which send to the Voicebot at runtime. The value can be either a literal Text string or the name of a call attribute.
For example, the value is typed as Attribute the specified call attribute is queried at runtime and passed to the bot. This provides a powerful mechanism for passing data such as the calling number to the bot.
Voicebot frame
Integration ID
Allows to view the project name.
Voicebot ID
Allows to view the agent details.
VoiceBot Version
Provides the Voicebot version details if any specific version is selected, if not shows Not Specified.

Voicebot Selection dialog box
Voicebot ID
Allows to select the agent details.
Voicebot Version check box
Allows to select the Use specific voicebot version check box and to select the required version from the list.

Voicebot Details
Allows to view the Voicebot information like Voicebot Type, Agent ID, Agent Name, Agent description, Project ID, Project Name, Self Uri, Languages, Environments, and Intents/ Parameters.
Voicebot inputs frame
Voicebot Inputs allows specification for a list of input name/value pairs which are sent to the Voicebot at runtime. The value can be either a literal Text string or the name of a call attribute.
For example, the value is typed as Attribute, then the specified call attribute is queried at runtime and passed to the bot. This provides a mechanism for passing the data such as the calling number to the bot.
Add
Allows to add Voicebot input values.

Name
Allows to type the Name of the input value.
Value Type
Allows to select the Value Type for the input value.
Value
Allows to type the value name in the box.
Remove
Allows to remove the Voicebot input values.
Edit
Allows to edit the Voicebot input values,
Voicebot selection
From the Voicebot selection, the Agent can select the Project Name and voicebot version.
Voicebot input valuesthe caller intent and fill the slots (For example, the bot matches the caller spoken responses with the intent schedule an appointment and a filled slot of 10:00 am for the time).
When the bot completes the interaction, the call routes back into the Interaction Attendant flow, the intent, and slot values are captured into call attributes, and the Interaction Attendant existing capabilities then the Voicebot allow the flow to operate based on the filled intent and slot data.
Full View of Voicebot
Voicebot selection dialog
The options in this Voicebot selection, gives the option to select the Voicebot ID.
Voicebot details
Voicebot details provide the information to implement the Attendant/Handlers.
Voicebot input values add/edit dialog
The value can be either a literal Text string or the name of a call attribute. If the value is typed as Attribute the specified call attribute will be queried at runtime and passed to the bot. This provides a powerful mechanism for passing data such as calling number to the bot.Voicebot Outputs
Before running the voicebot the Interaction Attendant runtime sets the value of all call attriubtes beginning with Eic_Voicebot to an empty string. This simplifies the use case where the call may be processed by multiple voicebot invocations.
After running the voicebot the Eic_Voicebot_Intent call attribute is set to the value of the intent indicated by the voicebot. Each returned slot value is set as the value of an attribute formed from the string Eic_Voicebot_Slot_ followed by the slot name. Each returned output value is set as the value of an attribute formed from the string Eic_Voicebot_Output_ followed by the output name.
Action When Finished frame

Go back to the previous menu radio button
The Go back to the previous menu option returns control to the parent menu from which the message was played.
The Go back to the previous menu option
Sets up a simple loop that "reruns" the parent menu from the top.
Disconnect radio button
This option disconnects the call after replaying the wave file the number of times that is specified by the repeat value.
Transfer to Operator Processing
Transfers the call for evaluation by operator profiles defined for this server.
Jump to radio button
This option allows you to jump to any profile, schedule, menu, or operation that is defined for the current server. Flow of control will pass to this destination once the wave file has been played the number of time specified by the repeat value.


