


- Contents
Interaction Desktop Help
Schedule Preferences Details Dialog Box
Requirements: Only agents with the appropriate licenses can see their work schedules in the CIC client. For more information, see Interaction Optimizer. You also need the Allow Agent Preferences Security right to set your schedule preferences.
You use the Schedule Preferences Details dialog box to define your schedule preferences. You use pre-defined work preference types to describe your preferred schedule and indicate these work preferences in fixed intervals. An interval can be as short as fifteen minutes or as long as you require.
Accessing the Schedule Preferences Details Dialog Box
To access the Schedule Preferences Details dialog box, in the Schedule Preferences dialog box, do one of the following:
-
In the List View or Calendar View, click the Add button.
-
In the List View or Calendar View, right-click and select Add preference entry from the shortcut menu.
Tip: Select a date or range of dates in the Calendar view before clicking the Add button or selecting Add preference entry. The selected date or date range becomes the Start date and End date in the Schedule Preferences Details dialog box.
-
In the List View, select the appropriate preference and click the Edit button or right-click and select Edit preference entry.
-
In the Calendar View, select anywhere in the range of dates for the preference and click the Edit button or right-click and select Edit preference entry.
Result: The Schedule Preferences Details dialog box appears.
Understanding the Schedule Preferences Details Dialog Box
The Schedule Preferences details dialog box has a graphical interface in which you indicate your preferred activities (work preferences) in selected intervals through your work shift.
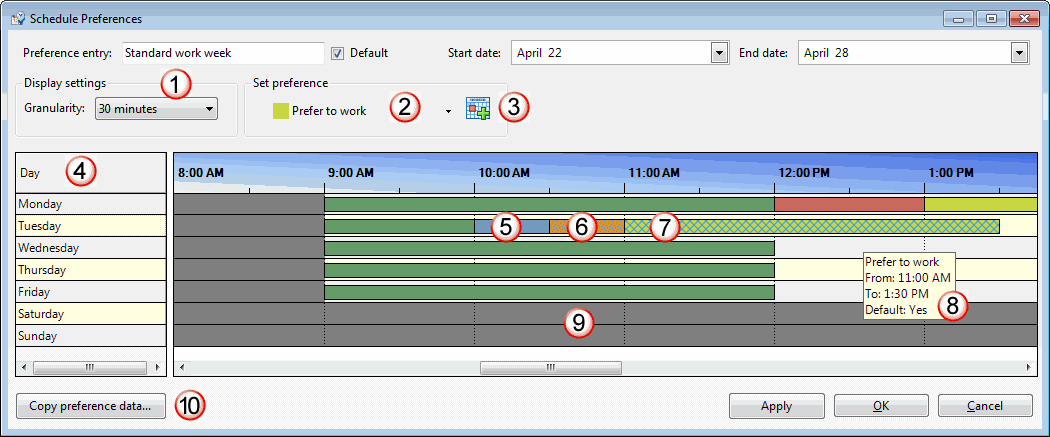
Some important features in this dialog box include:
|
1 |
The Granularity setting controls the size of the time intervals used in this dialog box. This in turn controls the size of the smallest interval you can paint. You can adjust this setting at any time, as needed. |
|
2 |
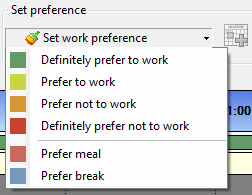
You select a work preference from the Set work preference drop-down
list before "painting" it onto the time interval grid.
Note: You can change the colors used for these work preferences. For more information, see Optimizer Preference Colors. |
|
3 |
Select a work preference from the Set work preference drop-down list and click the Drag and drop selected preference icon and then drag and drop the preference to the appropriate day and interval in the schedule and then release the mouse button. Note: The Default duration is 30 minutes. You can adjust the duration by moving the right or left border of the work preference. |
|
4 |
You can select the name of a day or day(s) from the Day control. This selects all the defined work preferences for the selected day(s). |
|
5 |
A solid color indicates a work preference that you have defined and saved. |
|
6 |
A dotted pattern indicates a work preference that you have added or changed, but not yet saved. |
|
7 |
A crosshatched pattern indicates the currently selected work preference(s). You can:
|
|
8 |
Point to any defined work interval or click on any interval to display its work preference details. |
|
9 |
Gray areas in the schedule display indicate times that are outside your defined work shift. Note: Your CIC administrator configures shift constraints. These constraints include earliest shift start time and latest shift stop time. If a latest shift stop time is not defined, a gray area showing the shift end boundary does not appear.
|
|
10 |
Click the Copy preference data button to import preference details from an existing set of default preferences or preference overrides. |
Related Topics