- Contents
PureConnect Cloud Resources
Create and Modify Report Schedules
You can create and modify report schedules for Interaction Reporter and Interaction Report Assistant. For more information about:
-
Scheduled reports, see the CIC Scheduled Reports User's Guide.
-
Interaction Reporter, see the Interaction Reporter Help.
-
Interaction Report Assistant, see the Interaction Report Assistant Help.
Create a report schedule
To create a report schedule
-
If you are creating a report schedule in Interaction Reporter and you haven't exported a filter for the report, do the following:
-
Open IC Business Manager.
-
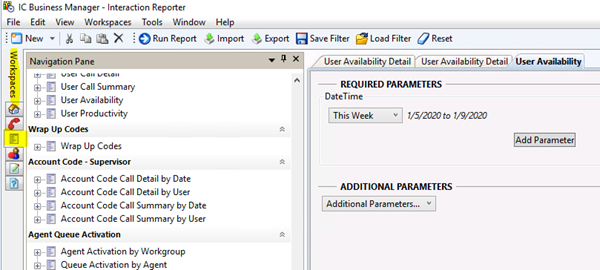
In the menu bar, click Workspaces and then click Interaction Reporter.
-
In the Navigation Pane, double-click the requested report. The report's parameters appear in the Workspace.
-
In the Workspace, specify the report parameters and then, in the toolbar, click Save Filter.
-
In the Filter Name box, type a name for the report filter and then click OK. The filter appears under the report name in the Navigation Pane.
-
In the toolbar, click Export.
-
In the File Name box, specify a location and name for the filter export file and then click Save.
-
If you are creating a report schedule in Interaction Report Assistant and you haven't exported a filter for the report, do the following:
-
Open IC Business Manager.
-
In the toolbar, click New and then click View.
-
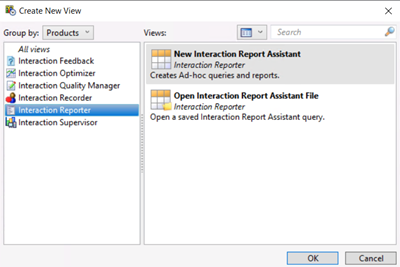
In the Create New View dialog box, click Interaction Reporter and then click New Interaction Report Assistant.
-
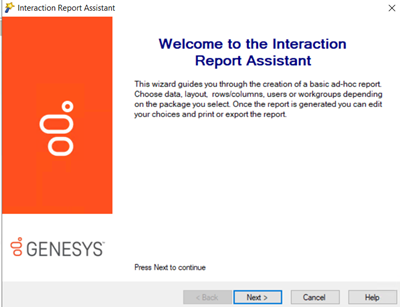
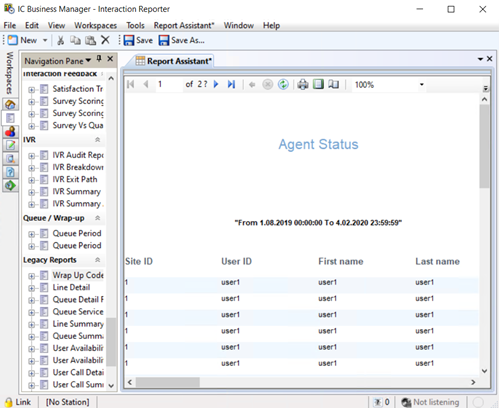
In the Interaction Report Assistant wizard, specify the report parameters (such as report type, fields, users, work groups, format, grouping) and then click Finish. The report appears in the Report Viewer in the Workspace.
-
In the menu bar, click Report Assistant.
-
In the toolbar, click Save.
-
In the File Name box, specify a location and name for the report and then click Save.
-
Do the following:
-
Open the Scheduled Reports client.
-
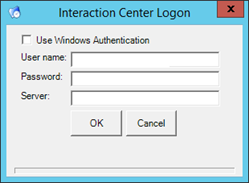
Specify the logon credentials and name of the primary CIC server, and then click OK. The Scheduled Reports window appears.
-
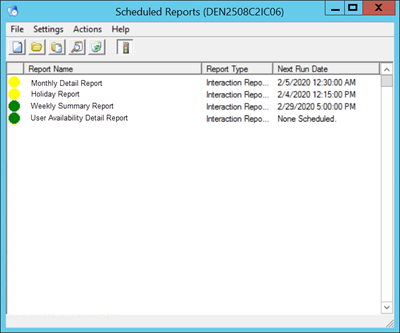
In the menu bar, click File and then click New Scheduled Report. The Scheduled Reports - Report information page appears.
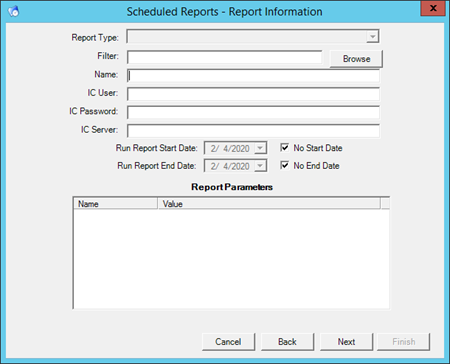
Report Type: Type of report (for example, Interaction Reporter, Interaction Report Assistant).
Filter: Select the filter that you created for the report.
Name: Specify a name for the report (for example, Weekly Queue Detail Report).
IC User: CIC user ID.
IC Password: CIC user password.
IC Server: Name of the primary CIC server.
Run Report Start Date: Reporting period start date. If you select the No Start Date check box, this list box is unavailable.
No Start Date: If selected, the reporting period isn't limited to a specific start date. If cleared, select a start date from the Run Report Start Date list box.
Run Report End Date: Reporting period end date. If you select the No End Date check box, this list box is unavailable.
No End Date: If selected, the reporting period isn't limited to a specific end date. If cleared, select an end date from the Run Report End Date list box.
Report Parameters: Criteria for filtering the report.
-
Complete the information and then click Next. The Scheduled Reports - Report Destination page appears.
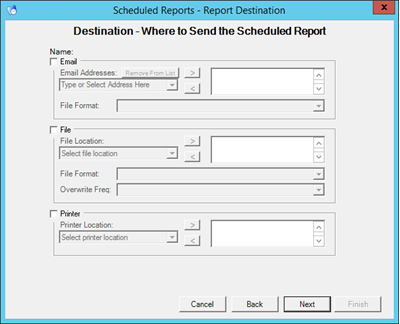
Email: If selected, the system sends the report to the email addresses that you specify.
Email Addresses: Type or click an email address to which to send the report and then click > to add it to the email addresses list. You can specify multiple email addresses to which to send the report.
File Format: File format in which to create the report.
File
File: If selected, the system saves the report to a file.
File Location: Click a location to which to save the file and then click > to add it to the location list. You can specify multiple file locations to which to save the report.
Note: The system populates the File Location list box with the locations defined in the PureConnect Scheduled Reports Configurator Tool. For more information about the tool, see the CIC Scheduled Reports User's Guide.
File Format: File format in which to create the report.
Overwrite Freq: How frequently to regenerate the report and overwrite the file.
Printer: If selected, the system sends the report to a printer.
Printer Location: Click a location to which to print the report and then click > to add it to the location list. You can specify multiple printer locations to which to send the report.
Note: The system populates the Printer list box with the printers defined in the PureConnect Scheduled Reports Configurator Tool. For more information about the tool, see the CIC Scheduled Reports User's Guide.
-
Complete the information and then click Next. The Scheduled Reports - Report Frequency page appears.
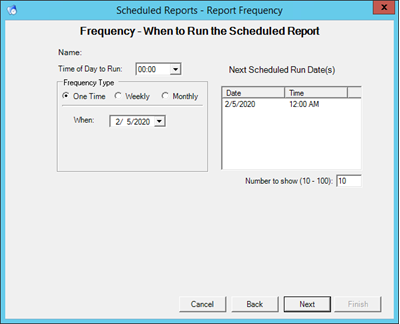
Name: Name of the report.
Time of Day to Run: Specify the time of day, in hours and minutes, to run the report.
One Time: If selected, runs the report one time on the date that you specify.
When: Specify a date in the future to run the report one time only.
Weekly: If selected, runs the report weekly on the days of the week that you specify.
Pick Day(s) of Week: Select one or more days of the week to run the report.
Monthly: If selected, runs the report monthly on the days of the month that you specify, or on the first or last date of the month (relative date).
Day(s) List: If selected, runs the report monthly on one or more specific days of the month.
Day(s) of the month: Specific days of the month to run the report. Separate the days with a comma. For example, to run the report on the first, fourth, and seventh days of the month, type "1,4,7".
Relative: If selected, runs the report on the first or last day of the month.
The [day] of the month: Day of the month (first or last) to run the report.
-
Complete the information and then click Next. The Scheduled Reports - Report Period page appears.
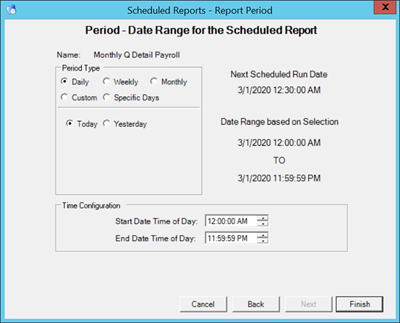
Name: Name of the report.
Daily: The report includes all activity that occurred on a single day.
Today: If selected, the report includes all activity for the current day.
Yesterday: If selected, the report includes all activity for the previous day.
Weekly: The report includes all activity that occurred in a single week.
Start DOW: Day of the week that starts the reporting period.
End DOW: Day of the week that ends the reporting period.
This Week: If selected, the report includes all activity for the current week for the specified reporting period.
Last Week: If selected, the report includes all activity for the previous week for the specified reporting period.
Monthly: The report includes all activity that occurred in a single month.
This Month: If selected, the report includes all activity for the current month.
Last Month: If selected, the report includes all activity for the previous month.
One Month Back From Run Date: If selected, the report includes all activity for the previous 30 days from the report run day.
Custom: The report includes all activity for a custom reporting period.
Last: If selected, the report includes all activity for the number of days before the current day that you specify in the Days box.
Specific Days of Month: If selected, the report includes all activity for the reporting period that you specify.
Start: Day of the week that starts the reporting period.
End: Day of the week that ends the reporting period.
This Month: If selected, the report includes all activity for the current month for the specified reporting period.
Last Month: If selected, the report includes all activity for the previous month for the specified reporting period.
Specific Days: The report includes all activity for a specific date range.
Start Date: Date that starts the reporting period.
End Date: Date that ends the reporting period.
Start Date Time of Day: Time of day, in hours minutes, and seconds to start the report.
End Date Time of Day: Time of day, in hours minutes, and seconds to end the report.
-
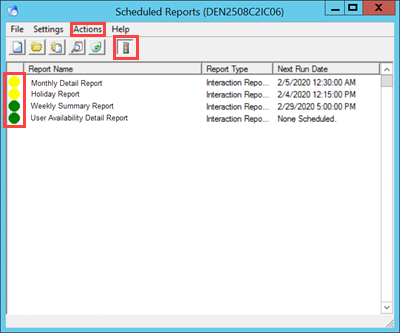
Click Finish. The report appears as inactive (indicated by a yellow light) in the Scheduled Reports window.
-
To activate the report, click the report and then click the Activate icon. The report is now active (indicated by a green light).
Modify a report schedule
To modify a report schedule
-
Open IC Business Manager.
-
For an Interaction Reporter report, do the following to update and export the filter:
-
In the menu bar, click Workspaces and then click Interaction Reporter.
-
In the Navigation Pane, double-click the report schedule to modify. The report's parameters appear in the Workspace.

-
In the Workspace, modify the report parameters and then, in the toolbar, click Save Filter.
-
In the Filter Name box, type a name for the report filter and then click OK. The filter appears under the report name in the Navigation Pane.
-
In the toolbar, click Export.
-
In the File Name box, specify a location and name for the filter export file and then click Save.
-
For an Interaction Report Assistant report, do the following in IC Business Manager to update and export the filter:
-
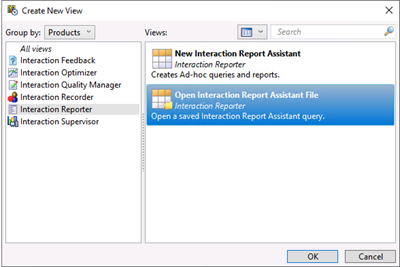
In the toolbar, click New and then click View.
-
In the Create New View dialog box, click Interaction Reporter and then click Open Interaction Report Assistant File.
-
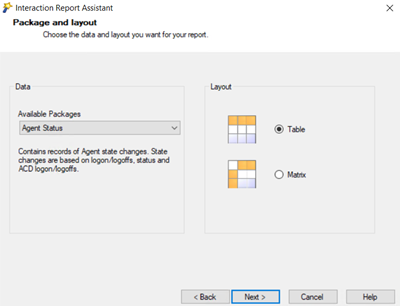
Click the report to modify and then click OK. The Interaction Report Assistant wizard appears.
-
Modify the report parameters and then click Finish. The report appears in the Report Viewer in the Workspace.

-
In the menu bar, click Report Assistant.
-
In the toolbar, click Save.
-
In the File Name box, specify a location and name for the report and then click Save.
-
Open the Scheduled Reports client and then, in the Scheduled Reports window, do the following to select the revised filter:
-
In the data grid, double-click the report to modify.
-
Click Browse..., click the exported filter, and then click Open.
-
Modify report settings on the pages in the Scheduled Reports window as necessary and then click Finish.
-
In the Scheduled Reports window, do the following to deactivate and reactivate the report to implement the change:
-
In the data grid, click the report and then, in the toolbar, click the Deactivate icon. The report appears as inactive (indicated by a yellow light).
-
With the report still selected, click the Activate icon. The report appears as active (indicated by a green light).
-
In the Scheduled Reports window, do the following to test the report:
-
In the data grid, click the report to test.
-
In the menu bar, click Actions and then click Test / Execute Scheduled Report.
-
In the Test / Execute Scheduled Report dialog box, click Run.
-
Verify that you received the report by email and that the new content (for example, users and work groups) is visible in the report.


