


- Contents
Director Installation and Configuration Guide
Define Queue Objects
Use the Queue Configuration dialog box in Interaction Administrator to define the remote queues to which Interaction Director can route. To define more than one queue object at once, see Create Multiple Queue Objects.
To define queue objects
-
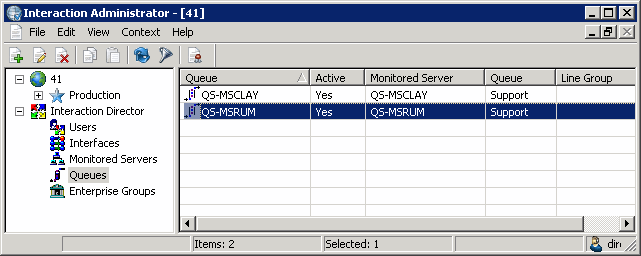
On the Director server, start Interaction Administrator and then click the Queues container.
Status icon: Status of the queue. Director polls the links every two minutes and updates this status accordingly.
|
Icon |
Description |
|
|
The link is operational. Director can route calls to this monitored server. |
|
|
The link is not operational. Director cannot route calls to this monitored server. |
|
|
Director has not determined the status of the link. |


Queue: Name of the Queue object as defined in Director.
Active: Indicates whether the queue is ready to receive route requests. Only active queues can receive requests.
Monitored Server: CIC server to which Director can route calls.
Queue: Name of the remote queue as defined on the Monitored Server.
Line Group: Name of the line group associated to the remote queue.
-
Right-click in the list view and then click New. The Entry Name dialog box appears.

-
In the box, type a unique and descriptive name for the queue and then click OK. The New Queue Configuration dialog box appears.
Note:
Genesys recommends that you establish a naming convention for queues that combines the location with the name of the site queue so that it's easier to group queues to form Enterprise Groups. For example, queues located in San Francisco begin with SF_ and queues located in Los Angeles begin with LA_.
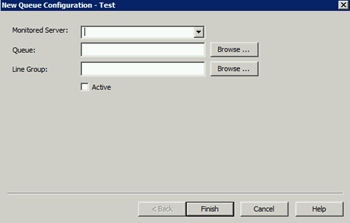
Monitored Server: Name of the Monitored Server. If the server you want isn't in the list, create one using the Monitored Servers Container.
Queue: Site queue on the remote CIC server that Director can use for routing and monitoring purposes. If you select the Active check box, click Browse... and then select a queue from the Browse Remote Server dialog box. If you clear the Active check box, you can save your changes without specifying a queue.
Line Group: Name of the line group to associate to the queue. Click Browse... and then select a queue from the Browse Remote Server dialog box.
Active: If selected, the Queue is ready to receive route requests. Ensure that you specify a site queue. If cleared, you can save your changes without specifying a queue.
-
Complete the information and then click Finish.
-
Define other queues as necessary.