


- Contents
CIC Integration to Microsoft Lync Administrator's Guide
Configuring Lync Server for RCC
The following instructions that should work for most implementations of RCC with Customer Interaction Center. For detailed instructions on configuring Lync Server for RCC, refer to Microsoft's documentation at http://technet.microsoft.com/en-us/library/gg558664.aspx.
This procedure uses the Lync Server Management Shell for most of the RCC configuration for Lync Server. A small part of the configuration is managed through the Lync Server Control Panel.
Narrow the trusted application pool's IP address to the IC Server (or SIP proxy), and then publish the topology.
Build a trusted application pool
A trusted application pool is required to trust the CIC server.
This example is pointing to a single CIC server, so it is using the CIC specific information. In a switchover configuration, this pool parameter would point to a network or hardware load balancing, which would determine which CIC server to use.
Create the pool type by doing one of the following:
-
For a non-switchover environment, enter the following in the Lync Server Management Shell:
New-CsTrustedApplicationPool <IC Server FQDN> -Registrar <Lync Pool FQDN> -Site 1 -TreatAsAuthenticated $true -ThrottleAsServer $true -RequiresReplication $false
-
For a switchover environment, use the command above, but replace <IC Server FQDN> with the SIP proxy FQDN or IP address.
Configure the trusted application
Next, configure a trusted application that lives on the pool you built in the previous section so that Lync will trust requests from this server and port combination.
Configure the trusted application by entering this command in the Lync Server Management Shell:
New-CsTrustedApplication -ApplicationID CIC -TrustedApplicationPoolFQDN <IC Server FQDN> -Port 11001 EnableTcp
Make sure that the port is set to match the RCC SIP line
port configured in CIC. If you set it to a different port, the CIC server
will never hear traffic from Lync. Also, to use TCP include EnableTcp
in the command because without EnableTCP Lync sets trusted
applications to use TLS. If you are using TLS or MTLS, leave the -EnableTcp
off of the above line.
Specify the IP address of the CIC server
At this point, you have configured Lync to trust traffic from the IC server on port 11001. The next step is to tell Lync how to send traffic to the CIC server. With OCS, this configuration is accomplished with the Static Routes tab, which was accessible in the user interface, but with Lync, this is managed either through the Lync Server Management Shell or using the Topology Builder. Both methods are described below.
Specify the IP address of the CIC server using the Lync Server Management Shell
-
Enter this command in the Lync Server Management Shell:
Enable-CsTopology
-
Enter this command to create a static route that matches the CIC server's domain (in this example, rcc.dev2000.com), with a next hop of the CIC server and listening port. This step adds the route in a PowerShell variable:
-
For TCP
$staticRoute = New-CsStaticRoute TCPRoute Destination < CIC Server IP > -Port 11001 MatchUri rcc.dev2000.com
-
For TLS/MTLS
$staticRoute = New-CsStaticRoute -TLSRoute -Destination < CIC Server FQDN > -Port 11001 -MatchUri rcc.dev2000.com -UseDefaultCertificate $true
Don't be concerned about the URI value and attempting to map it in your domain. You can essentially use any value. This value is used later when configuring a user's Line Server URI in the User configuration. If MTLS is configured you will need to set up the Certificate Authority.
-
-
Add the route from the previous step to the routing configuration using this command:
Set-CsStaticRoutingConfiguration Route @{Add=$staticRoute}
-
Enter the following command in the PowerShell to download the current topology so you can narrow the Trusted Application Pool's IP address list to only the IC server (or SIP proxy).
Get-CsTopology AsXml | Out-File c:\rcc.xml
-
Open the rcc.xml file and manually edit the section
Cluster Fqdn="<IC Server FQDN>"from0.0.0.0to the IP address of the IC server, and then edit and save the file. -
Enter the following command to publish the change and complete the setup:
Publish-CsTopology FileName c:\rcc.xml
Everything should now be configured at the Lync Server level to run RCC with the CIC client.
Specify the address of the IC server using the Topology Builder
-
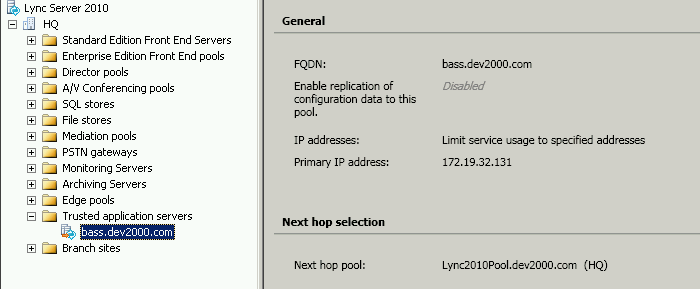
Open the Topology Builder and expand the Trusted Application Servers container.
You should see the trusted application pool that you created in the Lync Server Management Shell.
-
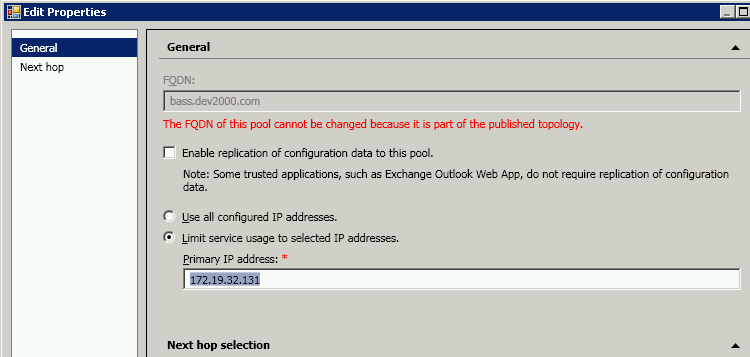
Right-click the pool to display a shortcut menu, and then select Edit Properties.
-
On the General page, select the Limit service usage to selected IP addresses option button, and then enter the IP address of the IC server (or SIP proxy).
-
Click OK, and then publish the topology for the settings to take effect.
At this point, everything should be configured at the Lync Server level to run RCC with CIC. The next step is to configure a user in Lync to use RCC.