


- Contents
Short Message Service Technical Reference
IIS Configuration
Reverse Proxy- Proxy Type
After installing the roles and extensions, configure the reverse proxy.
-
To open the IIS Manager, in the Run dialog box, run the command inetmgr.
-
Select the server name (on the left-pane) and open the Application Request Routing Cache node.
-
Select the Server Proxy settings... link for the ARR.
-
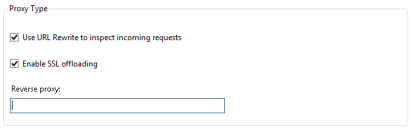
On the proxy settings, select the Use URL Rewrite to inspect incoming requests checkbox.
-
Additionally, select the Enable SSL offloading checkbox.
-
Finally, in the Reverse proxy text box, add the CIC server's IP address.
-
Apply the changes.
Reverse Proxy- URL Rewrite
After configuring the reverse proxy and ARR, configure the URL Rewrite to manipulate the incoming requests.
-
Navigate back to the IIS Manager home screen.
-
Open the URL Rewrite extension node.
-
By default there should be at least one inbound route because we added an IP address when we configured the proxy, open that existing route (ARR_server_proxy).
-
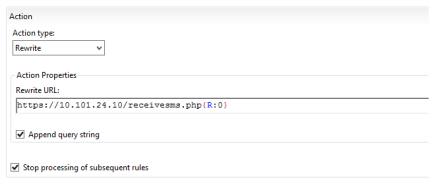
In the Action section, change Rewrite URL to the following:
https://<IP ADDRESS OF CIC server>/receivesms.php{R:0}Note:
In the example in this section, the URL is unique to EzTexting. If you use another broker, change
/receivesms.phpto the broker's incoming patch as defined in Interaction Administrator. If the CIC server is receiving on a port different than port 80 or 443, you must define the port here as well. For example,https://IPAddress:8191/receiveTexts.php{R:0}. -
Apply the changes.
Reverse Proxy - CIC Server's certificate
If you are using HTTPS, you need to trust the CIC Server's certificate on the Reverse Proxy. The SMS Server uses the Server certificate to secure the connection. The Server certificate is signed by the CIC Certificate Authority certificate, and the CIC Certificate Authority certificate is signed by the Server Group certificate. The Server Group certificate is self-signed. Both the CIC Certificate Authority certificate and the Server Group certificate need to be in the certificate store on the reverse proxy. The CIC Certificate Authority could go in either the Trusted Root Certificate Authorities store, or more appropriately the Intermediate Certificate Authorities store. The Server Group certificate should go in the Trusted Root Certificate Authorities store.
The following steps explain how to do that:
Note:
It is not a requirement that you use HTTPS between the web server and the CIC server.
-
Copy the CIC Server's ServerGroup certificate to the Reverse Proxy.
-
Open mmc.exe and add the "Certificates" snap-in.
Note:
Ensure you add this for the computer account.
-
Expand the Trusted Root Certification Authorities and select the Certificates container.
-
Right-click in that container and select All Tasks | Import.
-
Follow the on-screen instruction and import the ServerGroup certificate.
Result: The Reverse Proxy can now connect to the CIC server and it can forward requests from the broker to the CIC server.
Note:
Configuring the URL Rewrite address to use HTTPS does not mean only incoming HTTPS messages will be accepted. Technically speaking, SSL is first stripped off incoming HTTPS packets from an SMS Broker. URL Rewrite then negotiates SSL with the CIC server and encapsulates the HTTP (previously HTTPS) message. In other words, regular HTTP messages from the SMS Broker can be sent to the reverse proxy while HTTPS is configured.
Reverse Proxy - Default Web Site HTTPS Binding
In addition to configuring HTTPS between the reverse proxy and CIC server, inbound HTTPS must also be accepted. The following steps outline how to create a self-signed certificate and bind port 443 to the default website (created automatically during previous steps).
-
To open the IIS Manager, in the Run dialog box, run the command inetmgr.
-
Select the server name (left-most pane) and double-click Server Certificates.
-
In the right-hand pane, select Create Self-Signed Certificate.
-
Enter a name and select OK.
-
Expand the Sites folder (left-most pane) and select the site titled Default Web Site.
-
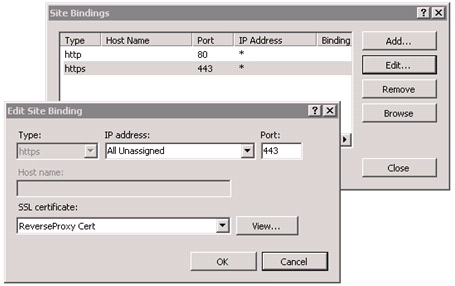
In the right-most pane, click Bindings.
-
To add a new binding, set the following values:
Type
https
IP Address
All Unassigned
Port
443
SSL Certificate
<Cert Name from step 4>
Result: The reverse proxy will now accept both HTTP and HTTPS traffic from SMS Brokers. You can verify this by navigating to
https://<Public_IP_of_Reverse_Proxy>.Note:
For inbound SMS to work properly, the SMS Broker must import the self-signed SSL certificate. If the broker won't do this, you must purchase and configure a signed certificate from a certificate authority (CA) to replace the self-signed certificate.