


- Contents
VoiceXML Technical Reference
VoiceXML Interpreter Server Web Configuration Interface
You can use the VoiceXML Interpreter Server Web Configuration interface to check the server's status as well as to view and change the server's current configuration settings.
Accessing the Web Configuration interface
To access the VoiceXML Interpreter Server Web Configuration interface:
-
Ensure that the VoiceXML Interpreter Server is running.
-
Open your browser and access http://{servername}:Port where {servername} is the name of the system running the VoiceXML Interpreter Server and Port is the port number specified during installation as the Web Configuration Server Port. (The default port number is 8090.)
-
In the network authentication dialog box, type the User Name and Password that you specified during the VoiceXML Interpreter Server installation. The Status page for the appropriate type of VoiceXML Interpreter server appears.
Note:
If you forget the user name or password of the VoiceXML Interpreter Server Web Configuration interface, do the following on the VoiceXML Interpreter Server:
-
Note the value in the registry key:
HKEY_LOCAL_MACHINE\SOFTWARE\Wow6432Node\Interactive
		 Intelligence\VoiceXML\WebConfigLoginName
. -
Clear the value in the registry key:
HKEY_LOCAL_MACHINE\SOFTWARE\Wow6432Node\Interactive Intelligence\VoiceXML\WebConfigLoginPassword.Don't delete the registry entry; only clear its value.
-
Log on to the interface with the user name from "webConfigLoginName" and no password.
-
Reset the password to restore the security of the web interface.
About
On the About tab of the Status page, you'll find the name of the VoiceXML Interpreter Server, the file version, and the IP address of the system you are using to access the Web Configuration interface.

Server Status
The Server Status tab of the Status page lists all the VoiceXML sessions that are running currently.
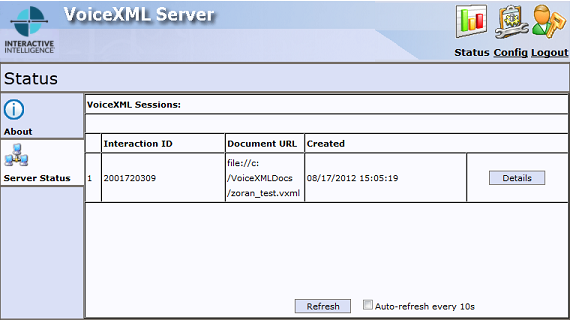
At any time, you can manually update the information on this screen by clicking Refresh. If you prefer, you can select the Auto-refresh every 10s check box and the information on this page will reload every 10 seconds.
Checking Active Document Sessions
You can check the active VoiceXML document sessions by clicking the Details button to display more detailed information for a specific interaction.
At any time, you can manually update the information on this screen by clicking Refresh. If you prefer, you can select the Auto-refresh every 10s check box and the information on this page will reload every 10 seconds.
The Sessions Details page displays information in the following fields:
|
Field |
Description |
|
Session ID |
The ID of the currently running document session. |
|
Interaction ID |
The ID of the interaction between the CIC server and the VoiceXML Interpreter server. |
|
Status |
The status of the connection. |
|
Detailed Status |
Details of exactly what is happening in the connection. |
|
Current Document |
The path to and name of the currently active document. |
|
Created |
The date and time that the document became active. |
Configuring the VoiceXML Interpreter Server
You'll use the Configuration page to configure the VoiceXML Interpreter Server. To display the Configuration page, click Config. When you do, you'll see the Configuration page, which contains three tabs: Servers, Parameters, and Administration.
Servers
On the Servers tab you'll see the CIC server to which the VoiceXML Interpreter Server is connected and can determine whether the VoiceXML Interpreter Server is accepting VoiceXML sessions from that CIC server.
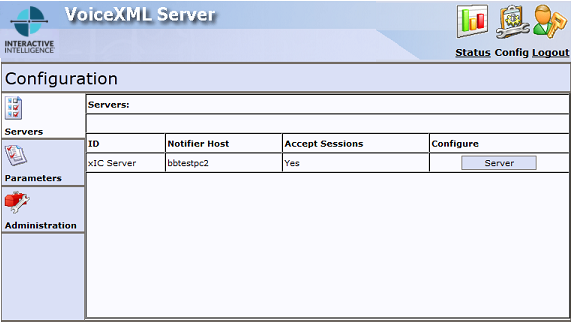
Clicking the Server button will allow you to connect a VoiceXML Interpreter Server to an CIC server as well as bring a VoiceXML Interpreter Server online or take it offline by changing the Accept Sessions setting.
Connecting a VoiceXML Interpreter Server to a CIC server
To connect a VoiceXML Interpreter Server to an CIC server, click the Server button. When you do, the Servers tab displays the Configuration of Server page.
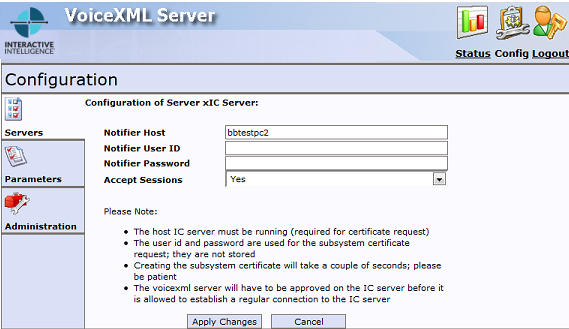
The Configuration of Server page contains the following fields:
|
Field |
Description |
|
Notifier Host |
Enter the name of a CIC server. |
|
Notifier User ID |
Enter the user name of the Customer Interaction Center user account that the VoiceXML Interpreter Server will use to log on to the CIC server. |
|
Notifier Password |
Enter the password for the user name specified above. |
|
Accept Sessions |
This field is set to Yes by default. The Yes setting configures the VoiceXML Interpreter Server to accept document sessions. |
When you finish configuring the server, click Apply Changes.
Note: A VoiceXML Interpreter Server can only be associated with one CIC server at a time.
Taking a VoiceXML Interpreter Server Offline
To take a VoiceXML Interpreter Server offline so that it no longer accepts new document sessions, select No from the Accept Sessions dropdown and click Apply Changes.
When you do, the VoiceXML Interpreter Server will prompt you to confirm that you want to change the status of the Accept Sessions to No. Click OK to continue. At this point, the VoiceXML Interpreter Server will finish processing all currently running document sessions, but will not accept new document sessions.
Bringing a VoiceXML Interpreter Server Online
To bring a VoiceXML Interpreter Server back online, so that it can accept new document sessions, select Yes from the Accept Sessions dropdown and click Apply Changes.
Parameters
To configure the VoiceXML Interpreter Server Parameters, select the Parameters tab. Once you make changes to the parameters, click Apply Changes.
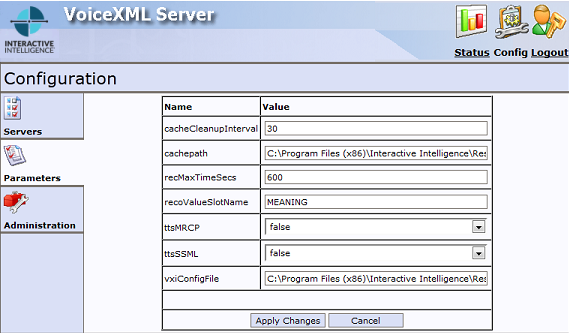
The Parameters tab contains the following fields:
|
Parameter |
Description |
|
cacheCleanupInterval |
The number of seconds the Interpreter Server waits before deleting a locally cached VXML resource.The minimum that can be specified is 15 seconds and the maximum is 120 seconds. The default value (30 seconds) can remain unchanged. |
|
cachepath |
The directory used to store cached VXML resources. The default value can remain unchanged. |
|
recMaxTimeSecs |
The maximum time of a recording in seconds. This default value can remain unchanged. |
|
recoValueSlotName |
The element name to use for the value slot in returned NLSML recognition results. If none is specified, the default name is “value.” |
|
ttsMRCP |
Setting this parameter to true tells the VoiceXML Interpreter that the TTS engine supports the MRCP protocol. If the TTS engine does not support MRCP, set this parameter to false. The default setting is false. |
|
ttsSSML |
Setting this parameter to true tells the VoiceXML Interpreter that the TTS engine supports SSML text handling. If the TTS engine does not support SSML, set this parameter to false. The default setting is false. |
|
vxiConfigFile |
Path to the VoiceXML library configuration file. The default value can remain unchanged. |
If you add any of the available optional parameters to the configuration file and restart the VoiceXML Interpreter Server, those optional parameters will be accessible and can be changed from the VoiceXML Interpreter Server Web Configuration Interface. For more information, see "Optional parameters" in VoiceXML Interpreter Server Configuration.
Note: These are the same parameters that exist in the configuration file. For more information, see "Configuration file" in VoiceXML Interpreter Server Configuration.
Administration
You can use the controls on the Administration tab to change your login credentials and control external access.
To change your login credentials, you must first enter your old user name and password. Then, enter a new username and new password twice. To complete the operation, click Apply.
To change how you access the Web Configuration Interface, you'll use the control in the HTTP/HTTPS Server panel.
-
If you want to be able to access Web Configuration Interface from a web browser running on any workstation on your network, make sure that the setting status shows
External access is currently enabled.
-
If you only want to be able to access the Web Configuration Interface from a web browser running on the VoiceXML Interpreter Server, make sure that the setting status shows
External access is currently disabled.
-
The label of the button in the HTTP/HTTPS Server panel will toggle between Enable and Disable depending upon the status of the setting.