


- Contents
WFM Technical Reference
Step 4: Configuring the WFM service
Next, specify various things about how WFM provides status information to the third-party software.
To configure the WFM service:
-
On the Database Configuration page, click the Next button.
WFM displays the Service Configuration page.
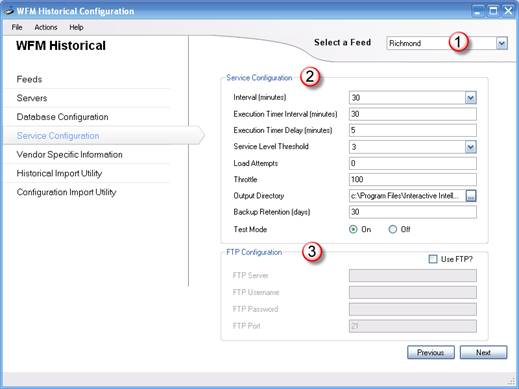
The Select a Feed list box (1) shows the feed for which you are configuring the service and lets you switch to a different feed.
-
In the Service Configuration section (2), expand the Interval list box and select the time interval for grouping status data. The default value is 30 minutes. Match the Interval to the Reporting Interval defined in Interaction Administrator.
-
Specify Execution Timer values:
-
In the Execution Timer Interval list box, select the number of minutes between interval executions. The default value is 30 minutes. Set a higher value for organizations with large amounts of historical data or for organizations that are not concerned about historical data being delivered quickly. Set the Execution Timer Interval to the same value as the Interval configured in the previous step.
-
In the Execution Timer Delay list box, select the number of minutes after the interval execution time that WFM waits before querying your CIC data.
If WFM queries your CIC server database at the same time that the CIC server is writing its data to the database, performance will suffer and data could be missed. This parameter tells WFM how long to wait after that time before it queries your CIC server data.
Note:
If you set up WFM to query multiple CIC servers, the data is retrieved in the order of the configured servers. -
-
Specify service level, load attempts, and throttle:
-
In the Service Level Threshold list box, select how many service buckets to include as acceptable wait times.
Each bucket indicates how long a customer has to wait before a call center agent picks up the call. Interaction Center ships with six default buckets, each of which is 10 seconds longer than the previous one. With the WFM default service level threshold of 3, WFM sends the percentage of calls answered within the first 3 buckets (1 to 10 seconds, 11 to 20 seconds, and 21 to 30 seconds).
-
In the Load Attempts text box, enter how many times WFM tries to load an interval before giving up.
The default value is 0, meaning that WFM keeps trying until it succeeds in loading a particular interval.
-
In the Throttle text box, enter the number of intervals WFM processes simultaneously if it needs to catch up.
If you have turned the service off for several days or there is a network outage, WFM might need to process many intervals to catch up.
-
-
Click the Browse
 button
next to the Output Directory text box. Browse to
the folder where WFM places its output files for the third-party software.
button
next to the Output Directory text box. Browse to
the folder where WFM places its output files for the third-party software.Note:
If you are configuring for FTP, the Output Directory text box disappears and a Relative FTP Directory text box appears in the FTP Configuration section.Each third-party software package has a preferred location for these files; consult your vendor documentation. For software that receives data via FTP, this location is the folder on the FTP server where WFM puts its output files.
-
In the Backup Retention text box, type the number of days you want to keep backups of your output files after you create them.
-
Click one of the Test Mode radio buttons to turn test mode on or off.
By default, test mode is turned on. After you install WFM, keep test mode turned on until you have verified that the system is configured and working the way you want. Test Mode saves the XML data sets that get run through the vendor's XSL. Use this data for debugging the flat file outputs that the WFM Historical Module generates.
-
If you want WFM to send its output files via FTP:
-
Select the Use FTP check box.
-
Fill in the boxes for FTP server, relative FTP directory, user ID, password, and port.
-