


- Contents
Interaction Administrator Help
 Configure the pattern of
a regional dial plan
Configure the pattern of
a regional dial plan
When you configure a regional dial plan, you must configure its pattern.
To configure the pattern of a regional dial plan
-
In the System Configuration container, click the Phone Numbers subcontainer.
-
In the list view, double-click Configuration.
-
In the Phone Number Configuration dialog box, on the Regional Dial Plan tab, click Dial Plan.
-
On the Regional Dial Plan dialog box, do one of the following:
-
To add a dial plan pattern, click Add.
-
To edit a dial plan pattern, select it and then click Edit.
-
To copy a dial plan pattern, select it and then click Copy.
-
-
In the Regional Dial Plan - Edit Pattern dialog box, in the Input Pattern field, enter a series of literal numbers, variables, or both. CIC tries to match the dialed input with this pattern.
The combination of the input pattern, list name, and location filter define a unique dial plan entry.
The input assistance prompt displays a list of the special input characters that are allowed in the Input Pattern field. It also contains commonly used input patterns, which you can select and modify if necessary. You should also be familiar with wildcard pattern syntax.
Note:
Quoted and escaped string literals
The Regional Dial Plan enables CIC administrators to embed literal characters
or strings in a dial plan input pattern, even if it contains wildcard
characters. These literal characters in an input pattern can be used by
handler customizations to do special processing, or provide visible indicators
to CIC administrators. For example, “Oldphone:”+1NxxNxxxxxxZ , or sip:"?"@"inin.com".
Previously, this would not be possible because certain characters
(such as “?” and “n”) were only treated as wildcard characters.
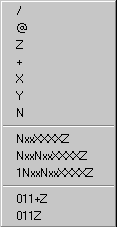
Phone number templates can consist of all digits, all wildcard characters, some non-dialing characters such as '+', '^', and '/', or any combination of these characters. The '/' character is generally used as a prefix to introduce an extension for direct extension dialing. The '^' character is used as a prefix before an extension, but that extension is not automatically dialed (that is, it is stored as informational data with the number). The '+' is used as a prefix to introduce a country code. These three characters are not actually dialed, but they are preserved as part of the stored phone number. The spaces these characters hold within the number are counted when determining ordinal positions in the formatted number (that is, which number is in the first position, second position, and so on).
- In the Location Filter
list, optionally select a filter to apply for a specific location.
This is a feature of regionalization. Locations are used to restrict
or filter access to dial plan entries. You can use a location
filter for the dial group entries. The combination of the location
filter, list name, and input pattern define a unique dial plan entry.
The Location Filter options are:
-
-
<All> - Select this option to make this dial plan entry specific to all stations, regardless of location.
-
<Skip> - Select this option to ignore the location filter completely.
-
<Many Locations...> - Select this option to choose multiple locations for this dial plan entry. This option is available only if you have defined one or more locations.
-
<Default Location> - Select this option to choose the <Default Location> for this dial plan entry.
-
Specific locations - Select a specific location from the list for this dial plan entry. This option is available only if you have defined one or more locations.
-
Notes:
For stations that do not belong to a location, (those that have an empty
location string), the All option
is the only option that will match these stations.
If a dial plan entry does not have <All> access, then those specific
options (patterns or dial groups) are removed from the dial plan and are
not presented as dialing choices on dialing lookup in the describe number
tool.
Any input pattern that has the <All> filter may require special care
when defining the dial groups for the dial plan entry. For example a 911
pattern, the default line groups specified should be local to the location
region as possible.
-
In the List Name list, select the list name. For information on how to add or edit the list names, see Managed named lists of phone numbers. The combination of the list name, pattern, and location filter define a unique dial plan entry.
-
In the Classification list, select the classification of phone numbers. For information n how to add or edit the classifications, see Manage phone number classifications.
Phone numbers that can be identified by a pattern in the numbers, or an explicit group of phone numbers with a common purpose are called phone number "classifications." For example, internal calls could be identified by the "Internal" classification, toll free (for example, 800 numbers) could be identified by the "Toll Free" classification, and calls to emergency services (such as 911, fire department, police, and hospital) could be identified by the "Emergency" classification.
These named groups of phone numbers are used to control individual users, workgroups, and station dialing privileges in CIC. For example, stand-alone phones may have only Emergency and Internal dialing privileges, while members of the Sales workgroup may have full dialing privileges provided in all classifications. - In the Standardized Number field, select the standardized number entry and modify it if necessary. The standardized number is a standard format for all phone numbers. Its primary use is to store called numbers in a +1 calling format.
Note: This standardized number is used to make a call, so input patterns should be defined to match the standardized numbers. For example, the 7-digit pattern 715xxxx maps to +1317715xxxx, so there should be a +1317715xxxx, or an equivalent input pattern, in the table to match the standardized number.
-
In the Default Dial String field, enter the default dial string. You can select the dial string entries from the list and modify the numbers and characters, if necessary. The dial string is the actual string of characters sent to the CO to place a call. You can specify the dial string based on the dialing requirements the CO may have on your lines. For example, some areas may require you to dial the local area code, even for non-toll local calls. Using the Dial String field, you can add the local area code as a prefix to all local calls so CIC users do not need to dial the local area code. As another example, some trunks may require you to dial a '1' or a '9' prefix before certain numbers, or perhaps you need to add a long distance prefix to specify a long distance carrier (for example, 1010550). You can add any prefix (or suffix) to any type of phone number using the Dial String field. CIC client users do not need to dial the numbers you include as a prefix in the Dial String field.
-
In the Display String field, enter the formatted phone number that is displayed in the CIC clients when the user is not allowed to edit the phone number before the call is placed. You can control the numbers displayed to end users by the template you use in the Display String field. For example, if the standardized form of the number includes a special long distance carrier prefix (for example, 1010550), you can drop that part from the phone number you display to CIC client users.
The display string variable uses the standardized format syntax. You can use either the wildcard character syntax or the ordinal number. However, if you use the wildcard characters, pay attention to the two conditions where you might have to use the ordinal number syntax in this field, and the potential efficiency of ordinal numbers over wildcard characters. For more information about syntax, search for Ordinal or Wildcard Syntax or Dial Plan Phone Numbers in the PureConnect Documentation Library on the CIC server. - In the Edit Base field, select an entry from the list and then modify the numbers and characters as necessary. The edit base is an existing phone number from the system that the user can modify before the call is placed. For example, in the CIC clients, the edit base number could be any of the following:
-
-
A Directory or Speed Dial Contact phone number that the user has permission to modify
-
A Follow-Me configuration number
-
A forward status forward number
-
A remote number station
-
- To use account codes, select the Account Code Verification option. After you apply account code verification to a dial plan object, you can track that call type with a verified account code that the user provides for the outbound call. You can use this feature to track call types for billing purposes.
Note: Do not apply Account Code Verification to the 911 and Intercom Dial Plan Objects.
-
In the Components box, specify the different parts of a phone number in each dial plan entry that need to be tracked in the report logs (such as area code, long distance prefix, country code, and so on). These components are used for tracking different parts of the phone number in the reporting databases.
Note: If you create new dial plan objects for the Local and Long Distance categories, you must copy the content of the default Components field (such as the ReportingCode1 and ReportingCode2 components) and paste them in to your components field. Failure to do this may result in incomplete call data in your reports.
The default dial plan objects in the Local and Long Distance classifications created during installation contain two components: ReportingCode1 and ReportingCode2. These components represent the digits in the ordinal positions indicated by the ordinal number syntax in the field. For example, the syntax for the first entry is:
ReportingCode1:{3}{4}{5};
The part before the colon is the name or label for this component ("ReportingCode1"). The ordinal numbers after the component refer to the 3rd, 4th, and 5th digits in the current dial plan object. In the case of a Local or Long Distance classified number in the NANP, these digits always refer to the area code. The semicolon at the end is simply a separator between components.
In another example, the syntax for the second component in the Components field is:
ReportingCode2:{6}{7}{8}
Again, the part before the colon is the component name ("ReportingCode2"). The ordinal numbers after the component refer to the 6th, 7th, and 8th digits in the current dial plan object. In the case of a Local or Long Distance classified number in the NANP, these digits always refer to the local exchange.
If these same digits refer to a different part of the phone number in another location (such as city code, prefecture code, etc.), you can keep these components as they are and they will work for your location. If you need to track other parts of the phone number, you must:
-
-
Create new components in the Components box.
-
Customize the CallDisconnectMonitor handler to add the new components to one of the extra columns in the Call Detail report log.
-
Modify or add a new column in a Crystal Report template that is based on the Call Detail report log.
-
-
In the Description box, document the purpose, along with any details, of each dial plan entry. This information will be valuable to other CIC administrators, especially if you have more than one administrator managing CIC or more than one person editing the dial plan configuration.
-
To use account codes, select the Account Code Verification option. When you select this option, you can track that call type by using a verified account code that the user provides for the outbound call. For example, you would use this feature to track call types for billing purposes.
Note: You should not apply Account Code Verification to the 911 and Intercom Dial Plan Objects.
-
Configure dial groups for the object. Dial groups enable you to specify which outbound lines or channels to use for each type (classification) of phone number. For example, international calls may be directed to one dial group that uses lines with the best rate for international calls. Local calls may be directed to another dial group called "Local" over low-cost analog lines from the local CO. If you do not specify a dial group for a dial plan entry, calls placed via that dial plan object use the first available line with a direction of Outbound or Both.
Note: All of the lines or channels in a dial group must have identical dialing requirements. For example, in a dial group, you cannot have some lines that require a 9 prefix and other lines that do not.
Do the following, as necessary:
-
To add a dial group, click Add Group. Select the dial group and then click OK. If there are no dial groups, create them in the Line Groups container.
-
To edit a dial group, select it and then click Edit.
-
To remove a dial group, select it and then click Remove.
-
To add a secondary dial group to an existing dial group entry, select the dial group and then click Add Group.
Related topics
Configure a regional dial plan in Interaction Administrator
Manage named lists of phone numbers
Manage phone number classifications