


- Contents
Interaction Process Automation Designer Help
Data Grid

Data grid controls allow you to display items as a collection. Most commonly the collection will hold complex data types. For example, you could create a custom data type called customer that contains these properties for a customer: Age, First Name, Last Name. You could then create a variable that is a collection of customers, bind it to the data grid, and the data grid will show the properties of customer as columns. Each row of the table shows one member of the collection. Each column of the table shows a property of the complex data type.
You can also bind the data grid to a simple or basic variable type, like a string collection. In this case, you will see a list with a single column.
Data grids are read-only; you can use them to display data, which users cannot modify directly in the table. However, users can select data in the data grid and you can use their selection in further processing.
-
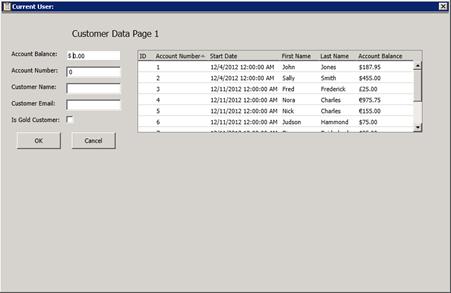
Example of a Data Grid in a Form
Setting the Properties for a Data Grid
After you add the data grid to a work item page, you must set the properties of the data grid.
To set properties, display the control's shortcut menu and click Edit Properties.

Data Grid Control Properties
Property
Description
Required Field
If selected, this option requires that the user select one or more rows in the data grid.
For example, you could use a data grid to show a list of values on a form. You could make the data grid required, meaning that the user would have to select a value shown in the grid. Then you could add an Edit button to the form to access a different form where the user could provide additional information about the selected value.
Allow multi-select
Indicate whether the user can select multiple items in the control.
Bindings (Source for Values)
You can bind the control to a process-level variable or to a local variable that has been defined for a work item. Alternatively, you can insert a new variable. For more information, see the links below.
Selection Type
Select by data type or by unique identifier.
• By Data Type returns a copy of the object selected and puts it in the bound variable. For example, if you pick a customer object, the whole object will be returned.
• By Unique Identifier is valid only for collections of complex data types. It will return whatever is configured as a string for the unique identifier of the complex data type.
Layout
Indicate the number of columns in the control.
Defining the Bindings for the Data Grid
-
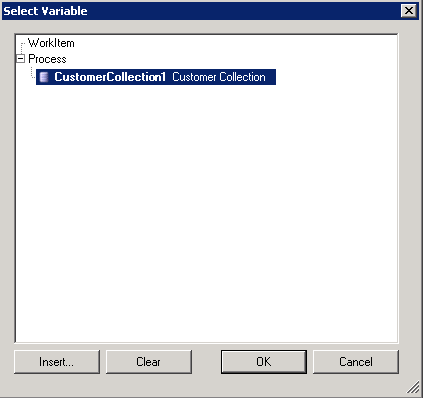
In the Properties pop-up, next to Bindings *Source for Items in Datagrid, click the hyperlink. If no variables have been selected, the hyperlink says <Not Set>. If a variable has been selected, then the name of the variable appears in the hyperlink.
The Select Variable dialog box appears.
-
Do one of the following:
-
To select a variable that has been already defined for another work item or for the process, select it in the hierarchy tree and then click OK.
-
To insert a variable specifically for this data grid, click Insert. Then specify the properties for the variable. For all variables, you must complete the Add To field to indicate whether you are adding the variable to a process or to a work item. When you click OK, you are automatically returned to the Select Variable dialog box. Select the new variable in the hierarchy tree and then click OK.
The Select Column Bindings dialog box appears. The number of columns that appear depends on whether you selected a variable with simple or complex data type. For a simple data type, a single column appears. For a complex data type, multiple columns appear.
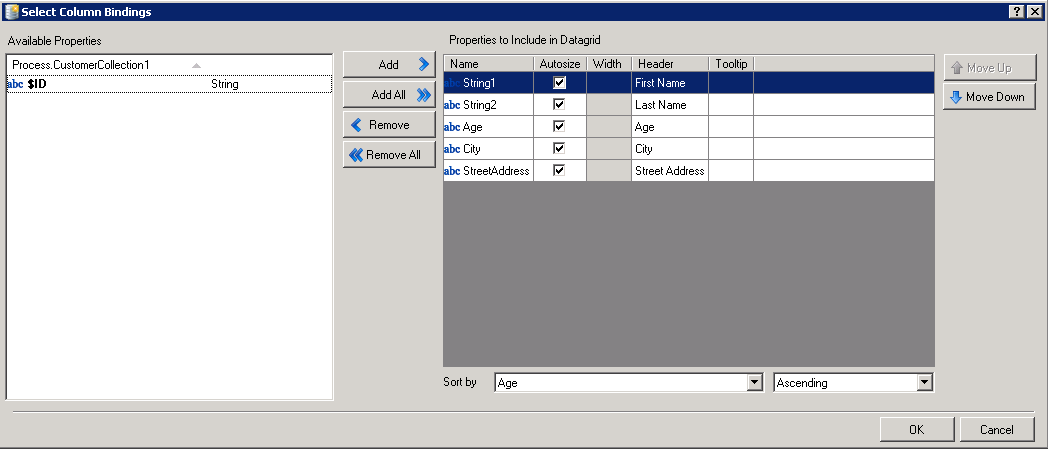
3. The Available Properties box shows the properties for the variable. Each property that you select will appear as a column in the data grid control. For each property that you want to select, click the Add button. To select all of the properties, click Add All..
To designate the width of each column, do one of the following:
-
To have the IPA Designer automatically adjust the width of the data grid based on the actual that data appears, select the Autosize check box. In this case, the longest data element returned will determine the width of the column.
-
To specify a fixed width in pixels, use the arrows under the Width column heading.
The header text appears at the top of the column that is specific to this variable in the data grid. By default, the header is pulled from the variable definition. To change the header, click in the field under the Header column and type a new header.
You can include a tool tip, which is a short explanation of the field. To do this, click in the field under Tool tip and type the text you want to display.
-
You can specify a property by which to sort the data in the data grid. To do this, in the Sort list select the property to sort by. Then in the list to the right, select Ascending or Descending.
-
8. The property at the top of the Properties to Include... box will appear in the left-most column in the data grid. To change the position of the properties in the data grid, select one or more rows and then use the Move Up button and the Move Down button.
9. Click OK.
Defining How Selected Data will be Stored
1. Will the user select one or more items from the data grid?
-
If no, (if you are just using the grid to display data), then in the Properties pop-up, from the Selection list, select None.
-
If yes, then continue with the next step.
2. Do one of the following:
-
Select By Data Type to return a copy of the object that the user selected and put it in the bound variable.
For example, suppose the data grid is bound to a collection of customers and you have enabled multi-select. If you select By Data Type, then the items the user selects will be stored in a new customer collection variable. -
Select By Unique Identifier only if the collection is of complex data types. In this case, whatever the user selects will be configured as a string for the unique identifier of the collection.
3. If you selected either By Data Type or By Unique Identifier, then the hyperlinked words, <Not Set>, appear next to the list. Click this hyperlink to specify the unique identifier—a variable and its properties. Database actions that create complex data types automatically set a unique identifier. However, if you manually create a custom data type or select a data type from a web service call, the unique identifier is not automatically set and you need to configure it.
Viewing the Columns in a Data Grid
-
After you have selected the columns (properties) for a data grid, you can view them in order to edit their sort order, position, headings, and so on.
-
1. In the Properties pop-up, next to Columns, the hyperlink indicates the number of columns that you have selected to include in the data grid. If there are multiple columns, click the link to view the Define the Bindings in the Select Column Bindings dialog box.