


- Contents
Interaction Recorder Policy Editor Help
Edit Retention Policy Step 2
Use this page of the Edit Retention Policy dialog to apply retention Actions to recordings. Actions define how a Policy executes. If an action is not defined for a retention Policy, a warning message is displayed when you are creating the Policy. If no actions are defined for a Policy, an ERROR message is displayed in the Policy Editor status bar.
The retention actions that can be selected to apply to recordings are:
-
assign questionnaire to <questionnaire list>
-
clear the attribute on the recording
-
set attribute on the recording
-
remove tags
-
set tags to <tags>
-
store media at <media location>
-
re-evaluate retention policies in <time period>
-
purge the recording or media only
-
archive recordings to <location> for <volume_prefix> with chunks of <size>
-
stop processing more policies
Selecting Actions for Recordings
Select retention actions to apply to recordings in the Step 2: Select actions box.
To select actions to apply to recordings:
-
In the Step 2: Select actions box, select the check box for the retention action to apply to a recording.
In the Policy description pane, the action is added below the perform the following actions descriptor. -
If a selected action requires configuring, a variable is displayed in the Policy description pane. To configure the value, click the variable and a pop-up window is displayed. See the Criteria values for Step 2: Select actions table below for information on configuring these variables.
-
Continue selecting action check boxes and configuring them in the Policy description pane.
Completing Action Selection
When you have completed configuring the action settings, verify that the retention actions you want for recordings are listed in the Policy description pane under the perform the following actions descriptor. Also be sure that the value for each action is configured.
After you have verified your selections, click Finished. The New Policy name is displayed and selected in the Policy pane, and the complete description is displayed in the Policy description pane.
Configuring Variables for Actions
The following table describes the details for configuring variables when setting retention action values in the Policy description pane. Variables are configured in a pop-up window when you click the variable below the perform the following actions descriptor. The following criteria appear in the Policy description pane when the action is selected.
|
Action |
Description |
|
|
assign questionnaire to <questionnaire list> |
This action assigns an active questionnaire to the questionnaire list associated with a recording. In the Assign Questionnaire dialog, select the questionnaire from the questionnaire list. To select this questionnaire for calibration, select the Mark for calibration check box. To require the scored user's signature for the completed questionnaire, select the Require agent signoff check box. Next, to assign the questionnaire to a scoring user, in the Select scoring user box, in the Search for entities field, begin typing the name of an entity: Agent, Workgroup, or Role. Entity names that match are displayed in a pop-up window. Note that the entity type icon is displayed next to the entity name. A Filter legend lists the entity types and their icons. To reduce the number of entities returned in the search results, clear the check boxes for the entities you do not want to include in the search. In the pop-up window, click the entity to apply this questionnaire to. The entity is displayed in the entity list box. Continue adding entities using the Search for entities field. These entities will be selected by round-robin. To remove an entity from the list, select an entity and click Remove. Note When assigning a Role, the maximum number of Roles that can be configured for a Retention policy is 300. |
|
|
clear attribute <attribute> on the recording |
Configure this action to remove a custom attribute from recordings. In the Edit Attribute type or select a name of the custom attribute to be removed from recordings. To add an additional criterion to clear an attribute from a recording, click [Add]. To remove the criteria list, click [Remove]. |
|
|
set attribute <attribute> on the recording to <value> |
Configure this action to set a custom attribute for a recording. |
|
|
attribute |
In the Edit Attribute pop-up window, type or select a name for the custom attribute. |
|
|
value |
In the Edit Value pop-up window, enter a value for the attribute selected for this action. |
|
|
remove the following tags <tags> |
Use this action to remove tags from an interaction recording. In the Tags Editor pop-up window, type or select a name for the tag to be removed, and click Add. The name of the tag to be removed from recordings is added to the list. This is a list of tags that will be removed from recordings for this policy. |
|
|
set tags to <Tags> |
Use this action to create tags for an interaction recording. In the Tags Editor pop-up window, type or select a tag name and click Add. All the tags created in the Tags Editor list are displayed in the Policy description pane. |
|
|
store media at <media location> |
Configure this variable to store a recording in a specific folder, or to select an Amazon S3 location to store your recording. In order to view a screen recording in the playback window, the action Store Media at executes before the action Archive Recording to when both actions are in the same Retention Policy. Note All Amazon S3
communication uses HTTPS protocol. Select a Folder To select a specific folder to store the recording, click the media location variable, and in the Select Folder pop-up window select a folder from the drop-down list. You can also browse for a folder using the ellipsis button. Notes - We highly recommend that the stored recordings media location be a valid UNC path. This is necessary because there might be multiple CIC Servers and Interaction Recorder servers requesting recording files from one another. To set the <media location> variable to a valid UNC path, on the Select Folder pop-up window, type a UNC path. - If a Retention policy includes both the "store media at" action and the "purge the media only" action, the "store media at" action is not executed. - If no Interaction Recorder Remote Content Servers are configured, specifying local storage paths might unexpectedly result in performance issues with the CIC server, specifically when drive storage is limited. If Interaction Recorder Remote Content Servers are configured and you experience connection or network access issues, specifying local storage paths can result in recording storage to unexpectedly fall back to the CIC server. Performance issues can occur on the CIC server when drive storage becomes limited. We recommend specifying network or shared paths for optimal performance. Amazon S3 location To store a recording using Amazon Simple Storage Service (Amazon S3), select the check box Amazon S3 location. Next, select a Bucket from the drop-down list and in the Subfolder field type a name for the subfolder where the recordings will be stored. Configure Amazon S3 BucketConfigure in Interaction Administrator Configure in
Policy Editor The endpoint information helps reduce data latency when you access or store recordings with the Amazon S3 service. Click Test to validate the proper access level for the specified account credentials. For information on Amazon Simple Storage Service, see Amazon Web Services at http://aws.amazon.com/s3. |
|
|
re-evaluate retention policies in Never |
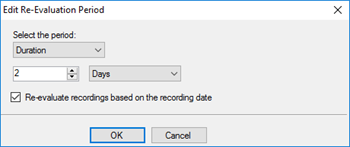
Configure this variable to set the time period for a recording to be re-evaluated. Recordings can be re-evaluated based on the last time a recording was evaluated by a policy, or based on the recording date. In the Edit Re-Evaluation Period dialog box, select the time period from the drop-down list. The available re-evaluation time periods are: Never or Duration. The default time period is Never, which means the recording will never be re-evaluated by the policy. You can modify the retention expiration date manually in Interaction Recorder Client, in the Search Results View. For more information, see "Modify Retention Expiration" in the Interaction Recorder and Interaction Quality Manager Technical Reference, in the PureConnect Documentation Library. When you select Duration,
values are displayed. You can set the re-evaluation duration by
Minutes, Hours, Days, Weeks, Months, Quarters, or Years, to re-evaluate
the recordings based on the last time a recording was evaluated
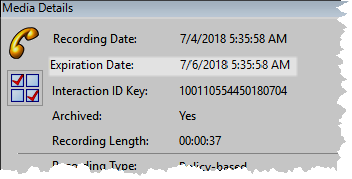
by a policy. To re-evaluate the recordings based on the recording date, select the Re-evaluate recordings based on the recording date check box. The Duration value is added to the recording date. For example, if you select 2 Days, the recordings will be re-evaluated two days after the recording was created.
Note: If the server parameter, IR Use Recording Date for Expired Calculations, has been set True in Interaction Administrator, the Re-evaluate recordings based on the recording date check box is not available. For more information on this server parameter, see "Appendix C: Interaction Recorder Server Parameters" in the Interaction Recorder and Interaction Quality Manager Technical Reference, in the PureConnect Documentation Library. You can view the retention expiration date of a recording in the Media Details pane in Interaction Recorder Client in IC Business Manager.
After Retention Policies evaluate a recording, in order for the recording to be re-evaluated by the Retention Policies, be sure to create a Retention Policy with the re-evaluation action. This action allows the recording to be re-evaluated by Retention Policies. Note: When a recording matches multiple Retention Policies, the policy with the shortest re-evaluation time interval is used to re-evaluate the recording. For example if a recording matches three retention policies, one with a 3-day re-evaluation interval, another with a 30-day re-evaluation interval, and another policy matches with a 1-year re-evaluation interval, the recording will be re-evaluated in 3 days. |
|
|
purge the recording and media |
Configure this variable to purge a recording and media for a recording, or to only purge the media for a recording. Media refers to the actual audio or video recording, and recording and media refers to the audio or video recording and the database records. If you purge the media only, the database records remain for reporting purposes. To purge the audio or video and the database records, click the variable and toggle to recording and media. To purge only the audio or video recording, click the variable and toggle to media only. |
|
|
archive recording to <media location> for <volume prefix> with chunks of 0 MB |
Configure these variables to archive recordings to a specific volume folder, or to select an Amazon S3 location to archive a recording. In order to view a screen recording in the playback window, the action Store Media at executes before the action Archive Recording to when both actions are in the same Retention Policy. Note For information on automatically archiving recordings using Interaction Recorder Policy Editor, see "Appendix D: Archive Recordings" in the Interaction Recorder Technical Reference in your PureConnect Documentation Library.
Select a Folder To select a specific folder to archive a recording, click the media location variable and in the Archive storage location pop-up window, specify a valid non-local shared UNC path. Click the volume prefix variable, and in the Archive volume prefix pop-up window, specify a prefix string for the archive volume name. Click the 0 MB variable, and in the Edit Storage size pop-up window, type the maximum storage size for each archive volume folder. Click the MB box to toggle between MB and GB. Notes - When entering the storage size for an archive volume folder in an Archive action, the Edit Storage size dialog shows a red error rectangle around the storage size field and the OK button is not available, if the field is empty or 0 is specified. The Edit Storage Size dialog shows a yellow warning rectangle around the storage size field when the storage size is determined to be risky and outside of the normal storage range. A tooltip is displayed explaining the error or warning. - If no Interaction Recorder Remote Content Servers are configured, specifying local storage paths might unexpectedly result in performance issues with the CIC server, specifically when drive storage is limited. If Interaction Recorder Remote Content Servers are configured and you experience connection or network access issues, specifying local storage paths can result in recording storage to unexpectedly fall back to the CIC server. Performance issues can occur on the CIC server when drive storage becomes limited. We recommend specifying network or shared paths for optimal performance. Amazon S3 location To archive a recording using amazon Simple Storage Service (Amazon S3), click the media location variable, and in the Archive storage location pop-up window select the check box Amazon S3 location. Note
Next, select a Bucket from the drop-down list and in the Subfolder field type a name for the subfolder where the recordings will be archived. Click the volume prefix variable, and in the Archive volume prefix pop-up window, specify a prefix string for the archive volume name. Click the 0 MB variable, and in the Edit Storage size pop-up window, type the maximum storage size for each archive volume folder. Click the MB box to toggle between MB and GB. Configure Amazon S3 BucketConfigure in Interaction Administrator Configure in
Policy Editor The endpoint information helps reduce data latency when you access or store recordings with the Amazon S3 service. Click Test to validate the proper access level for the specified account credentials. For information on Amazon Simple Storage Service, see Amazon Web Services at http://aws.amazon.com/s3. |
|
|
stop processing more policies |
Add this action to a Policy to stop processing policies that follow it. The order of a policy is set in the Policy pane, using the up and down arrows. |
|