


- Contents
CIC Web Applications Installation and Configuration Guide
Step 3: Configure IIS
For information about all the installation steps, see Install CIC Web Applications on Microsoft IIS. See also Appendix A: IIS XML Configuration.
To configure IIS
-
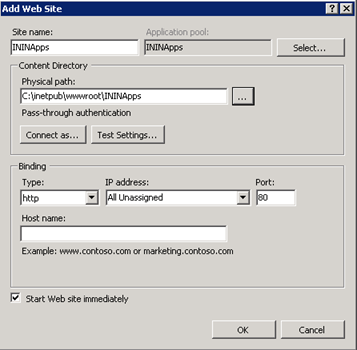
Create a new Site named ININApps in IIS:
-
Right-click on Sites and choose Add web site.
-
In the dialog box, set the Content Directory Physical path to the CIC Web Applications folder you previously created in your server's Home Directory.
-
-
Remove the .NET Framework version of the application pool:
-
In the IIS Manager side pane, click Application Pools.
-
Right-click the newly created ININApps application pool.
-
Click Basic Settings.
-
Change the .NET Framework version to
No Managed Code.
-
Click OK.
-
-
Enable static content compression on the new Site:
-
Click the site in IIS Manager.
-
Double-click the Compression module.
-
Check Enable static content compression.
-
Click Apply.
-
-
Update the maximum URL and query string size in Request Filtering, if enabled:
-
Click the site in the IIS Manager.
-
Double-click on the Request Filtering module, if enabled. If the module doesn't appear, Request Filtering is not enabled.
-
Select the URL tab in the Request Filtering view.
-
Click on Edit Feature Settings in the Actions pane.
-
Update Maximum URL Length (bytes) to
8192
. -
Update Maximum Query String (bytes) to
8192
. -
Update Maximum allowed content length (bytes) to something greater than or equal to
20971520
.
-
-
Click OK.
-
-
Add allowed server variables:
Note: Steps 6 through 10 can alternatively be completed using XML configuration file. See Appendix A for XML configuration.
-
Click the site in the IIS Manager.
-
Double-click on the URL Rewrite module.
-
In the Actions pane, click View Server Variables.
-
Create the following three server variables by clicking Add in the Actions pane.
-
WEB_APP
-
ICWS_HOST
-
HTTP_ININ-ICWS-Original-URL
-
-
-
Create the rewrite map.
-
Click the site in the IIS Manager.
-
Double-click the URL Rewrite module.
-
In the Actions pane on the right, click View Rewrite Maps.
-
Click Add Rewrite Map.
-
Enter MapScheme for the rewrite map name.
-
In the Actions pane, click Add Mapping Entry.
-
Type the following:
Original value:
New value:
on
https
-
Repeat steps f and g with the following information:
Original value:
New value:
off
http
-
-
Create URL rewrite rules. You will create one inbound rule and two outbound rules.
-
Click the site in the IIS Manager.
-
Double-click the URL Rewrite module.
-
Navigate to the Actions pane and select Add Rule(s).
-
For each rule, select Blank rule under the appropriate type (Inbound rule or Outbound rule).
-
Enter the following information for each rule. Tables are provided for ease of copying values, followed by screenshots for each rule.
Note: Do not add conditions for any of the rules.
Inbound rule
This rule allows the client to reach the Session Manager host that ICWS is served from.
Name
inin-api-rewrite
Requested URL
Matches the Pattern
Using
Regular Expressions
Pattern
(?:^(.*/)api|^api)/([^/]+)(/.*)Ignore case
checked
Server Variables
See
Server Variables
table belowAction type
Rewrite
Rewrite URL
(see
Configure HTTPS for IIS
for HTTPS)http://{ICWS_HOST}:8018{R:3}Append query string
checked
Log rewritten URL
checked
Stop processing of subsequent rules
checked
Server Variables
Name
Value
Replace
WEB_APP
{R:1}TrueICWS_HOST
{R:2}TrueHTTP_ININ-ICWS-Original-URL
{MapScheme:{HTTPS}}://{HTTP_HOST}{UNENCODED_URL}False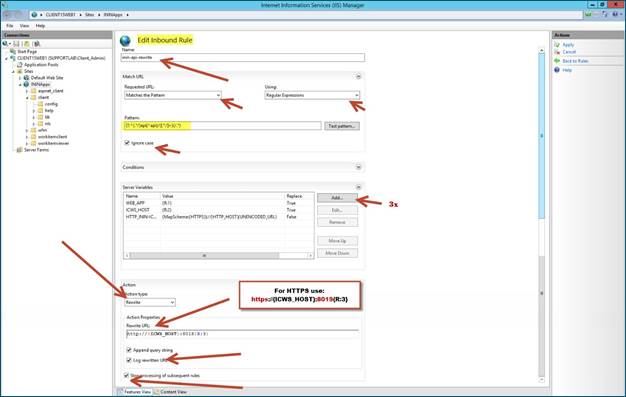
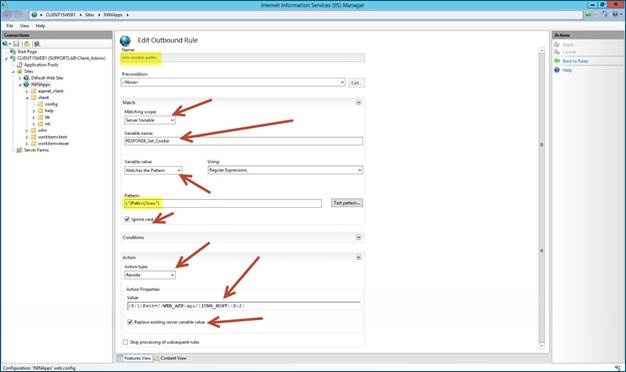
Outbound rule 1
This rule allows the cookies required by ICWS and the client to be located where the client needs them.
Name
inin-cookie-paths
Precondition
<None>
Matching scope
Server Variable
Variable name
RESPONSE_Set_Cookie
Variable value
Matches the Pattern
Using
Regular Expressions
Pattern
(.*)Path=(/icws.*)Ignore case
checked
Action type
Rewrite
Value
{R:1}Path=/{WEB_APP}api/{ICWS_HOST}{R:2}Replace existing server variable value
checked
Stop processing of subsequent rules
unchecked
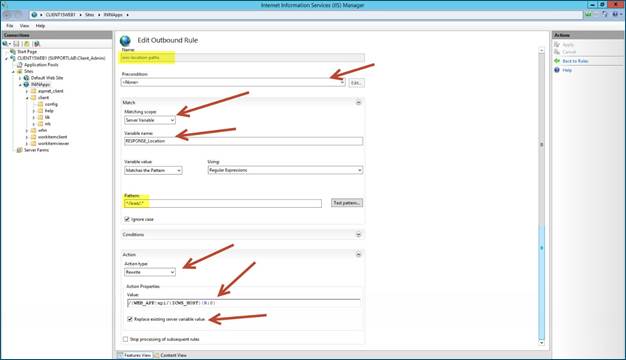
Outbound rule 2
This rule adjusts the location header
Name
inin-location-paths
Precondition
<None>
Matching scope
Server Variable
Variable name
RESPONSE_location
Variable value
Matches the Pattern
Using
Regular Expressions
Pattern
^/icws/.*Ignore case
checked
Action type
Rewrite
Value
/{WEB_APP}api/{ICWS_HOST}{R:0}Replace existing server value
checked
Stop processing of subsequent rules
unchecked
When you are finished, you will have one inbound rule and two outbound rules:


-
-
(Optional) Increase the cache sensitivity thresholds if you have application load performance issues.
-
In Configuration Editor, select the system.webServer/serverRuntime section.
-
Update frequentHitThreshold to 1.
-
Update frequentHitTimePeriod to 00:10:00.
-
-
Enable static content caching for Interaction Connect:
The following table summarizes the cache settings. Steps to configure cache settings follow.
Note: Client/addins and client/config do not exist in a new installation. If you plan to user servers.json or create custom add-ins, use the cache settings below for those folders.
Recommended cache settings
Directory or file
Expire web content:
client/lib
After 365 days
client/addins
Immediately
client/config
Immediately
client/index.html
After 15 minutes
-
Expand the site in the tree view and select the client/lib folder.
-
Double click the HTTP Response Headers module.
-
Click Set Common Headers.
-
In the dialog box:
-
Check Expire Web content.
-
Select After and enter 365 days in the fields.
-
-
Click OK.
-
Repeat steps 1-5 for the client/addins and client/config directories with the following difference:
Select Immediately under Expire web content.
-
Right-click on the client folder and select Switch to Content View.
-
Select index.html.
-
In the Actions pane click Switch to Features View.
-
Repeat steps b-e for index.html (which should now show up under client). This time set the After expires field to 15 minutes.
-
-
Verify that the following MIME types are defined in the IIS Manager for the ININApps Site by double clicking the MIME Types module:
-
.css -> text/css
-
.gif -> image/gif
-
.html -> text/html
-
.jpg -> image/jpeg
-
.js -> application/x-javascript
-
.json -> application/json
-
.otf -> application/octet-stream
-
.png -> image/png
-
.svg -> image/svg+xml
-
.ttf -> application/octet-stream
-
.woff -> font/x-woff
-
.woff2 -> application/font-woff2
-
-
(Optional) If you want to set the CIC server that the CIC Web Applications connect to, follow the instructions in
servers.json
. -
Restart the IIS server by using the iisreset command line application.
-
Verify that all applications work as expected.
The basic installation tasks are complete, and the CIC Web Applications should be functional. To enable encryption, see Enable HTTPS between the web browser and IIS and Enable HTTPS between IIS and CIC.