- Contents
PureConnect Integration with Genesys Intelligent Automation Technical Reference
Configure a Chatbot Widget in Interaction Connect
Integrating PureConnect with Genesys Intelligent Automation for chatbots requires a one-time configuration of a chatbot widget in Interaction Connect. Then, you generate a script that contains the Genesys Intelligent Automation connection information and add the script to the appropriate page in your company's website.
For more information about configuring and deploying widgets, see Widgets in the Interaction Connect Help.
To configure a chatbot widget in Interaction Connect
-
Log on to Interaction Connect and then click the Widgets tab.

-
In the toolbar, click New. The Create a Widget panel appears.

-
In the Name box, type a unique name for the widget and then click Create. The General tab in the Edit Widget: [widget name] panel appears.

IC Server Host Names: Name or names of your IC server and any off-server Session Managers, separated by a comma.
Tip: If your reverse proxy cannot communicate with your IC server without a Fully Qualified Domain Name (FQDN), specify the FQDN in the IC Server Host Names box.
Reverse Proxy URL: Name or FQDN of the web server functioning as a reverse proxy to the IC server inside your firewall.
Use PureConnect Cloud: Indicates whether you are a PureConnect Cloud customer.
PureConnect Cloud URL: If you are a PureConnect Cloud customer, your PureConnect Cloud URL.
Use HTTPS: Indicates whether to use an HTTPS communication port for communication between the web server and IC server. If set to Yes, the system uses HTTPS port number 8019. If set to No, the system uses HTTP port number 8018.
Debug: Indicates whether to allow debug logging from the bus to appear in the browser console.
Theme: Sets the widget's appearance, such as colors and fonts.
Fallback Language: If the widget cannot use any of the browser's preferred languages, default language to use.
Internationalization file path: (Developer use only) Path to a remote i18n.json language pack file to override the default English language strings built into the widget.
Common Stylesheet ID: HTML ID of a <style> tag that contains CSS overrides, custom themes, or other custom CSS for the widget.
Download Google Font: Indicates whether to prevent the Roboto font file from downloading at startup. If you have security concerns regarding third-party fonts, you want to optimize page load time, or you already include Roboto on your website, move the slider to Yes.
Mobile Mode: Indicates whether to display the widget in mobile mode.
True: Displays the widget in mobile mode on all devices.
False: Displays the widget in desktop mode on all devices.
Auto: Determines whether the website visitor is using a desktop or mobile browser and displays the widget in the corresponding mode.
Mobile Mode Breakpoint: Breakpoint width in pixels when displaying the widget in mobile mode.
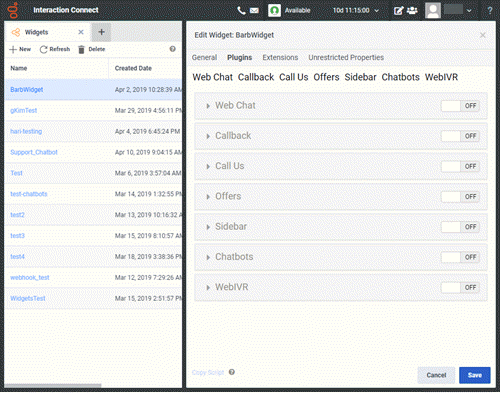
Add/Remove Plugins: Plug-ins for the widget to use instead of the default startup plug-ins. Click in the list box to display the plug-ins that are available for selection. To remove a plug-in, click the corresponding X.
Custom JSON: Custom JSON object to apply to the widget.
-
Complete at least the required information and then click the Plugins tab.

-
Move the Web Chat slider to ON. The Web Chat section expands.

Emoji Enabled: Indicates whether to display the emoji menu inside the chat message input.
Uploads Enabled: Indicates whether to display the upload menu inside the chat message input.
Proactive Enabled: Indicates whether to invite a website visitor to chat after a specified number of seconds.
Proactive Idle Timer: Number of seconds to wait after a visitor reaches your webpage before displaying a chat invitation.
Proactive Cancel Timer: Number of seconds for the chat invitation to remain visible.
Chat Button Enabled: Indicates whether to show or hide a chat button on your web page.
Chat Button Open Delay: Number of milliseconds to wait before displaying the chat button.
Chat Button Effect Duration: Number of milliseconds to wait before displaying the chat button fade-in animation.
Chat Button Hide During Invite: Indicates whether to hide the chat button when inviting a website visitor to chat. If set to Yes and the visitor dismisses the chat invitation, the widget displays the chat button.
Target Type: Queue type to use for ACD routing.
Target Name: Name of the queue to use for ACD routing.
-
Complete at least the required information in the Web Chat section.
-
Move the Chatbots slider to ON. The Chatbots section expands.

-
In the Bot Provider Id box, click Genesys Intelligent Automation. More configuration items appear.

Intelligent Automation URL: Genesys Intelligent Automation URL for your Genesys Intelligent Automation server. (The URL is in Genesys Intelligent Automation under Administration > Servers.)
Intelligent Automation Site ID: Site ID that Genesys Intelligent Automation generated when you created an application or module in Genesys Intelligent Automation. For more information, see Create an Application or Module.
Intelligent Automation Authorization Key: Authorization key that Genesys Intelligent Automation generated when you created a company in Genesys Intelligent Automation. For more information, see Identify the Company Authentication Key.
Use a Reverse Proxy for Intelligent Automation: Indicates whether to use a reverse proxy for Genesys Intelligent Automation. If Yes, specify the Intelligent Automation Server.
Intelligent Automation Server: If you indicated to use a reverse proxy for Genesys Intelligent Automation, specify the FQDN of the web Genesys Intelligent Automation server. The system uses the Reverse Proxy URL specified on the General tab in the Edit Widget: [widget name] panel to create the end-result URL to access Genesys Intelligent Automation.
Note: If you indicated to use a reverse proxy for Genesys Intelligent Automation, configure the reverse proxy rewrite rules after completing and saving the chatbot widget. For more information, see Configure Reverse Proxy Rewrite Rules.
GIA version 9.0.102+: Indicates whether to use Genesys Intelligent Automation version 9.0.102 or later, or an earlier version.
Use Chat Persona: Indicate whether you want to use the Chat Persona in GIA version 9.0.102+. Selecting Yes allows the Genesys Intelligent Automation (GIA) chatbot to use buttons, images, and videos rich media types. For more information about configuring a chat persona in Genesys Intelligent Automation, see Personas in the Genesys Intelligent Automation Help.
-
Complete at least the required information in the Chatbots section.
-
To use microapps with this widget, do the following:
-
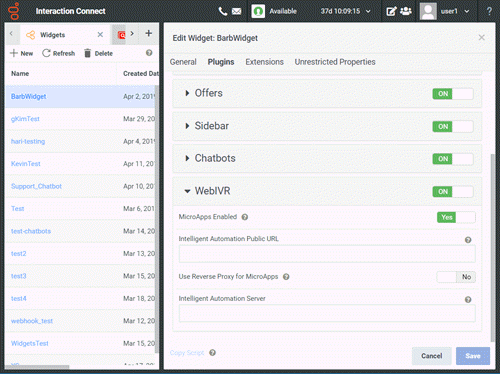
Move the WebIVR slider to ON. The WebIVR section expands.

Intelligent Automation Public URL: URL for accessing microapp services for Genesys Intelligent Automation.
Use a Reverse Proxy for MicroApps: Indicates whether to use a reverse proxy for microapp services. If Yes, specify the Intelligent Automation Server.
Intelligent Automation Server: If you indicated to use a reverse proxy for microapp services, specify the FQDN of the web Genesys Intelligent Automation server. The system uses the Reverse Proxy URL specified on the General tab in the Edit Widget: [widget name] panel to create the end-result URL to access Genesys Intelligent Automation.
-
Complete the information in the WebIVR section.
-
Click Save and then do the following:
-
Click Copy Script. Interaction Connect copies the script to your Clipboard.
-
Close the confirmation dialog box and then paste the script to the appropriate page in your company's website.


