- Contents
Scan a Document to an Account
Use the Documentation panel to scan a paper document and attach it to an account. If the document is in electronic format, see Attach a Document to an Account.
To scan a document to an account
-
With an account displayed in the Work Form, do one of the following:
-
Click the View Scanned Images or Documents icon.
-
From the Info menu, click Documentation.
-
At the top of the Panels section, click the name of the currently displayed panel (for example, Phones, Notes) and then click Documentation.
The Documentation panel appears.
-
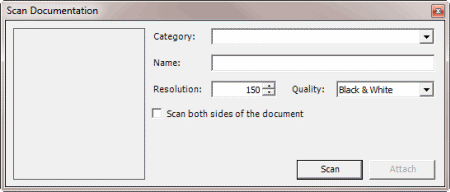
In the Documentation toolbar, click Scan. The Scan Documentation dialog box appears.

-
In the Category list box, you can leave it blank, click an existing category to associate to the document, or type a new category.
-
In the Name box, type a name to assign to the document.
-
To change the scan resolution, in the Resolution box, type a value or use the arrows to increase or decrease the value.
-
To change the scan quality, in the Quality list box, click a value.
-
If the document has two sides and you want to scan both sides, select the Scan both sides of the document check box.
-
Click Scan. The document is scanned to an image file and displayed in the Scan Documentation dialog box.
-
Click Attach. The scanned document is attached to the account.


