- Contents
WorkFlow Designer Help
Create a User-defined Event
Use the Event Configuration tab to create a user-defined event.
To create a user-defined event
-
Do one of the following:
-
To open the Event Configuration tab from the menu, from the Window menu, click Event Configuration.
-
To open the Event Configuration tab from the Window toolbar, click the Event Configuration icon
 .
.
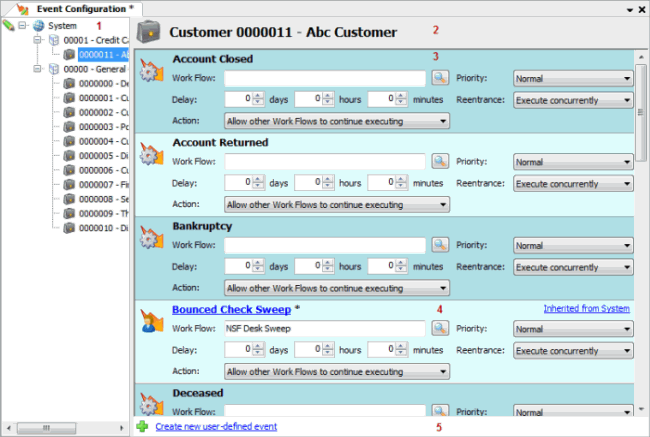
The Event Configuration tab appears.

-
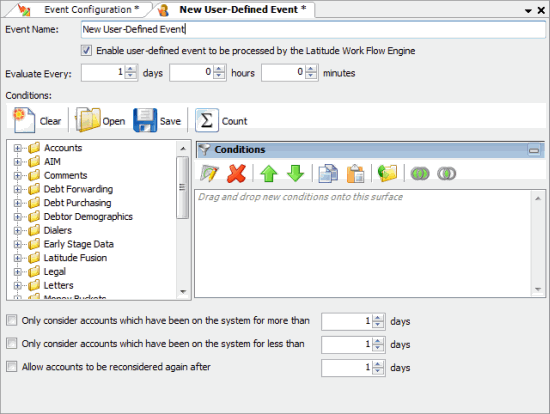
In the lower section of the tab, click Create new user-defined event. The New User-Defined Event tab appears.

-
In the Event Name box, type a unique name for the event.
-
In the Evaluate Every boxes, set the frequency in which to evaluate accounts for eligibility.
-
Specify the conditions for the event. For more information, see Create a User-defined Event Condition.
-
In the lower section of the tab, do the following:
-
To evaluate accounts that have been on the system for more than a specific number of days only, click the Only consider accounts which have been on the system for more than check box and then specify the number of days.
-
To evaluate accounts that have been on the system for less than a specific number of days only, click the Only consider accounts which have been on the system for less than check box and then specify the number of days.
-
To reevaluate accounts after a specific number of days, click the Allow accounts to be reconsidered again after check box and then specify the number of days.
-
In the Window toolbar, click Save. WorkFlow Designer renames the New User-Defined Event tab to the specified event name.
-
Click the X to close the event tab. The user-defined event appears on the Event Configuration tab.
-
In the Navigation tree, click the level to apply the event to (system, class of business, or customer).
-
Locate the user-defined event in the Events pane.

Work Flow: Workflow assigned to an account when it meets event conditions.
Delay: Time between the occurrence of the event's eligibility and its placement into the event queue (wait time between eligibility and queue placement).
Action: Determines what happens to an account triggered for this workflow that is processing currently in another workflow.
Priority: Determines how often Workflow Designer processes accounts that are eligible for the event in comparison to other events.
Reentrance: Determines what happens to an account that is already processing in the workflow that is triggering the event.
Execute concurrently: Account starts running through the workflow again, allowing multiple instances of the account within the workflow.
Restart work flow: Stops the account's current progression through the workflow and starts a new instance of the account at the beginning of the workflow.
Do not start work flow: Allows the account to continue processing in the currently running workflow; doesn't start a new instance of the account.
Resume paused work flow: Resumes a paused workflow for the existing instance of the account. The account continues through the workflow, but doesn't start a new instance of the account. If there are no instances, the account starts in the workflow.
-
Complete the information and then click Save.


