- Contents
Job Manager Help
Modify a Job Configuration
Use the Job - [Job Configuration Name] tab to modify a job configuration that automates a manual process (for example, AIM file import, Exchange file export).
To modify a job configuration
-
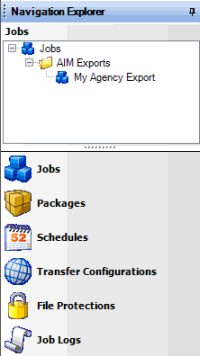
In the Navigation Explorer pane, click Jobs. The Jobs panel appears.

-
Click the plus sign (+) to expand the folder where the job is located.
-
Do one of the following:
-
Right-click the job and then click Job Properties.
-
Double-click the job.
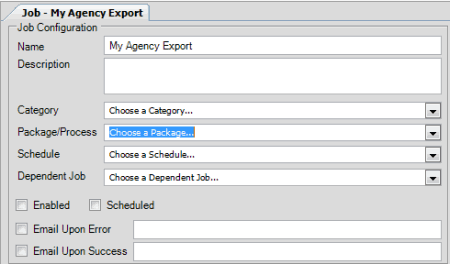
The Job - [Job Configuration Name] tab appears. Job Manager includes the name of the job configuration in the tab name.

Name: Name of the job configuration as specified in the Jobs panel. To modify the name, rename it in the Jobs panel.
Description: Description of the job configuration.
Category: Job configuration category. For more information, see Job Categories.
Package/Process: Package or process to automate. The values that appear are based on the specified job configuration category. This box is not available when you select "Web API Job" or "YGC Export" from the Category list box.
Endpoint URL: URL and API key to retrieve RDN case updates from the RDN system, or URL for sending a POST request to any Web API endpoint. This box is available when you select "Wep API Job" from the Category list box.
Schedule: Schedule for running the job.
Dependent Job: Job that has to complete before this job can start. Not all jobs have a dependent job.
Enabled: If selected, Job Manager allows the job to run.
Scheduled: If selected, the schedule is active for the job.
Email Upon Error: If selected, Job Manager sends an email message to the specified email address when errors occur during processing.
Email Upon Success: If selected, Job Manager sends an email message to the specified email address when processing completes successfully.
-
Modify the information as necessary and then, in the toolbar, click Save.


