- Contents
Latitude Help
Genesys Cloud Client
The Genesys Cloud client adds Dialer capabilities to Latitude for Genesys Cloud™ users, including campaign and manual dialing. The options available are based on your permissions.

-
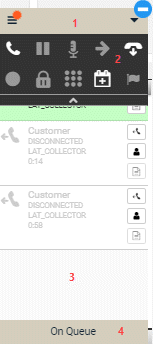
Menu bar: Provides access to two menus of options. For more information, see Client interface in the PureCloud embedded clients in the Genesys Cloud Resource Center.
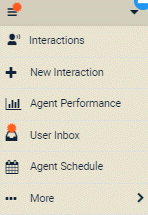
Hamburger menu options
Provides access to tasks, views, and settings. An orange burst indicates that your inbox contains new notifications.


|
Option |
Description |
|
Interactions |
View your active and recently disconnected interactions. For more information, see Interactions in the client menu in the Genesys Cloud Resource Center. |
|
New Interaction |
Place a call, send an email, or send an SMS message. For more information, see New Interaction in the client menu in the Genesys Cloud Resource Center. |
|
Agent Performance |
View your real-time statistics for voice, chat, email, and message interactions. For more information, see View agent performance statistics in the Genesys Cloud Resource Center. |
|
User Inbox |
View your call history, voicemails, evaluations, and work schedule notifications, such as shift trade and time off requests. For more information, see User Inbox in the client menu in the Genesys Cloud Resource Center. |
|
Agent Schedule |
View your work schedule (provided you have the appropriate permissions). For more information, see View your schedule in the Genesys Cloud Resource Center. |
|
More |
Display the next set of menu options. |
|
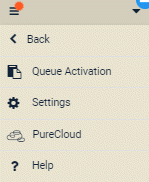
Back |
Display the previous set of menu options. |
|
Queue Activation |
If you have the appropriate permissions in Genesys Cloud, you can view your active and available queues. Active queues are the queues that you receive interactions from when you go on queue. Available queues are the queues that you do not receive interactions from when you go on queue. You can move an active queue to the Available Queues list and you can move an available queue to the Active Queues list. For more information, see Queue activation in the Genesys Cloud Resource Center. |
|
Settings |
View and configure your Genesys Cloud client settings, such as call forwarding and notifications. For more information, see Settings in the client menu in the Genesys Cloud Resource Center. |
|
PureCloud |
Log on to Genesys Cloud, while remaining logged on to Latitude and the Genesys Cloud client. For more information, see PureCloud in the client menu in the Genesys Cloud Resource Center. |
|
Help |
View the documentation for the Genesys Cloud client. Links to Help in the client menu in the Genesys Cloud Resource Center. |
Arrow![]() menu options
menu options
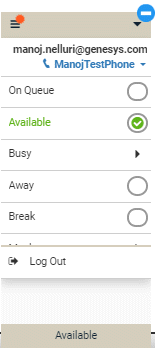
Allows you to change your status, change your phone, or log off the Genesys Cloud client.

|
Option |
Description |
|
Phone |
Specify which phone to use when placing and receiving calls. For more information, see About phones in the PureCloud embedded clients in the Genesys Cloud Resource Center. |
|
Status |
Change your primary (and in some cases, secondary) status. Your ability to receive interactions depends on your status. For more information, see Statuses in the Genesys Cloud Resource Center. Important! |
|
Log Out |
Log off the Genesys Cloud client. For more information, see Log off Genesys Cloud Client. |
-
Call Controls: Displays the call controls that might be available, depending on your permissions and the interaction's current state. For more information, see Call Controls in the Genesys Cloud Resource Center.
|
Icon |
Name |
Description |
|
|
Pickup icon |
Pick up an interaction. |
|
|
Hold icon |
Place a call on hold. |
|
|
Mute icon |
Mute a call. |
|
|
Transfer icon |
Transfer an interaction. |
|
|
Disconnect icon |
Disconnect an interaction. |
|
|
Record icon |
Record a call that you place manually through the interface or the Phones panel. Call recordings are available in the Communication panel in Latitude. For more information, see Play a Call Recording. Note: Call recording starts automatically in campaign dialing. |
|
|
Secure Pause icon |
Pause a call recording. Secure pause prevents the recording of sensitive information, such as a credit card number. Note: Secure pause isn't available for calls that you place manually through the interface or the Phones panel. However, if you used the Record icon to start recording the call, you can stop the recording and then restart it when ready. |
|
|
DTMF icon |
Open the dialpad while on a call to allow you to send DTMF tones to the connected call, select IVR options, or type information such as an account number or credit card number. |
|
|
Schedule Callback icon |
Display the Schedule a callback dialog box to allow you to schedule a callback for ACD voice interactions (call, callback, outbound dialing, and voicemail). |
|
|
Flag Voice Quality Issue icon |
Flag voice interactions (call, callback, outbound dialing, and ACD voicemail) for quality issues such as deteriorated audio, unexpected disconnections, or failed transfers. |
-
Interactions: Displays information about the current interaction, recent interactions, and other notifications. For more information, see Interactions in the client menu in the Genesys Cloud Resource Center.
-
Status bar: Displays your current status. When you click the Status bar, the same options appear as when you click the Arrow
 menu.
menu.
Related Topics


