


- Contents
Interaction Connect Help
Configure Facebook channels
A channel represents a Facebook page. CIC routes visitor posts and direct messages on the selected Facebook page to the selected workgroup.
Note: You must enable Social Media and log on to your Social Media account before you can configure Facebook or Twitter channels.
-
Expand the Facebook section and click Add Facebook Account.
-
Log on to an existing corporate Facebook account.
Note: This is the account that manages your business Facebook page or pages.
Result: A successful logon adds this Facebook account to the Account drop down list.
-
If prompted, authorize the Facebook account to use the GenesysSocialEngagement app.
Note: Authorizing the GenesysSocialEngagement app enables the Genesys hub to route visitor posts and direct messages on the Facebook page to the appropriate workgroup as interactions.
-
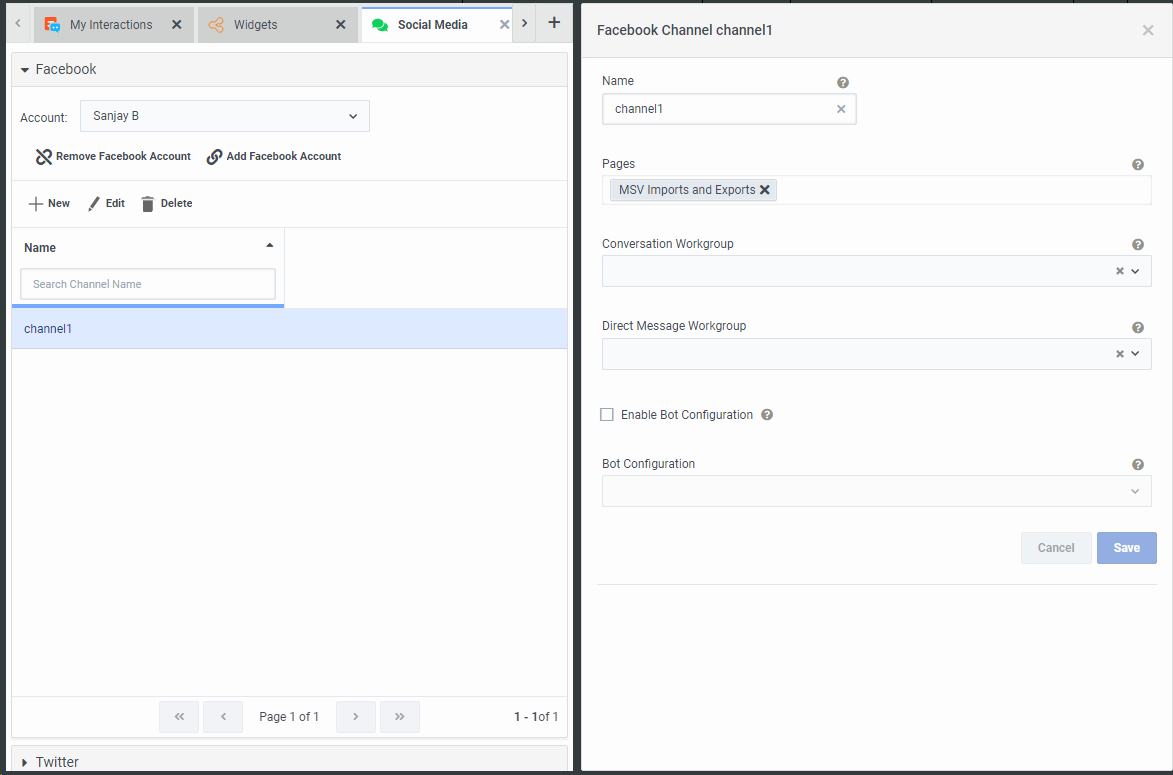
Click New.
-
In Name, type a name for this Facebook channel.
Note: Use this label to organize your Facebook channels.
-
In Pages, select the appropriate corporate Facebook page.
Note: This is the display name of the Facebook page. This selection is limited to the pages administered by the selected Facebook account.
-
Configure either or both of these options:
-
In Conversation Workgroup, select the CIC workgroup to which you want Social Media conversations to be routed.
-
In Direct Message Workgroup select the CIC workgroup to which you want Social Media direct messages to be routed.
Tip: You can select the same or different workgroups for these options. Public conversations and direct messages for one channel can go to different workgroups.
Note: The workgroup must have an ACD queue. CIC routes Social media interactions only to the agents in this workgroup who have the ACD Social Media license. The CIC administrator must also set Utilization options for Social Conversation and Social Direct Message for the workgroup or users.
-
-
To enable bot configurations to incoming Social Media direct messages on a channel:
-
Check the Enable Bot Configuration box.
-
Select appropriate bot from Bot Configuration drop-down list for which bot configurations should be enabled.
-
Note: You must configure a bot from Bot View before you can enable the Bot configuration. (For more information, see Configure a Bot). Once you complete the enabling of bot configuration in social media, update the handlers ‘CustomSocialMediaDirectMessageChatBotRouting.ihd’ and ‘CustomSocialMediaDirectMessagePostChatBotRouting.ihd’ on the IC server for customization and publish handlers.
-
Click Create.
Result: The new Facebook Channel name appears in the Social Media view.
Tip: You can edit or delete the Facebook channel by selecting its label and clicking the appropriate button in the Social Media view.

Related Topics