


- Contents
Interaction Attendant Help
 Configure an Expression Case
An Expression Case is a node that contains defined conditional processing for a parent Selection action. Before you can define case nodes, you must first Configure a Selection Node.
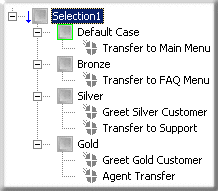
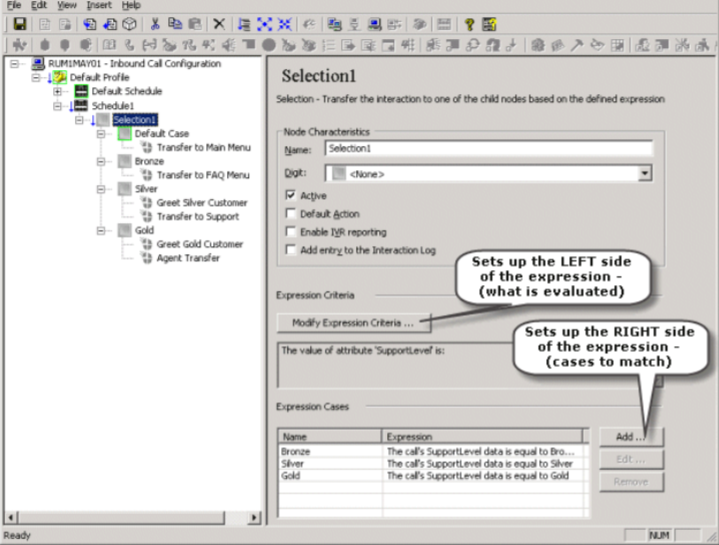
In the tree view, Expression Cases appear as nodes underneath the Selection action. This makes it easy to see all of the available paths that can be taken. In addition, a Default Case appears below the selection node. If all other expression cases evaluate false, routing will take the path below that case. Each case behaves like a multi-action container where actions can be placed underneath, and they are processed in top down order like that of an e-mail profile. Whenever a new selection action is added to the tree view, a default case is added underneath it as well.
|
|
The figure at left shows Expression Case nodes below the Selection action and displays child operations to perform for each possible case. In this example: Default Case: If the value of the attribute is not Bronze, Silver, or Gold, the Default Case expression case is selected, which in this example transfers the interaction to a Main Menu. Bronze: An expression case was created to transfer Bronze interactions to a FAQ menu. Silver: An expression case was created to direct the system to send Silver interactions (in this example, calls) a customized greeting message on their way to the Support queue. Gold: An expression case was created to direct the system to transfer Gold interactions (in this example, calls) to an Agent's queue after first receiving their own custom greeting. |
Configure an Expression Case
-
Set up a Selection node. For instructions, see Configure a Selection Node.
-
Select the newly created selection node and under Expression Cases click Add. The Case Edit dialog opens.
-
Set up the Expression Case:
-
To set up an expression case for Inbound, Outbound, or Operator Configurations:
-
-
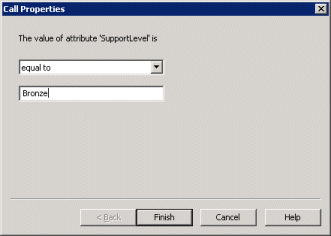
In the Name field, type a meaningful name for the expression case and then click Edit Expression. The Call Properties dialog opens.
-
Click the The value of attribute '[attribute name]' drop down list and select one of the following operators:
-
-
Greater than
-
Greater than or equal to
-
Equal to
-
Less than or equal to
-
Less than
-
Before (applies to data/time criteria only)
-
After (applies to data/time criteria only)
-
-
In the field below the The value of attribute '[attribute name]' drop down list, enter a value against which to compare the expression criteria (in the example above: Bronze, Silver, or Gold). Click Finish.
-
-
To set up an expression case for E-mail Configurations:
-
-
In the Name field, type a meaningful name for the expression case and then click Edit Expression. The Email Conditions dialog opens.
-
In the Select condition(s) area, select one or more criteria to apply to the expression.
-
In the Edit the rule description (Click an underlined value) area, click the hyperlink(s) associated with each rule to specify how the e-mail is evaluated upon arrival.
-
-
Note: The next dialog box to appear will differ, depending on the criteria you select. For example, if you select the marked with importance condition check box, "and marked with specific importance" appears in the Edit the rule description area, and the word "specific" contains a hyperlink. When you click the specific hyperlink, the Importance Level dialog opens, and you can specify the degree of importance to place on the e-mail.
-
-
-
Configure each rule description and then click OK to close the Email Conditions dialog.
-
-
-
Click OK to close the Case Edit dialog.
-
To define additional cases, click the Selection node, and then click Add. You can only create case nodes by clicking Add on the selection node form view. Interaction Attendant does not contain a toolbar or menu item for adding case nodes.
-
Select an expression case and use the toolbar or Insert menu to add an operation node that determines what action each branch should take if an interaction meets the case criteria. Repeat this procedure for each expression case. In the following example, Play Audio, Menu Transfer, and Agent Transfer nodes were added.
-
Place a check mark in any Node Characteristics that apply:
|
Checkbox |
Description |
|
Active |
By default, this field contains a check mark, which means the form is "on", or "active" and Interaction Attendant will process them. If you un-check a form's Active check box, the name of the form turns gray in the tree to indicate that the form is inactive. Interaction Attendant and its handlers will ignore the form and its children. Leave the box unchecked to save a configuration that you are testing. Inactive forms are unavailable to interactions |
|
Default Action |
At any given level in the tree structure, one node can be marked as the default action. The operation defined by the default node is performed if callers do not press a key within the timeout period specified by that menu. The icon for default forms has a green border in the tree structure. Any node below a menu or schedule can be marked as the default action, by checking the form's default action check box. Note: The Default Action check box is not available for e-mail interactions, and does not appear in E-mail Configuration files. |
|
Enable IVR Reporting |
This option determines whether or not reporting data will be collected when control passes through this node. Several IVR Reports summarize this information. IVR Reporting is disabled by default. Place a check mark in this box to capture the date, time and duration of time that the interaction remained in the node and its children. This option is hidden when Attendant is connected to a server that does not have reporting installed. For more information about this feature, see IVR Reporting Option. |
|
Add entry to the Interaction log |
When this option is enabled, information about this node is appended to the interaction's Interaction Log when the interaction enters this node. This helps track the path that an interaction took through Attendant. The Interaction Log is maintained for reporting purposes. See View the Interaction Log for details. |
|
Configure Screen Recognition button |
Select this button to configure words or phrases that can be associated with menu options. Callers can verbally indicate the options they want in the IVR instead of pressing a digit on the phone. You can enter multiple words and phrases for each menu item, just as callers may phrase the same request in different ways. For example, "transfer funds" or "funds transfer". See Working with Speech Recognition for details. |
Related Topics