


- Contents
Interaction Attendant Help
 Configure a Selection Node
A Selection action branches on condition after evaluating one or more expression cases. This action is similar to a Logical Transfer, but is easier to set up when multiple expression cases must be evaluated. Selection nodes are easier to understand because there are no jumps to other nodes in the tree view. The Selection action works like a C++ switch statement, or a Visual Basic Select Case statement, if you are familiar with programming concepts.
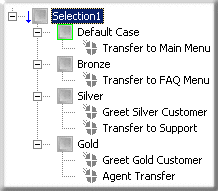
For example, a company which offers three levels of technical support (Bronze, Silver, or Gold) could store an interaction's support level in an attribute, and later use a Selection node to examine the value of that attribute to take different actions.
|
|
The figure at left shows Expression Case nodes below the Selection action and displays child operations to perform for each possible case. In this example: Default Case: If the value of the attribute is not Bronze, Silver, or Gold, the Default Case expression case is selected, which in this example transfers the interaction to a Main Menu. Bronze: An expression case was created to transfer Bronze interactions to a FAQ menu. Silver: An expression case was created to direct the system to send Silver interactions (in this example, calls) a customized greeting message on their way to the Support queue. Gold: An expression case was created to direct the system to transfer Gold interactions (in this example, calls) to an Agent's queue after first receiving their own custom greeting. |
Selection actions make it easy to set up multiple branches based upon evaluation of flexible expression criteria.
Configure a Selection Node
-
Add a Selection node. In the Name field, type a meaningful name for the selection action.
-
Click the Digit drop down list and select a number to assign to the selection action. This is the key that callers press to select the menu entry. When you assign a digit, the only available digits are those that are not already in use at this level of the tree. If you do not assign a digit, callers cannot invoke the operation directly.
Note: The Digit drop down list is not available for e-mail interactions, and does not appear in E-mail Configuration files.
-
Place a check mark in any Node Characteristics that apply:
|
Checkbox |
Description |
|
Active |
By default, this field contains a check mark, which means the form is "on", or "active" and Interaction Attendant will process them. If you un-check a form's Active check box, the name of the form turns gray in the tree to indicate that the form is inactive. Interaction Attendant and its handlers will ignore the form and its children. Leave the box unchecked to save a configuration that you are testing. Inactive forms are unavailable to interactions |
|
Default Action |
At any given level in the tree structure, one node can be marked as the default action. The operation defined by the default node is performed if callers do not press a key within the timeout period specified by that menu. The icon for default forms has a green border in the tree structure. Any node below a menu or schedule can be marked as the default action, by checking the form's default action check box. Note: The Default Action check box is not available for e-mail interactions, and does not appear in E-mail Configuration files. |
|
Enable IVR Reporting |
This option determines whether or not reporting data will be collected when control passes through this node. Several IVR Reports summarize this information. IVR Reporting is disabled by default. Place a check mark in this box to capture the date, time and duration of time that the interaction remained in the node and its children. This option is hidden when Attendant is connected to a server that does not have reporting installed. For more information about this feature, see IVR Reporting Option. |
|
Add entry to the Interaction log |
When this option is enabled, information about this node is appended to the interaction's Interaction Log when the interaction enters this node. This helps track the path that an interaction took through Attendant. The Interaction Log is maintained for reporting purposes. See View the Interaction Log for details. |
|
Configure Screen Recognition button |
Select this button to configure words or phrases that can be associated with menu options. Callers can verbally indicate the options they want in the IVR instead of pressing a digit on the phone. You can enter multiple words and phrases for each menu item, just as callers may phrase the same request in different ways. For example, "transfer funds" or "funds transfer". See Add Speech Recognition keywords or phrases to Inbound Call Operations. |
-
For Inbound, Outbound, or Operator calls only, set up the expression criteria:
-
Click Create Expression Criteria to set up the left hand of the expression, or what is evaluated. The Expression Type Wizard opens. You can create an expression using the following data types:
-
-
-
Data previously entered by the caller
-
Data about the current call
-
The current time
-
Data about a particular workgroup (ACD or Custom)
-
Data from a database
-
-
Select a data type. Then click Next or Finish based on the options available for the data type selected. You may be prompted to select or enter specific data. For example, if you select Data about the current call, you must click Next to specify the name of a call attribute (see the following figure). Conversely, if you select The current time, you can click Finish immediately since no additional information must be supplied.
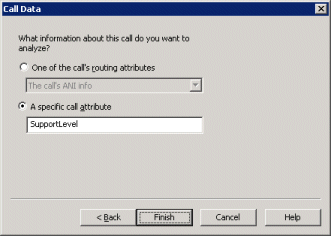
The Call Data dialog opens when you select Data about the current call.
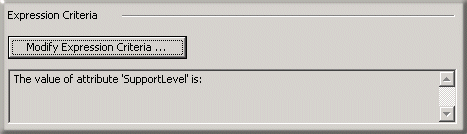
Note: The resulting Expression Criteria will appear as read-only text. Note that the Selection node is in error until valid expression criteria is defined.
-
The next step is to add expression cases. For instructions, see Configure an Expression Case.
Related Topics