


- Contents
Interaction Attendant Help
 Multi-Action Container
In general, Attendant forms execute without much caller intervention, in the order specified by the design. However, when the Attendant tree is sorted, the nodes that execute as a block are often separated, making it difficult to visually analyze a process. To avoid this problem, you can group nodes for a related process below a Multi-Action operation.
A Multi-Action node groups related steps of a process together, to create a call flow routine.
A Multi-Action node does not perform any actions itself. It is a container for other nodes that do perform actions. For instance, a common situation in Attendant is to prompt a user for his/her account number and then to look up a value in a database. This requires several steps (User Data Entry, DB Query, Menu, etc.) to implement.
In this example, steps can be grouped together to create a meta-node of sorts, by placing them below a Multi-Action node named "Get Account Data". This makes the call flow easier to inspect, since all nodes for the process remain together, regardless of sort order. Multi-Action nodes encapsulate other nodes into routines that are easier to understand and inspect in the tree view. Multi-Action nodes also provide an intermediate level of IVR reporting capability.
Since the children of a Multi-Action node are not sorted, you may arrange them in the order of execution, or in any other order, and they will stay in that visual order when the tree is sorted. However, the execution order of nodes is still controlled by the flow specified in each node's Action When Finished. The actions attached to a Multi-Action node can be sequentially. See How to Run Actions Sequentially below.
Multi-Action nodes work like folders to group other nodes together. They are implemented like menu nodes, but provide fewer configuration options. Each Multi-Action node is an organizational device only and as such it has few configurable options. Functionality is limited to optional call logging, IVR reporting, and prompt playback.
The behavior of child nodes in a Multi-Action node is slightly modified. Child nodes cannot be assigned a digit, since the Multi-Action node itself is assigned a digit. The Multi-Action node may be flagged as a default action for sibling nodes in the tree.
Important: You must check "Default Action" for one child of a Multi-Action node. Otherwise, the Multi-Action node will be marked in error, as the routine lacks an entry point.
Node Characteristics frame
Options in this frame name the node, assign the digit used to select it, and establish whether or not it is active, used by default, logged, or tracked for reporting purposes.
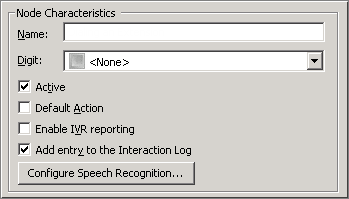
Name field
The label you enter here becomes the name of the node in the tree structure.
Digit list box
Use this list to select the key that callers press to enter a caller data entry operation. When you assign a digit, the list displays only available digits—those that are not already in use at this level of the tree. If no digit is assigned, callers cannot invoke the operation directly. It is possible to create menu options that are invoked by a routing process, rather than by a user selection. For details, see invoke a menu operation automatically.
Active check box
By default, forms are "on", or "active", which means that Interaction Attendant will process them. If you uncheck a form's Active check box, the name of the node turns gray in the tree to indicate that the form is inactive. Interaction Attendant and its handlers will thereafter ignore the form and its children. Use this feature to save a configuration that you are testing. Inactive forms are invisible to callers. When a node is inactive, it appears grayed out in the tree view.
Default Action check box
At any given "level" in the tree structure, one node can be marked as the default action. The operation defined by the default node is performed if the caller does not press a key within the timeout period specified by that menu. The icon for default forms has a green border in the tree structure. Any node below a menu or schedule can be marked as the default action, by checking the form's default action check box.
Enable IVR Reporting
This option determines whether or not reporting data will be collected when control passes through this node. Several IVR Reports summarize this information. IVR Reporting is disabled by default. Enable it to capture the date, time and duration of time that the call remained in the node and its children. This option is hidden when Attendant is connected to a server that does not have reporting installed. For more information about this feature, see IVR Reporting Option.
Add entry to the Interaction Log
When this option is enabled, information about this node is appended to the call's Interaction Log when the call enters this node. This helps track the path that a call took through Attendant. The Interaction Log is maintained for reporting purposes. See View the Interaction Log for details.
Configure Speech Recognition... button
Select this button to configure words or phrases that can be associated with menu options. Callers can verbally indicate the options they want in the IVR instead of pressing a digit on the phone. You can enter multiple words and phrases for each menu item, just as callers may phrase the same request in different ways. For example, "transfer funds" or "funds transfer". See Add Speech Recognition keywords or phrases to Inbound Call Operations.
Audio File frame
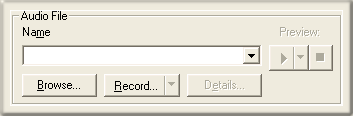
Controls in this frame set a prompt to play when control is passed to this node. If you do not select or record a prompt using the embedded audio controls, no voice prompting will occur. See manage voice prompts for details.
How to Run Actions Sequentially
As mentioned above, the execution order of nodes is controlled by the flow specified in each node's Action When Finished frame. When an operation is attached to a Multi-Action node, an additional flow-of-control option appears in the form's Action When Finished frame. Jump to the next node in this container passes control to the node below the current node, in top-down order. This makes it easy to configure sequential operations, and bypasses the need to navigate the Jump to a custom location combo box. Attendant will pass control to the next node without requiring input from the user.
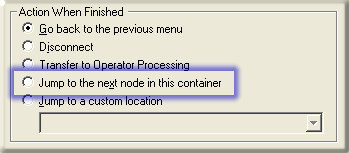
The basic rules are:
-
If "Jump to the next node" is selected and it is the last node in the container, Attendant considers the configuration to be invalid. It displays an error indicator next to the node in the tree view.
-
If "Jump to the next node" is selected and the node is copied or dragged out of the container, the Action When Finished selection reverts back to the default "Go back to the previous menu".