


- Contents
Interaction Process Automation Designer Help
Select
Use Select to make the process branch depending on which of several possible values a variable has. For example, suppose that customer accounts are categorized as class 1, 2, or 3 depending on their business value to your organization. You might want a process to handle class 1 customers differently from those in class 2, and handle class 2 customers differently from those in class 3. IPA Designer could use the Select action to make the process branch depending on the value of the AccountClass variable:
-
If AccountClass = 1, then do this.
-
If AccountClass = 2, then do that.
-
If AccountClass = 3, then do something else.
-
f AccountClass equals none of the values you listed, then do another thing.
Note: One important difference between the Decision and Select actions is that a Decision action can make your process branch if a value is in a given range. On the other hand, the Select action requires specific values and cannot work with ranges of values. For example, you could tell a Decision action to do something if a person's credit score was above 700. With a Select action, however, you would need to give the action specific values for each case: do one thing if a person's credit score is 701, another if a person's credit score is 557, and so forth. Therefore, if you need to make a task branch based on ranges of values, you are better off using a Decision action.
To add this action to a task:
-
Drag the action from the Toolbox to the desired location in the workspace.
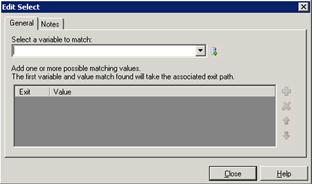
IPA Designer displays the Edit Select dialog box (see figure).
-
In the Select a variable to match list, select the variable that the Select action should use.
Tip: To create a new variable on the fly, click the  icon at the right end of the list box.
-
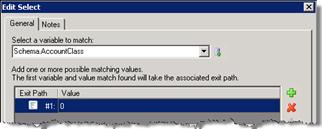
To add a value for one of the cases, click Plus
 to the right of the Exit | Value row.
IPA Designer adds a row for the value (see figure).
-
Double-click the new row in the Value column, type the value for the first case, and press Enter.
IPA Designer adds the value for the first case of the Select action. -
Repeat steps 3-4 to add more values as needed.
-
If you need to delete a value, click its row and then click the Delete icon.
-
If you need to edit a value, double-click the Value column of the desired row, make any desired changes, and then press Enter.
-
Click Close.
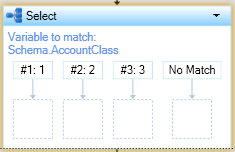
IPA Designer will display a diagram showing a separate action path under each of the values you added to the list (see figure). The process will follow the action path under the value that the Select statement found in the variable.
-
For each value, drag the desired action to the box under it.
The process will do this action if and only if the variable matches the value above the action. -
Under the "No Match" path, drag an action that the process should execute if the variable doesn't match any of the values in the Select action.