


- Contents
Interaction Supervisor Help
Agent Details view
Summary
The Agent Details view summarizes the activity of a single agent, for a single workgroup, or for all workgroups that the agent has membership in. This view displays Agent Statistics for the current period, previous period, current shift and previous shift, in a single expander control.

Statistics pertain to time in a workgroup or a user interaction, and not overall time in the system. The time an interaction was in IVR for example, is not counted. Once the view is created, you can select a different agent, or other workgroups that the selected agent is participating in.
Add this view
-
If necessary, start IC Business Manager and log on.
-
In IC Business Manager, select a workspace from the Workspaces menu, or create a new workspace to host the view.
-
Select New > View from the File menu. The Create New View dialog appears, listing views by category or product. Licensing and station rights determine the availability of selections.
-
Select Categories from the Group By drop list.
-
In the Categories list, select Agents and Workgroups.
-
Select Agent Details in the list of views on the right.
-
Click OK. The Select Agent page of the Agent Details Wizard appears.
-
Select the name of an agent. You may need to type a name in the Filter box. When more than 20 agents exist in the system, only the first 20 are shown, and an indicator (
 )
informs that more agent names are available.
)
informs that more agent names are available.
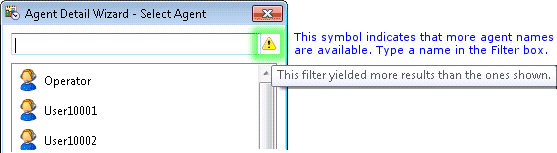
In that case, typing an agent's name in the Filter box locates the agent. When fewer than 20 agents exist in the system, the filter box is not displayed. Only agents that are members of at least one workgroup appear in this list.
Once you select an agent, his or her name appears in the Agent box under Selected Parameters. This helps verify the current selection. Note that Workgroup appears in that section as read-only text. Workgroups are selected on the next wizard page. -
Click Next to Proceed. The Select Workgroup page of the Agent Details Wizard appears.
-
The Select Workgroup page prompts whether to select statistics for a single workgroup, or for the agent's activity in all workgroups. Click to select a workgroup by name, or select [All] for all workgroups the agent is a member of. Optionally use the Filter box to locate specific workgroups by typing all or part of a workgroup name.
Once you make a selection, the workgroup name (or [All]) appears in the Workgroup box under Selected Parameters. This helps verify your selection. -
Click Finish. The view appears, showing statistics for the selected agent and workgroup.
Change statistics in this view
-
Right-click anywhere in the view to open a shortcut menu.
-
Select Add/Remove Statistics… from the menu. The Interval and Queue Statistic Selection dialog appears. This dialog selects which time intervals and statistics will appear in the view.
-
Options in the Interval frame manage time periods reported in the view. The list on the left contains items that are not currently included in the view. The list on the right contains items to include in the view.
-
Select periods in the list on the left. Then click Add to move them to the other list. Add All selects all items for inclusion.
-
Use Move Up and Move Down buttons to optionally change the display order of columns in the view.
-
To exclude periods from the view, select items in the list on the right. Then click Remove. The Remove All button excludes all time periods from the view, but at least one must be included.
-
Options in the Queue Statistics frame manage statistics reported in the view. The list on the left contains items that are not currently included in the view. The list on the right contains items to include in the view.
-
Select statistics in the list on the left. Then click Add to move them to the other list. Add All selects all items for inclusion.
-
Use Move Up and Move Down buttons to optionally change the display order of rows in the view.
-
To exclude statistics from the view, select items in the list on the right. Then click Remove. The Remove All button excludes all statistics from the view, but at least one must be included.
-
Click OK when you are finished.
Shortcut Menu Commands
Right-click any statistic in the view to display shortcut menu commands. The menu options are:
Edit Alerts…
Opens dialog for adding or changing the parameters of alerts. This menu option is enabled when the shortcut menu is opened by right-clicking on a statistic.
Add/Remove statistics…
Opens the Interval and Queue Statistic Selection dialog is presented, so that the user can pick and choose statistics to display in the view.
Remove > column
Removes a column from the view.
Remove > entire row
Removes a row from the view.
Display Help for a statistic
-
Right-click the statistic to display the shortcut menu.
-
Select Help. The description of the statistic appears in the Statistic Help dialog.
Set Alerts
See Manage Alerts.