


- Contents
Interaction Dialer Manager Help
Add a Time Zone Map data set
-
At the Home screen, click Timezone Map Data.
-
Click the Add button. An entry temporarily named New Item will appear.
-
Edit the Name field to give the data set a more descriptive name. This name can be anything you like. It can contain spaces and special characters.
-
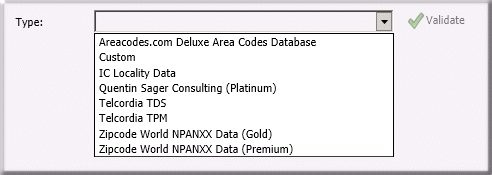
Select a third-party data set from the Type drop list, or choose Custom if you have created your own zone mapping data set in accordance with the open data set format.
-
Selecting an existing file from the Data File drop list, or click Upload New to locate and upload a file that has not been used before. If you selected IC Locality Data in the previous step, you do not need to upload a file, or select an existing one.
-
Use the Priority control to prioritize entries. Entries with lowest numbers are evaluated first.
-
Click Validate to ensure that the file type matches the format of the specified data file. Dialer will attempt to read 100 records from the specified file and validate them for conformity with the format of the specified file type. The file is not exhaustively checked – just enough to verify that the file is basically correct. (Dialer displays a message to indicate the test result.)
-
Click Save.
NOTE: After a Zone Set is assigned to a campaign, and time zone mapping is enabled for the campaign, Dialer will use this data set to look up the time zone associated with each phone number in the campaign's contact list, ensuring that calls are dialed only at appropriate times of day.
Related Topics