


- Contents
Interaction Attendant Help
 Set Attribute
Telephones calls (and other objects in CIC) can have attributes assigned to them. An attribute is a piece of information about an object that travels with it throughout Customer Interaction Center. For example, one attribute of a call object is the telephone number of the person who placed the call. Each attribute is a name/value pair. To set an attribute, specify its name and a string value you wish to assign to the attribute.
The Set Attribute operation can assign a value to any attribute, including attributes that are reserved for use by important handlers in the Customer Interaction Center. If you modify a reserved attribute, you can adversely affect the performance or reliability of the server, so you should set attributes carefully.
The Interaction Attributes Technical Reference reports attributes that are reserved by CIC, including those which should not be changed.
Node Characteristics frame
Options in this frame name the node, assign the digit used to select it, and establish whether or not it is active, used by default, logged, or tracked for reporting purposes.
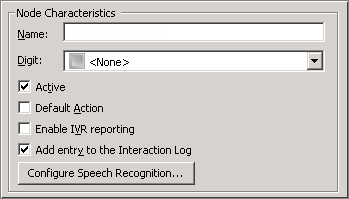
Name field
The label you enter here becomes the name of the node in the tree structure.
Digit list box
Use this list to select the key that callers press to enter a caller data entry operation. When you assign a digit, the list displays only available digits—those that are not already in use at this level of the tree. If no digit is assigned, callers cannot invoke the operation directly. It is possible to create menu options that are invoked by a routing process, rather than by a user selection. For details, see invoke a menu operation automatically.
Active check box
By default, forms are "on", or "active", which means that Interaction Attendant will process them. If you uncheck a form's Active check box, the name of the node turns gray in the tree to indicate that the form is inactive. Interaction Attendant and its handlers will thereafter ignore the form and its children. Use this feature to save a configuration that you are testing. Inactive forms are invisible to callers. When a node is inactive, it appears grayed out in the tree view.
Default Action check box
At any given "level" in the tree structure, one node can be marked as the default action. The operation defined by the default node is performed if the caller does not press a key within the timeout period specified by that menu. The icon for default forms has a green border in the tree structure. Any node below a menu or schedule can be marked as the default action, by checking the form's default action check box.
Enable IVR Reporting
This option determines whether or not reporting data will be collected when control passes through this node. Several IVR Reports summarize this information. IVR Reporting is disabled by default. Enable it to capture the date, time and duration of time that the call remained in the node and its children. This option is hidden when Attendant is connected to a server that does not have reporting installed. For more information about this feature, see IVR Reporting Option.
Add entry to the Interaction Log
When this option is enabled, information about this node is appended to the call's Interaction Log when the call enters this node. This helps track the path that a call took through Attendant. The Interaction Log is maintained for reporting purposes. See View the Interaction Log for details.
Configure Speech Recognition... button
Select this button to configure words or phrases that can be associated with menu options. Callers can verbally indicate the options they want in the IVR instead of pressing a digit on the phone. You can enter multiple words and phrases for each menu item, just as callers may phrase the same request in different ways. For example, "transfer funds" or "funds transfer". See Add Speech Recognition keywords or phrases to Inbound Call Operations.
Attribute and Value fields
These fields identify the attribute to set, and assign a value to it.

Attribute text box
Type the name of the attribute in this text box. This name can be anything you like, or it can be the name of a reserved attribute. For more information about attributes, refer to the Interaction Attributes Technical Reference located in the PureConnect Documentation Library.
Value
Type the text you wish to assign to the attribute in this field. This can be anything you like. For example, "This interaction was processed by Attendant."
Tips for Advanced Users
Some reserved attributes allow you to organize and manage characteristics
appropriate for specific interactions. For example, you can specify
which workgroups or agents receive an interaction, you can combine skills
to create a unique skill set, you can assign priority value for interactions
sent to a workgroup, and you can define an external telephone number to
which designated interactions are sent.
-
Eic_AttDynamicWorkgroupName. Use this attribute to organize multiple workgroups. For example, you can define your workgroups by area of expertise, such as web service calls or custom handler calls.
-
Eic_AttDynamicWorkgroupSkills. Defines a skill set based on two or more defined skills. The skills designated in this attribute must be separated using the pipe-delimited format. For example, if you want to specify that agents assigned to this interaction attribute contain multiple language skills, enter the value for this attribute as “Spanish|French|Norweigian”.
-
Eic_AttDynamicWorkgroupPriority. Assigns priority value for interactions specified for a specific workgroup.
-
Eic_AttDynamicAgentName. Specifies the agent or user to which specific interactions are sent.
-
Eic_AttDynamicExternalNumber. Defines the external telephone number to which designated interactions are transferred.
In addition, since the handler that supports Set Attribute
node processes values through the ReplaceAttributes tool before it sets
the target attribute, the Set Attribute node can be used to assign one
attribute value to another, or to insert the value of an attribute along
with a string literal. The syntax for inserting an attribute value is
"$(attributename)".
To copy one attribute value into another:
Attribute name: SOME_ATTRIB
Value: $(SOME_OTHER_ATTRIB)
To copy literal text and an attribute value into another attribute:
Attribute name: SOME_ATTRIB
Value: The phone number is $(SOME_OTHER_ATTRIB)
Action When Finished frame
These options set the processing that occurs after the operation completes successfully, when flow of control leaves the node. You can return control to the previous menu, disconnect the call, transfer to an operator profile, or jump to any node or action that has been defined for the current server.

Go back to previous menu
This option returns control to the parent menu. This sets up a simple loop that "reruns" the menu from the top.
Disconnect
This option disconnects the call when the data entry operation is completed successfully.
Transfer to Operator Processing
Transfers the call for evaluation by operator profiles defined for this server.
Jump to Next Node
This choice is available when the parent node is a Multi-Action Container. It continues processing at the next node in the container.
Jump to a custom location
This option allows you to jump to any profile, schedule, menu, or operation that is defined for the current server.