


- Contents
Maintain an Account Phone Number
Use the Edit Phone dialog box to add or modify phone numbers associated to an account. You can only modify phone number information if:
-
You just added the phone number.
-
You haven't refreshed the account in the Work Form.
-
You haven't added a contact attempt to the phone number.
Note: In Latitude versions 8.0 and later, if you modify a phone number, the system doesn't remove it from Latitude. Instead, it moves it to the Phone panel and changes the status to "bad."
To maintain an account phone number
-
With an account displayed in the Work Form, do one of the following:
-
In the Debtor section, click the tab for the debtor or co-debtor to modify and then click in the Home or Work box.
-
From the Info menu, click Phones. In the Phones panel, click Add Phone or click the Edit
 icon.
icon. -
In the Panels section of the Work Form, click the name of the currently displayed panel (for example, Notes, Nearbys) and then click Phones. In the Phones panel, click Add Phone or click the Edit
icon.
The Edit Phone dialog box appears.
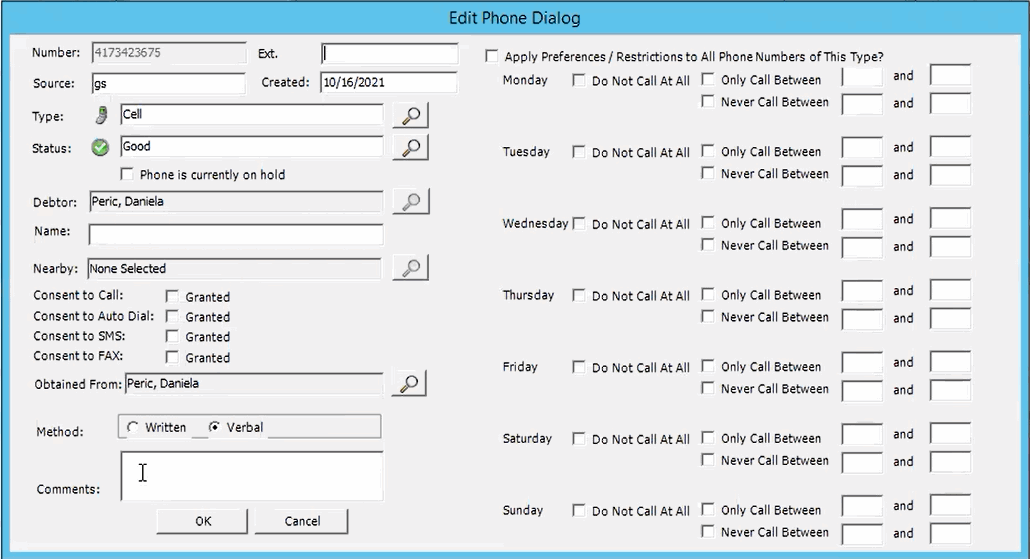
Number: Phone number associated to the account.
Ext.: Phone number extension.
Source: Typically indicates the user who added or modified the phone number. If the box contains Conversion, the system converted the number from a previous version of Latitude. If the box contains "ServiceName," the system imported the number from a vendor.
Created: Date you added the phone number to Latitude.
Type: If the type is cell, fax, spouse home, or spouse work, the phone number appears in the Phone panel only.
Status: Status of the phone number (for example, good, bad, unknown).
Phone is currently on hold: If selected, indicates that the phone number is temporarily unavailable.
Name: Description for the number.
Nearby: Name of the person associated to the debtor, such as a relative, friend, neighbor, boss, coworker, or employer.
Consent To Call: If selected, the person granted permission to call this phone number.
Consent To Auto Dial: If selected, the person granted permission to call this phone number using a dialer campaign.
Consent To SMS: If selected, the person granted permission to send a text message to this phone number.
Consent to fax: If selected, the person granted permission to send a fax to this phone number.
Obtained From: Person who granted or denied permission to contact this phone number.
Method: Indicates whether the person granted permission verbally or in writing.
Comment: More information regarding the phone number.
Apply Preferences/Restrictions to all Phone Numbers of this Type?: If selected, preferred day and time to call can be captured for phone numbers of this type.
-
Modify the information as necessary.
-
To select a different phone type, do the following:
-
Click the Search icon next to the Type box. The Select Phone Type dialog box appears.

-
In the Find box, type the phone type, and then press Enter. The search results appear in the list box.
-
Click the phone type and then click Open. The phone type appears in the Edit Phone dialog box.
-
To change the status, do the following:
-
Click the Search icon next to the Status box. The Select Phone Status dialog box appears.

-
In the Find box, type the phone status, and then press Enter. The search results appear in the list box.
-
Click the phone status and then click Open. The phone status appears in the Edit Phone dialog box.
Note: If you change the status to bad, the phone number doesn't appear on the Debtor tab.
-
To change the debtor associated to the phone number, do the following:
-
Click the Search icon next to the Debtor box. The Select Debtor dialog box appears.

-
In the Find box, type the debtor's name and then press Enter. The search results appear in the list box.
-
Click the debtor and then click Open. The debtor appears in the Edit Phone dialog box.
-
To add a nearby contact person, do the following:
-
Click the Search icon next to the Nearby box. The Select Nearby Contact dialog box appears.

-
Click Add New. The Edit Nearby dialog box appears.
-
Complete the information and then click OK. The nearby contact's name appears in the Edit Phone dialog box.
-
To change the nearby contact person, do the following:
-
Click the Search icon next to the Nearby box. The Select Nearby Contact dialog box appears.
-
In the Find box, type the contact name and then press Enter. The search results appear in the list box.
-
Click the contact name and then click Open. The nearby contact name appears in the Edit Phone dialog box.
-
When finished updating the information, click OK.
Related Topics
View Phone Numbers Associated to an Account