- Contents
Specify the Import Settings
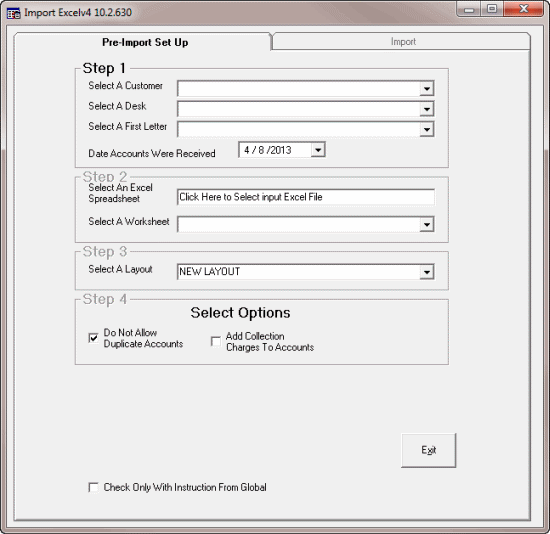
Use the Pre-Import Set Up tab in the Import Excel window to specify the settings for importing new accounts from a Microsoft Excel spreadsheet into Latitude. The spreadsheet contains one or more worksheets. You can only import one worksheet at a time. You obtain the spreadsheet from your customer or other account information provider. Save the file to a location you can access from your workstation.
To specify the import settings
-
In the Main Menu window, from the Apps menu, click Import Excel. The Import Excel window appears.

-
In the Select a Customer list box, click the customer for whom to import new accounts.
-
In the Select a Desk list box, click the desk to assign to the accounts. We recommend that you import accounts into an inventory desk for pre-collection activities (such as generating credit reports) and then distribute the accounts to collectors using the Desk Mover tool.
-
In the Select a First Letter list box, click the first letter to request for the imported accounts. After generating the letter requests, they are available for printing using Letter Console.
Note: The system generates letters for the primary debtor only. To generate letters for co-debtors, use Letter Requester.
-
In the Date Accounts Were Received list box, click the date you received the accounts.
-
In the Select an Excel Spreadsheet box, do the following:
-
Click in the box. The Open dialog box appears.
-
Click the Microsoft Excel file or comma-separated value (CSV) file to import and then click Open. The system populates the Select an Excel Spreadsheet box with the path and file name. The system populates the Select a Worksheet list box with the worksheets contained in the spreadsheet.
-
In the Select a Worksheet list box, click the worksheet to import.
-
In the Select a Layout list box, click the file layout to use. If you are importing new business for the first time for this customer, leave the default value of New Layout selected. If you imported new business for this customer previously and the layout hasn't changed, choose the saved layout.
-
If you don't want to import duplicate accounts, leave the Do Not Allow Duplicate Accounts check box selected.
-
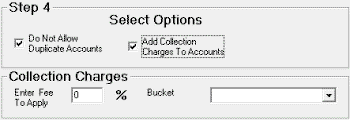
If you want to add collection charges to accounts when importing the accounts, do the following:
-
Select the Add Collection Charges to Accounts check box. The Collection Charges section appears.

-
In the Enter Fee To Apply box, type the collection fee percent to apply to the accounts.
-
To select a money bucket to store the fees, in the Bucket list box, click the money bucket.
The system creates a DAR (increasing adjustments) batch for the accounts that your agency can process, which increases the debtor's balance accordingly.
-
You are ready to map the worksheet to the Latitude database. For more information, see Map the Import Worksheet.


