- Contents
Interaction Connect Help
Response Management View
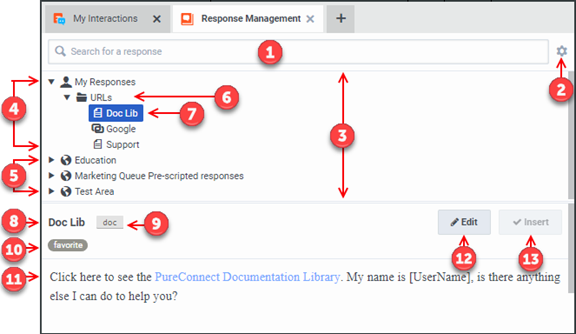
You can use the Response Management view to search for stored responses during any interaction. You can insert these responses in a chat response, email reply, or interaction notes. You can relay the information verbally during a call.
You can add the Response Management view to the CIC client. You can use the view anytime you have an active and selected interaction. For more information, see Using Response Management.
To display the Response Management view:
-
Click the Add View icon (plus sign) next to any tab.
-
Click Show All Views.
-
In the Add Views dialog box, in the Interactions column, select Response Management.
-
Click the Add View button.

Note: The Response management upload file for the POST request (Interaction Center Web Services (ICWS) (genesys.com), is now encoded and encrypted to address security issues (which are limited to an internal customer network) that involve uploading different files to different locations in CIC server by changing the response.
|
1 |
Search |
To locate a response, use the full-text Search for a response box. For more information, see Search for a Response. Note: This full-text search tool uses the information in Name, Shortcut, and Labels along with the response item’s content to find a response. |
|
2 |
Configure My Responses |
Click this tool to open the Response Management Editor. You can create, edit and delete your personal responses. |
|
3 |
Navigation Pane |
To locate a particular response, click anywhere in this hierarchical view, expanding categories as needed. Both your personal and system-wide response items and categories appear in this tree view. |
|
4 |
My Responses |
This folder contains your collection of personal responses. It can be organized into categories. Note: You cannot create personal responses in the current release of Interaction Connect. However, you can create personal responses in another CIC client, such as Interaction Desktop, and use these responses in Interaction Connect. For more information about creating personal responses, see the help in whichever alternative CIC client you use to create personal responses. |
|
5 |
System-wide Responses |
Your CIC administrator can create libraries of standard responses that all or selected CIC client users can use. Requirement: You need the appropriate Response Management View Access Control Right to use any of the system-wide response items. |
|
6 |
Category |
Categories are folders or collections of response items. An arrow indicates a category name. |
|
7 |
Selected item |
The selected response item is highlighted. |
|
8 |
Name |
This is the name of the selected response item. This name does not have to be unique. It can default to the first few characters of a message or a file’s directory path. |
|
9 |
You can type the shortcut and press Ctrl+Space to insert the response item in a chat or email reply. |
|
|
10 |
Labels |
Labels provide more search terms. |
|
11 |
Preview Pane |
The preview pane displays an HTML preview of a selected item's text or the directory path and file name of a selected file. |
|
12 |
Edit |
Click the Edit control to open the item in the Response Management Editor and make any necessary changes. |
|
13 |
Insert |
Click Insert to use selected item in an active and selected chat or email. |
Related Topics


