- Contents
Interaction Connect Help
Widgets Plugins Configuration
Requirements: See Widgets.
The Plugins page of the Widgets view has settings specific to each type of widget. To configure a specific type of widget, set the appropriate toggle switch to ON and expand the corresponding section of the Plugins page.
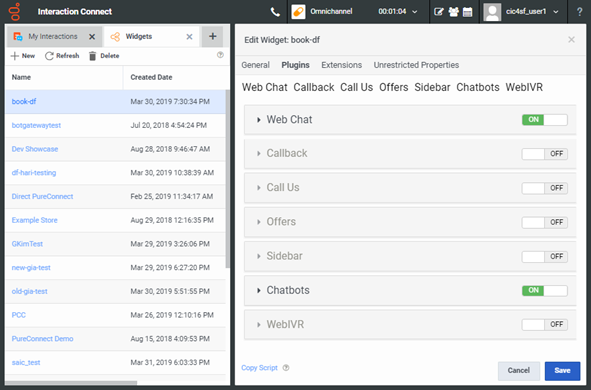
Expand the following configuration instructions for each type of plugin.
Widgets and the Sidebar
To enable the Callback, Call Us, or Offers widgets you must also add them to the Sidebar. Or you must add some JavaScript code to your website that tells the CXBus to open those widgets.
Examples:
- To open the Callback widget, use: window.CXBus.command(“Callback.open”)
- To open the CallUs Widget, use: window.CXBus.command(“CallUs.open”)
- To open the Offers window, use CXBus.command(“Offers.open”)
These commands could be tied to a button press or a timer. If, for instance, you want an offer to just appear for the customer. Using JavaScript code is really an advanced scenario, but gives you better control over when the widget should appear.
Possible Display Issue
If you use the Sidebar and position it Right and also enable the Chat button in the Web Chat widget configuration, this causes a display issue. The two controls overlap. To avoid this, add the WebChat widget to the Sidebar and do not display the Chat button.
Web Chat
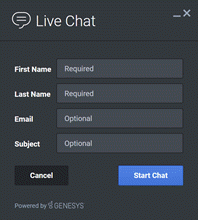
The Web Chat widget enables a website visitor to start a live chat with company representative. This creates a PureConnect Chat interaction that is routed to the appropriate queue.
Note: Configuration of the Web Chat Plugin is not required for Predictive Engagement chats. The Web Chat Plugin configuration is needed only for web chats. For more information about chat types, see Working with Chat Sessions.
|
Option |
Description |
|
Emojis Enabled |
Enable or disable the Emoji menu inside the Chat message input. |
|
Proactive Enabled |
If you enable proactive chat, a website visitor is invited to chat after a defined interval.
|
|
Proactive Idle Timer |
Set an interval in seconds. This defines the time that lapses between a visitor reaching your webpage and the appearance of a chat invitation. |
|
Proactive Cancel Timer |
Set the number of seconds a proactive chat invitation is visible before it automatically cancels itself and disappears. |
|
Chat Button Enabled |
Enable or disable the appearance of a Chat button on screen. Note: Enabling the appearance of the Chat button while using the Sidebar and positioning it Right causes a display issue. If you use the Sidebar, add the WebChat widget to the Sidebar and do not display the Chat button. |
|
Chat Button Open Delay |
Set the number of milliseconds delay before the Chat button appears on screen. |
|
Chat Button Effect Duration |
Set the length of the Chat button "fade in" animation effect in milliseconds. |
|
Chat Button Hide During Invite |
Set this to Yes to hide the Chat button when Proactive Chat is enabled. When the invitation is dismissed, reveal the Chat button again. |
|
Target Type |
Select a queue type. |
|
Target Name |
Enter the name of the queue as configured in Interaction Administrator. Note: PureConnect uses Target Type and Target Name for ACD routing purposes. |
Callback
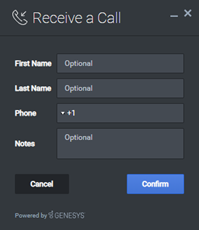
The Callback widget provides a form for website visitor details. PureConnect routes this information as a Callback interaction to the appropriate queue.
|
Option |
Description |
|
Target Type |
Select a queue type. |
|
Target Name |
Enter the name of the queue as configured in Interaction Administrator. Note: PureConnect uses Target Type and Target Name for ACD routing purposes. |
|
Country Codes |
To enable the display of country codes for phone numbers, select Yes. |
Call Us
Website visitors can initiate a call to any selected phone number displayed on the Call Us widget. Enter the contact information as it should appear on the Call Us widget.
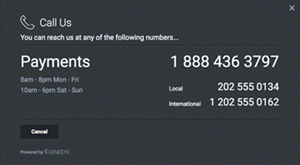
You can add multiple contacts and sets of business hours to the Call Us widget.
- To add new contacts or sets of business hours, click the + Add Contact or + Add Hours button.
- To delete a selected contact or set of business hours, click the appropriate trash can icon.
|
Option |
Description |
|
Name |
Enter a contact's name or a label for the phone number. |
|
Number |
Enter the contact's phone number. |
|
Localized Override |
Instead of the display name, enter a String Name from your localization file. This "i18n" property overrides the display name. Note: The first contact displays as the larger, main number. Additional numbers appear stacked in the phone number section of the widget. |
|
Hours |
Enter the business hours (for example, 8AM - 5PM Mon-Fri). Note: Multiple entries appear stacked in the business hours section of the widget. |
Offers
Important: The legacy version of the Offers Widget has been deprecated as of version 9.0.015.11. Offers are now embedded in the existing Engage Widget. If you're currently using the legacy Offers widget and need help, please reach out to your Genesys representative.
The Offers widget enables your website visitors to view a product or a promotion along with an image or video. You can select from Toaster or Overlay mode.
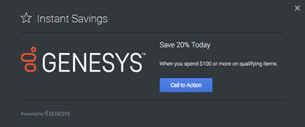
|
Option |
Description |
|
URL |
Enter the URL to open when the website visitor clicks on the image or button. |
|
Title |
Enter a title for the widget. This text appears in the widget header. |
|
Headline |
Enter the text to appear in larger text above the body. |
|
Body |
Enter the main body text of the widget. |
|
Button Text |
Enter the text to be displayed inside the button. |
|
Timeout |
Enter a delay in milliseconds after which the widget closes if there is no interaction. |
|
Image URL |
Enter the URL of an image that appears when the website visitor clicks on the image or widget button. |
|
Video URL |
Enter the URL of a YouTube or Vimeo video that appears in the Offer widget. Note: If an image URL is present, the image replaces this video. |
|
Display Mode |
Select the Toaster or Overlay display mode: Toaster mode displays automatically, then fades out after the delay entered in Timeout. In Overlay mode, the widget displays until the website visitor closes it. |
|
Text Position |
Select the text location to the left or right side of the image or video. This applies only to the Overlay display mode. |
|
Allow 3rd Party Video Libraries |
To allow the widget to load 3rd party video libraries from YouTube or Vimeo, select Yes. This enables the widget to show videos within an offer. This option is disabled by default. |
Sidebar
A Sidebar widget contains displays icons, titles, and command shortcuts for the widgets available on your company website.
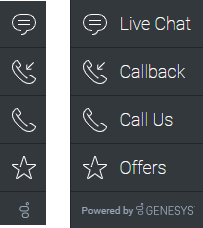
A channel is a widget plugin that appears in the Sidebar widget. You can add multiple channels to the Sidebar widget.
-
To add a widget plugin to the Sidebar, complete the configuration and click the + Add Channel button.
-
To remove a widget plugin from the Sidebar, click the trash can icon at the bottom of the configuration.
|
Option |
Description |
|
Show on Startup |
Display the sidebar on the screen when the Sidebar is launched. |
|
Position |
Select the position of the Sidebar on the screen. The default is Right. |
|
Expand on Hover |
To enable the expand (slide-out) or contract (slide-in) behavior of the sidebar, select Yes. |
|
Channels |
In this section, click the +Add Channel button, then configure the appearance and operation of one channel at a time for the Sidebar widget. Note: The order in which the channels appear in the Sidebar widget is based on the order in which you define them in this Sidebar widget configuration. |
|
Plug-in Name |
Enter the name of the channel. If you enter a reserved name, the default values for that plugin appear. Note: The plug-in name should not contain spaces. The name must also match the case the Widget code expects. Acceptable values are: WebChat, Callback, CallUs and Offers. |
|
Click Command |
Change the name of the command that is triggered when the website visitor selects a Sidebar option. |
|
Click Options |
Enter valid command options used when the click command is executed. |
|
Display Name |
Optionally change the default display name for this channel with your own static string. Or to achieve localization, use an i18n query string. Syntax: @i18n:<plugin namespace>.<display key>. |
|
Display Title |
Change the default tooltip content for this channel with your own static string. Or to achieve localization, use i18n query string. Syntax: @i18n:<plugin namespace>.<display key>. |
|
Icon |
Change the default icon for this channel. |
|
On Click |
Define a custom on click function. This overrides clickCommand and clickOptions. |
Chatbots
PureConnect supports not only the Genesys Intelligent Automation chatbot, but also chatbots from third-party vendors.
Requirements: To support third-party chatbots, the IC Server must be running CIC 2019 R1 Patch 5 version or later. Alternatively, you can apply a gap ES to an IC Server running CIC 2019 R1 Patch 4. Chatbot support also requires Interaction Connect version 2019 R1 Patch 5 or later.
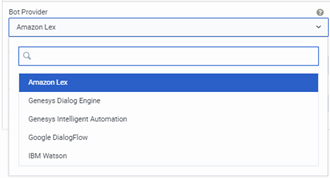
Select the appropriate provider from the Bot Provider dropdown list, then expand the appropriate section below for configuration instructions.
-
Amazon Lex
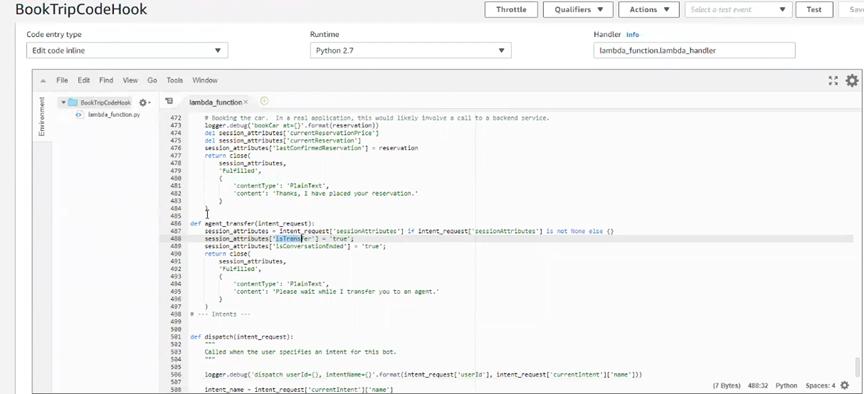
Amazon Lex is an interface for building conversation bots. The default Amazon Lex UI with slots does not enable you to set up the required session variables. In an Amazon Lex box, you set up session variables as part of an AWS Lambda function.You must handle all the intents within the Lambda function code.
Option
Description
Amazon Lex Bot Alias
Enter the alias that points to a specific version of your chatbot.
Amazon Lex Bot Name
Enter the name of your chatbot.
AWS Region
Enter the name of the Amazon region in which your chatbot instance is available.
AWS Congnito Identity ID
Enter the ID for temporary, limited-privilege credentials to your chatbot which enables it to use AWS resources.
Amazon Lex Welcome Message Trigger
Chatbots expect a welcome message when starting a chat session. Amazon Lex does not send one by default as it reacts to incoming messages only. Enter a word or phrase that chatbots can send to the Amazon Lex bot to invoke the configured welcome message.
Amazon Lex Chat Transfer Identifier
Enter the session attribute name that indicates the consumer is requesting to be transferred to an agent or customer service person.
Amazon Lex Chat Ended Intent
Enter the session attribute name that indicates the consumer has ended the chat.
-
Genesys Intelligent Automation
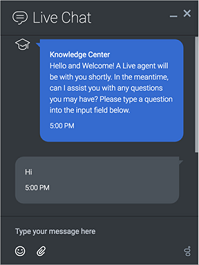
The PureConnect integration with Genesys Intelligent Automation is a fully tested, secure offering that allows easy integration of bots and other services with on-premises and cloud implementations of PureConnect. It uses a serverless, event driven microservice that deploys to, and resides in the cloud. For more information, see the PureConnect Integration with Genesys Intelligent Automation Technical Reference.
The Genesys Chatbot can appear like this to your website visitors:
Option
Description
Intelligent Automation URL
If you set Use a Reverse Proxy for Intelligent Automation to No, enter the full URL for the Genesys Intelligent Automation server.
If you provide this URL, the Intelligent Automation Server field is ignored.
Intelligent Automation Site ID
Enter the Intelligent Automation Site ID that Genesys Intelligent Automation generated when you created an application or module for the chatbot flow. For more information, see the PureConnect Integration with Genesys Intelligent Automation Technical Reference.
Intelligent Automation Authorization Key
Enter the Intelligent Automation key that Genesys Intelligent Automation generated when you created a company. For instructions about identifying this key, see the PureConnect Integration with Genesys Intelligent Automation Technical Reference.
Use a Reverse Proxy for Intelligent Automation
Enable or disable using a reverse proxy for the Genesys Intelligent Automation server.
Intelligent Automation Server
If you set Use a Reverse Proxy for Intelligent Automation to Yes, then enter the FQDN of the Genesys Intelligent Automation server.
If you use a reverse proxy, the Intelligent Automation URL field is ignored. The Reverse Proxy URL field on the General tab is used to create the end-result URL to assess Intelligent Automation.
GIA version 9.0.102+
-
If you are using GIA version 9.0.102 or later, select Yes.
-
If you are using a GIA version earlier than 9.0.102, select No.
Use Chat Persona
-
To use the Visual Persona in GIA version before 9.0.102, select No.
-
To use the Chat Persona in GIA version 9.0.102+, select Yes.
For more information about configuring a chat persona in Genesys Intelligent Automation, see https://docs.genesys.com/Documentation/GAAP/Current/iaHelp/Personas.
Selecting Yes enables the Genesys Intelligent Automation (GIA) chatbot to use buttons, images, and videos rich media types. For more information about rich media, see https://docs.genesys.com/Documentation/GAAP/latest/iaHelp/RichMedia.
As part of configuring GIA in PureEngage, the admin must also select Text, Buttons, and Videos in the Callflow Preferences as part of the chat-based persona. If the admin does not select these options, the rich media does not show up in GIA chats.
The admin must write custom scripts to use any of the other rich media types such as Quick Replies in GIA chatbots. For more information, see https://docs.genesys.com/Documentation/GWC/latest/Deployment/GWCRM.
Intelligent Automation Test Call
When "yes" is enabled then it uses GIA Test Application, If "No" is selected then it uses GIA production Application. -
-
Google DialogFlow
When you create a Google Dialogflow bot, you set up intents that get matched in the bot as the consumer types. For each intent, you can associate an action. Dialogflow processes the chat as directed by this bot configuration.
For more information, see https://dialogflow.com/.
Option
Description
Google Auth Client Email
Enter the email address associated with the service account in DialogFlow that has access to interact with the DialogFlow bot.
Google Auth Client Key
Enter the private key for the certificate associated with the service account in DialogFlow that has access to interact with the DialogFlow bot.
Tip: The client key should be the entire private_key string, including the -----BEGIN part. Don’t include the \n at the end.
DialogFlow Project Name
Enter the project name for the DialogFlow bot.
DialogFlow Chat Transfer Identifier
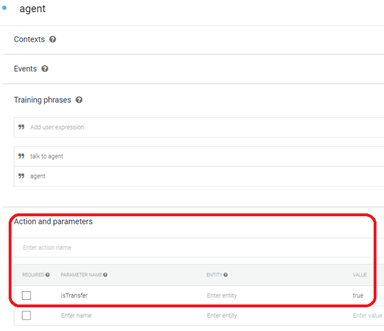
DialogFlow does not have the concept of a consumer requesting to be transferred to an agent or customer service person. To enable chatbots to determine that a consumer is requesting to talk to someone other than the bot, we need to know what to look for.
Enter the name of the boolean parameter that is configured inside an intent that denotes the consumer wants a transfer. Parameters are set on an intent in this section in DialogFlow:
DialogFlow Chat Ended Identifier
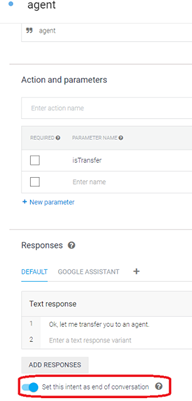
This is the name of the field that chatbots looks for to determine if a chat session is completed. By default, if an intent is set up with Set this intent as end of conversation turned on, then this value should be end_conversation. However, if a custom parameter is used (like the transfer identifier), this would be the name of the parameter that denotes that the chat has ended. The default mechanism to handle this in an intent is as follows:
-
IBM Watson
IBM Watson is an enterprise-ready, artificial intelligence platform. IBM Watson can be used to build AI-integrated chat bots.
You configure actions and responses on chatbot nodes in Watson Assistant dialogs. IBM Watson processes the chat as directed by this bot configuration.
Option
Description
IBM Watson URL
Type the URL for the region (location) in which this chatbot is deployed.
IBM Watson User Name
Enter the email address associated with the IBM Cloud Account user.
IBM Watson Password
Enter the password for the IBM Cloud Account.
IBM Watson Workspace
Enter the Workspace ID associated with the skill under API details.
IBM Watson Version ID
Enter the Watson version number under which this chatbot is running.
IBM Watson Chat Transfer Identifier
Watson does not have the concept of a consumer requesting to be transferred to an agent or customer service person. To enable chatbots to determine that a consumer is requesting to talk to someone other than the bot, we need to know what to look for.
Enter the name of the boolean parameter that is configured on a node to denote that the consumer wants a transfer. Select Dialog and navigate to the appropriate node.
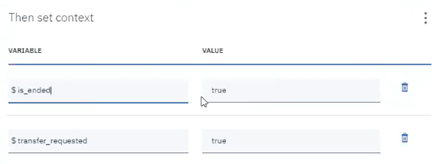
In the node corresponding to the consumer requesting a chat with an agent, define a variable indicating the transfer request. For example, $transfer_requested and true.
This is usually accompanied by a variable for disconnecting from the IBM Watson chatbot; that is a "chat ended" variable.
IBM Watson Chat Ended Intent
IBM Watson does not have a built-in end of conversation indicator. Define a context variable on a node that enables Watson to identify that the consumer has ended the conversation.
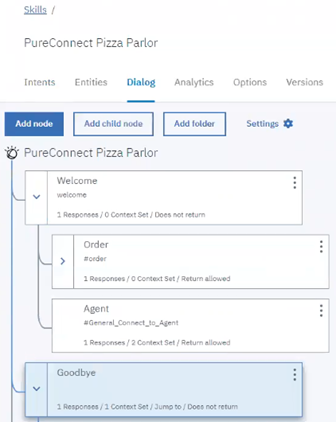
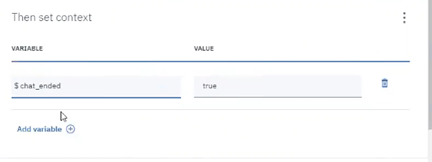
For example, in the Goodbye portion of the chatbot, in the appropriate dialog, define a variable that indicates the conversation is over. Open the context editor by clicking the ellipsis by Then set context.

Then open the context editor by clicking the elipsis by Then respond with. Then add a context variable by supplying an identifier and a value; for example, $chat_ended and true.
WebIVR
Genesys Intelligent Automation can provide your customers with chat bot-based access to your WebIVR applications. Customers can converse with a bot using natural language to accomplish various business needs, such as making a payment or checking an account balance.
You can use WebIVR-based MicroApps in chat interactions to accomplish various business tasks. For example, if an agent is helping a customer with a purchase and you want to collect credit-card information, you can use a MicroApp to securely capture the information without requiring it to go through the agent.
For more information, see https://docs.genesys.com/Documentation/GAAP/Current/iaRef/WebIVRWidgets.
|
Option |
Description |
|
MicroApps Enabled |
Set this to Yes to use WebIVR-based MicroApps in chat interactions. |
|
Intelligent Automation URL |
If you set Use Reverse Proxy for MicroApps to No, enter the full URL for the Genesys Intelligent Automation server. |
|
Use a Reverse Proxy for MicroApps |
Enable or disable using a reverse proxy for the Genesys Intelligent Automation server. |
|
Intelligent Automation Public URL |
If you set Use a Reverse Proxy for MicroApps to No, enter the full URLfor the Genesys Intelligent Automation server. |
Related Topics


