- Contents
Interaction Administrator Help
Data Extractor Settings
Configuring Data Extractor
-
In the System Configuration container, select the Data Extractor subcontainer.
-
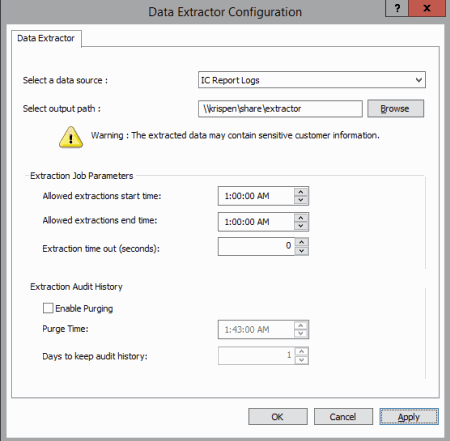
In the workspace under Data Extractor, click Configuration to open the Data Extractor Configuration dialog box.

-
Select a data source for your extractions from the drop-down list.
Note: Only ODBC read-only data sources are available.
-
To select the output path for the extracted data, click Browse. The Browse For Folder dialog box appears.
-
In the Browse For Folder dialog box, navigate to the output directory for the extracted data, and click OK. The output path is displayed in the Select output path field.
Note You can also type or paste the output path directly into the Select output path field. The output path can be a UNC path or a local path on the CIC server. Be sure that the CIC processes have write access to the output path location.
-
In the Extraction Job Parameters box, set the extraction window start and end times. This window specifies the time frame for when extraction jobs can begin. If you want a 24 hour start-time window, set the start and end times to the same value.

Notes
- A queued job does not start if the current time is past the end
time and before the start time. The job remains in the queue until the
next start time. Also, if a job has started before the end
time and is still running when the end time is reached, the job continues
running until it is completed or canceled.
- The Data Extractor service running on the CIC server might impact
the CPU usage on the CIC server. The SQL utilities that are used by the
Data Extractor service will run at below normal priority to minimize the
impact to other CIC services. Setting the allowed extraction times to
off peak hours is another way to minimize CIC server impact.
-
The extraction timeout specifies how long an extraction job is allowed to run before being canceled by the server. In the Extraction Job Parameters box, set the Extraction time out, in seconds.

The default value is set to 0, which results in no timeout.
-
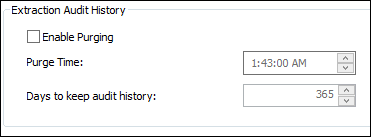
In the Extraction Audit History box, set the values for the extraction audit record purge. The audit history is used to populate the extraction job history.

-
Purging is disabled by default. To activate purging, select the Enable Purging check box.
-
Set the time of day to start the purge process in the Purge Time field. We recommend running the purge process during off-peak hours.
-
Set the number of Days to keep audit history.
-
-
Click OK or Apply.


