


- Contents
Interaction Attendant Help
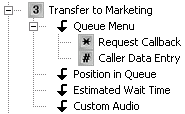
 Caller Data Entry
Caller Data Entry prompts callers to enter a string of digits using their telephone keypad. For example, it might ask a caller to enter a FAX number or an account number. User input ends after a specified number of digits are received, or when a terminating character is received. You have the option to convert the entry to speech, and read it back to the caller. The input data can also be attached to the call object as a call object attribute. Call object attributes can be used in DDE operations, and may be accessed by handlers. Data attached to a call is sometimes used in screen pops.
Understanding How Timeout Behavior is Calculated
If a user presses the key specified in the Digit list box, he or she has a predetermined amount of time to enter subsequent numbers before the system times out. The system also times out after a set period if a user enters less than the specified number of digits set in the End of Input Condition frame and does not enter a terminating character. Interaction Attendant will wait twice the set timeout value to receive the first digit and waits the exact timeout value for all subsequent digits. For example, if the timeout value is set to 3 seconds, the system will wait 6 seconds to receive the first digit, and will wait three seconds to receive each subsequent digit.
If Speech Recognition is enabled on the Caller Data Entry node, Interaction Attendant will wait four times the set timeout value to receive the first digit and waits the exact timeout value for all subsequent digits. Use the Reco Input Timeout Multiplier server parameter to set a multiplier other than four if Speech Recognition is enabled.
Note: Timeout values are set in the Caller Data Entry Error Handling Options Dialog.
You can determine the flow of control that occurs after data entry has been completed. For example, you can return to the previous menu, disconnect the call, or jump to any profile, schedule, menu, or operation. However, control cannot be passed to a profile, schedule, menu, or to an operation on another server.
In-Queue menus
You can place the Caller Data Entry node within an in-queue menu. When you also add a Request Callback node to the in-queue menu, you can configuring the Caller Data Entry node's Action When Finished frame to jump to the in-queue menu's Request Callback node. This configuration lets the caller enter a specific telephone number during a callback request, and Interaction Attendant will pull that number from the Caller Data Entry node when processing the callback request.
Note: Make sure you also configure the Request Callback node's Callback Number frame to call the appropriate Caller Data Entry node listed in the in-queue menu.
You can also configure a Caller Data Entry node within an in-queue menu to jump to another in-queue menu. To transfer to a menu under the same Group Transfer node, set the Allow Relocation to Other In-Queue Node server parameter to True. The Caller Data Entry node does not support jumping:
- From an in-queue caller data entry to a different in-queue operation under a different group transfer.
- Directly to a node under a different in-queue menu.
Node Characteristics frame
Options in this frame name the node, assign the digit used to select it, and establish whether or not it is active, used by default, logged, or tracked for reporting purposes.
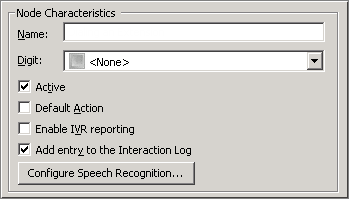
Name field
The label you enter here becomes the name of the node in the tree structure.
Digit list box
Use this list to select the key that callers press to enter a caller data entry operation. When you assign a digit, the list displays only available digits—those that are not already in use at this level of the tree. If no digit is assigned, callers cannot invoke the operation directly. It is possible to create menu options that are invoked by a routing process, rather than by a user selection. For details, see invoke a menu operation automatically.
Active check box
By default, forms are "on", or "active", which means that Interaction Attendant will process them. If you uncheck a form's Active check box, the name of the node turns gray in the tree to indicate that the form is inactive. Interaction Attendant and its handlers will thereafter ignore the form and its children. Use this feature to save a configuration that you are testing. Inactive forms are invisible to callers. When a node is inactive, it appears grayed out in the tree view.
Default Action check box
At any given "level" in the tree structure, one node can be marked as the default action. The operation defined by the default node is performed if the caller does not press a key within the timeout period specified by that menu. The icon for default forms has a green border in the tree structure. Any node below a menu or schedule can be marked as the default action, by checking the form's default action check box.
Enable IVR Reporting
This option determines whether or not reporting data will be collected when control passes through this node. Several IVR Reports summarize this information. IVR Reporting is disabled by default. Enable it to capture the date, time and duration of time that the call remained in the node and its children. This option is hidden when Attendant is connected to a server that does not have reporting installed. For more information about this feature, see IVR Reporting Option.
Add entry to the Interaction Log
When this option is enabled, information about this node is appended to the call's Interaction Log when the call enters this node. This helps track the path that a call took through Attendant. The Interaction Log is maintained for reporting purposes. See View the Interaction Log for details.
Configure Speech Recognition... button
Select this button to configure words or phrases that can be associated with menu options. Callers can verbally indicate the options they want in the IVR instead of pressing a digit on the phone. You can enter multiple words and phrases for each menu item, just as callers may phrase the same request in different ways. For example, "transfer funds" or "funds transfer". See Add Speech Recognition keywords or phrases to Inbound Call Operations.
Prompt frame
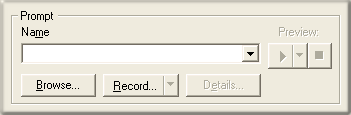
Controls in this frame set a prompt to play when control is passed to this node. If you do not select or record a prompt using the embedded audio controls, no voice prompting will occur. See manage voice prompts for details.
Use speech recognition for the data entry

Select this check box to allow callers to speak the numbers instead of manually entering them.
End of Input Condition frame
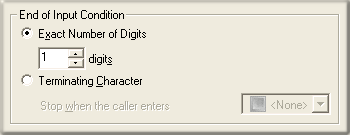
The options in this frame determine what signals Attendant to stop listening for incoming digits. You can end the data entry process when a fixed number of digits are received, or stop accepting data once a terminating character is pressed.
Exact number of digits
This radio button enables the digits spin control. Data acquisition is terminated once the number of digits that you select are received.
Terminating Character
This radio button enables the Stop when caller enters combo box, so that you can select the value that will be used to signal end of data entry. The possible values are 0-9, #, and *. <None> is also an option, but you should never use it. If you do, Attendant will never stop accepting data.
Verification frame
Options in the Verification frame control feedback given to callers about data entered.

Read the input back to the caller for verification check box
When verification is enabled, data entered by the caller is converted to speech and is read back to the caller. Afterwards, Attendant prompts the caller to confirm or reject the entry:
-
"If this is the desired entry, press 1. Otherwise to reenter, press 2."
-
If the caller selects 1, the input data is accepted. If the caller presses 2, the caller is prompted to reenter the data. The radio buttons control the way in which numeric input data is pronounced by the text-to-speech engine:
As Unique Digits radio button
1234 will be read back as "one two three four".
As a Numeric Value radio button
1234 will be read back as one thousand, two hundred and thirty four".
As a Monetary Value radio button
1234 will be read back as "twelve hundred thirty four dollars". Since the caller data entry operation does not provide a way to delimit dollars and cents, it doesn't offer a built-in method of capturing decimal numbers. However, you could use two caller data entry operations; one to capture the whole dollar amount, and another to capture the cents.
If the verification option is unchecked, no data is read back to the caller, and confirmation prompting does not occur. It's a good idea to provide callers with the ability to accept or reject data entered. You should always enable verification unless you are prompting for simple 1-digit values (e.g. 1=Yes, 2=No).
Call Attribute frame
You can attach data entered by the caller to the call itself as a call attribute. An attribute is a piece of information about an object that travels with it throughout the Customer Interaction Center. For example, one standard attribute of a call object is the telephone number of the person who placed the call. A call object can have as many attributes as are needed. Attributes stay with a call until it is disconnected.
CIC supports application programming interfaces (API's) that provide access to call object attributes. Dynamic Data Exchange (DDE) is commonly used to accomplish this, as is the Interaction Client Win32 COM API. Attributes typically store information that is passed to a database or a third-party application. For example, the IC can be set up to "pop" a database application when an incoming call arrives at an agent's workstation.
Related Documentation
For more information about DDE and other APIs, see the System APIs
section of the master documentation library on your IC server. The
Interaction Attributes Technical Reference (in the PureConnect
Documentation Library) describes attribute names that are reserved by
IC. If you assign data to a standard IC attribute, you
could potentially affect the execution of a handler. The Interaction
Attributes Technical Reference identifies attributes whose value you
should never change.
Suppose, for example, that you use caller data entry to capture an account number and store it as a call attribute. This preserves the account number as the call is routed throughout CIC. If the call is routed to an agent's desktop, the account number can be used to look up the customer record in a database. Information about the customer can be displayed on the screen at the time when an agent receives the call.
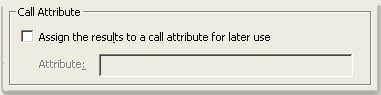
Assign the results to a call attribute for later use
Enable this check box to assign data entered by the caller to a call attribute. Each call attribute is a name/value pair. The attribute name can be anything you like, since it identifies the data.
Attribute
This field stores the name of the attribute that input data will be assigned to. Since many handlers in CIC process attributes, attribute names have been standardized to identify common types of data. Type the name of a standard call attribute in this field, or enter your own custom attribute name.
You can name a custom attribute anything you like. Custom names can contain spaces and special characters. To avoid potential conflicts with reserved attribute names, do not begin the name with the letters EIC_. CIC's standard attribute names begin with those letters. If you overwrite a standard attribute, you could accidentally interfere with normal operation of the IC server.
Advanced Error Handling Options

The Caller Data Entry form provides advanced error handling options that supplement the error handling provided by the schedule that the form is attached to. To define these options, press the Advanced Error Handling button.
Advanced Error Handling button
Opens the Caller Data Entry Error Handling Options Dialog. It defines the maximum length of time that Interaction Attendant should wait for keys to be pressed before re-prompting the caller, and establishes the maximum number of times that the prompt will be repeated before control is passed to the Schedule's error handler, or to the profile, schedule, menu, or operation that you select.
Action When Finished frame
These options set the processing that occurs after the operation completes successfully, when flow of control leaves this node. You can return control to the previous menu, disconnect the call, transfer to an operator profile, or jump to any node or action that has been defined for the current server.

Go back to previous menu
This option returns control to the parent menu. This sets up a simple loop that "reruns" the menu from the top.
Disconnect
This option disconnects the call when the data entry operation is completed successfully.
Transfer to Operator Processing
Transfers the call for evaluation by operator profiles defined for this server.
Jump to a custom location
This option allows you to jump to any profile, schedule, menu, or operation that is defined for the current server.