


- Contents
Interaction Attendant Help
 DB Insert
This menu operation inserts a new row (record) into a database table. This is frequently used to log customer activity. To insert a new record, you must know the name of the data source, table, and column that data will be stored in, and which fields in the database are required when adding a new record. You can insert information based upon:
-
String, numeric, or Boolean values
-
A Call Attribute (ANI, DNIS, Caller ID, Interaction ID Key, Line Name)
-
User input captured using a Caller Data Entry form
-
The result of a database query
-
The current date or current time
-
Any specified date or time
-
Flow of control options on this form determine what happens after a record is inserted.
IMPORTANT—DB Insert
in Attendant will not insert numeric values unless the Numeric data
type of a field is defined in the SQL database to declare a nonzero
value for the Scale parameter.
The DB Insert operation in Attendant won't insert numeric values into
a table unless the SQL data type is Real. When using SQL,
the Real data type is required for inserting Numeric values from handlers. If
you use the Numeric data type, numbers will be truncated or rounded
to Integer values. Likewise, the behavior for different
"decimal number" data types is inconsistent from one database
to another. To avoid these problems, you should pay
attention to the database configuration of numeric data types, and
explicitly specify the number of digits to the right of the decimal.
When you create a column in an SQL table with a Numeric data type,
there is a number value next to the data type field called "Length." This
is the total number of digits allowed to the left of the decimal point. To
avoid problems, you also must set the "Scale" parameter
to something other than the default, 0, to allow for digits to the
right of the decimal point.
If the Scale setting for Numeric fields is set to zero in the database,
the DB Insert operation fails when it tries to insert numeric values. Specifically,
step 73 of the InAttInsert handler (DB Put Data List toolstep) takes
the failure path since the AttrvalueList field will have a null value.
To resolve this problem, define the Scale of numeric fields
in the SQL database to be > 0.
Node Characteristics frame
Options in this frame name the node, assign the digit used to select it, and establish whether or not it is active, used by default, logged, or tracked for reporting purposes.
Name field
The label you enter here becomes the name of the node in the tree structure.
Digit list box
Use this list to select the key that callers press to enter a caller data entry operation. When you assign a digit, the list displays only available digits—those that are not already in use at this level of the tree. If no digit is assigned, callers cannot invoke the operation directly. It is possible to create menu options that are invoked by a routing process, rather than by a user selection. For details, see invoke a menu operation automatically.
Active check box
By default, forms are "on", or "active", which means that Interaction Attendant will process them. If you uncheck a form's Active check box, the name of the node turns gray in the tree to indicate that the form is inactive. Interaction Attendant and its handlers will thereafter ignore the form and its children. Use this feature to save a configuration that you are testing. Inactive forms are invisible to callers. When a node is inactive, it appears grayed out in the tree view.
Default Action check box
At any given "level" in the tree structure, one node can be marked as the default action. The operation defined by the default node is performed if the caller does not press a key within the timeout period specified by that menu. The icon for default forms has a green border in the tree structure. Any node below a menu or schedule can be marked as the default action, by checking the form's default action check box.
Enable IVR Reporting
This option determines whether or not reporting data will be collected when control passes through this node. Several IVR Reports summarize this information. IVR Reporting is disabled by default. Enable it to capture the date, time and duration of time that the call remained in the node and its children. This option is hidden when Attendant is connected to a server that does not have reporting installed. For more information about this feature, see IVR Reporting Option.
Add entry to the Interaction Log
When this option is enabled, information about this node is appended to the call's Interaction Log when the call enters this node. This helps track the path that a call took through Attendant. The Interaction Log is maintained for reporting purposes. See View the Interaction Log for details.
Configure Speech Recognition... button
Select this button to configure words or phrases that can be associated with menu options. Callers can verbally indicate the options they want in the IVR instead of pressing a digit on the phone. You can enter multiple words and phrases for each menu item, just as callers may phrase the same request in different ways. For example, "transfer funds" or "funds transfer". See Add Speech Recognition keywords or phrases to Inbound Call Operations.
DB Information frame
Options in this frame identify the data source and table that the database operation will apply to.
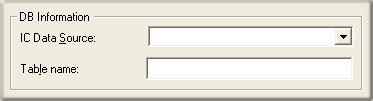
IC Data Source
Select the name of a database as it is defined in Interaction Administrator. See IC Data Source Configuration in the Interaction Administrator help to find out data sources are defined for CIC and its subsystems. Typically, this list contains I3Text White Pages, CIC Contacts, CIC Report Logging, CIC Report Logs, Tracker, and custom databases defined by your organization.
Table Name
Records will be inserted into the table whose name you enter here. If you do not know the names of tables in your database, contact your CIC Administrator.
Columns to Insert frame
This mini-table manages entries made to identify fields and data to insert into them. The Add, Modify, and Remove buttons work together to define fields that will be added as a new record. You need to know which fields are required when adding a record to your database. Those fields must be defined here, along with any additional data items that you wish to add as part of the record. When you define a field, it appears in the list.
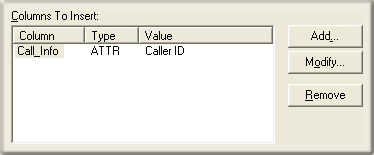
Each column must already be defined in the database. Insert adds data to existing columns in a database. It does not define new columns. If the specified column does not exist, no data is inserted.
Add button
Add opens the Column Information dialog, to define data that you want to insert, and the column (field) it will be inserted into.
Modify button
Modify populates the same dialog with the selected entry.
Remove button
Remove deletes the selected entry from the list. This does not remove the field from your database. Instead, it removes the option to populate a data field when a new record is added.
Action When Finished frame
These options set the processing that occurs after the operation completes successfully, when flow of control leaves the node. You can return control to the previous menu, disconnect the call, transfer to an operator profile, or jump to any node or action that has been defined for the current server.
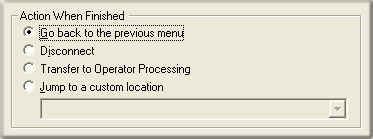
Go back to previous menu
This option returns control to the parent menu. This sets up a simple loop that "reruns" the menu from the top.
Disconnect
This option disconnects the call when the database operation completes successfully.
Transfer to Operator Processing
Transfers the call for evaluation by operator profiles defined for this server.
Jump to a custom location
This option allows you to jump to any profile, schedule, menu, or operation that is defined for the current server.