


- Contents
Interaction Optimizer Help
Configure Shifts
You can create and configure shifts to use when creating and maintaining schedules. This topic provides instructions on how to:
Note: Before you configure shifts, select the appropriate scheduling unit from the Interaction Optimizer Home page Scheduling unit drop-down list.
Create a new shift
-
From the Interaction Optimizer Home page, in the Configuration area click Shifts. The Shifts tab opens.
-
In the top section of the view, click Add.
-
On the Configuration tab, enter the following:
-
Shift name: The name that identifies the shift.
-
Enable schedule bidding: Select this check box to enable schedule bidding for this shift.
-
Configure weekly constraints for a shift
-
Click the Weekly Constraints tab. The Weekly Constraints tab opens.
-
Enter the following constraints:
-
Minimum paid time (hours): The minimum amount of paid time allowed for the shift for the week.
-
Desired maximum paid time (hours): The desired maximum amount of paid time allowed for the shift for the week.
-
Absolute maximum paid time (hours): The absolute maximum amount of paid time allowed for the shift for the week.
-
Minimum time between shifts (hours): The minimum amount of time allowed between shifts.
-
Maximum days: The maximum number of days allowed for the shift for the week.
Note: Enter a fraction of an hour in one of the time boxes to indicate the number of minutes. For example, .25 equals 15 minutes, .50 equals 30 minutes, and .75 equals 45 minutes.
Configure daily constraints for a shift
-
Click the Daily Constraints tab. The Daily Constraints tab opens:
-
To add a daily constraint, do the following:
-
Click Add.
-
Enter the following information:
|
Name |
The name of the constraint. |
|
Earliest shift start time |
The earliest time a shift can start. |
|
Latest shift start time |
The latest time a shift can start. |
|
Shift start time increment |
The amount of time to add to one shift start time to get the next possible shift start time. For example, if you have a earliest shift start time of 8:00am, a latest shift start time of 10:00am, and a shift start time increment of 15 minutes, your possible start times for the shift are: 8:00, 8:15, 8:30, 8:45, 9:00, 9:15, 9:30, 9:45, and 10:00. |
|
Maximum shift start time variance |
The amount of time a shift start time can vary over the entire week for one particular agent. For example, if the variance is set to 1 hour and Amy's schedule starts at 8:00 a.m. on one day and 9:00 a.m. on another day, all Amy's schedules for the week must start between 8:00 a.m. and 9:00 a.m. Note: This constraint is ignored if it prevents schedules from being generated. |
|
Latest shift stop time |
The latest time a shift can end. |
|
Minimum paid time |
The minimum amount of paid time allowed for the shift for the day. |
|
Maximum paid time |
The maximum amount of paid time allowed for the shift for the day. |
|
Minimum contiguous work time |
The minimum amount of time the agent must work before starting a non-contiguous activity or ending his or her shift. |
|
Maximum contiguous work time |
The maximum amount of time the agent can work before starting a non-contiguous activity or ending his or her shift. |
|
Active days |
Select the days the daily constraint is active. Days can be required, optional, or excluded. To make a day required, click the check box until a check mark appears. To make a day optional, click the check box until it's filled with blue. To exclude a day, click the check box until it's cleared. Note: You cannot save a shift unless you configure daily constraints. |
-
To delete a daily constraint, click the constraint to delete, click Delete, and then in the Confirm Delete dialog , click Yes.
-
To copy and paste a daily constraint, click the constraint to copy, click Copy and then click Paste. The daily constraint is copied and pasted in the top section of the Daily Constraints tab.
Configure shift activities
-
Click the Activities tab. The Activities tab appears.
Tip: You can show or hide the columns on the Activities tab by right-clicking in the view and clicking Choose columns...
-
To add an activity for a daily constraint, do the following:
-
Click Add. The Add New Activity dialog box appears.
-
Enter the following information:
|
Activity type |
The type of shift activity. |
|
Length |
The length of time the activity lasts. |
|
Attendance requirement type |
Valid values are:
Note: If required activities occur during a paid time off request, the required activities are ignored and a schedule containing the time off request is created. |
|
Actual or relative time |
Valid values are:
|
|
Earliest start time from shift start |
Type in the box or use the up and down arrows to set the earliest time this activity can start. The default value for this field is 8:00 AM. If Relative to shift start is selected in the Actual or relative time list box, this time is the earliest start time, relative to the shift start time, the activity can start. If you selected Actual time from the Actual or relative time list box, this time is the absolute earliest start time the activity can start. |
|
Latest start time from shift start |
Type in the box or use the up and down arrows to set the latest time this activity can start. If Relative to shift start is selected in the Actual or relative time list box, this time is the latest start time, relative to the shift start time, the activity can start. If you selected Actual time from the Actual or relative time list box, this time is the absolute latest start time the activity can start. |
|
Possible times increment |
The possible amount of time to increment the start time. |
|
Counts toward paid time |
Select this check box if the activity counts toward paid time. |
|
Counts toward contiguous work time |
Select this check box if the activity counts towards contiguous work time. |
|
Description |
A description of the activity. |
-
To delete an activity, do the following:
-
Click the activity to delete.
-
Right-click the Activities tab, and then click Delete, or, in the toolbar in the top section, click Delete.
-
In the Confirm Delete dialog , click Yes.
-
-
To copy and paste an activity, do the following:
-
Click the activity to copy.
-
Right-click the Activities tab, and then click Copy, or in the toolbar in the top section, click Copy.
-
Right-click in the Activities tab and then click Paste, or in the toolbar in the top section, click Paste. The Paste Activity dialog appears and is populated with the copied activity's information.
-
Change the information as needed.
-
-
To edit an activity, do the following:
-
Click the activity to edit.
-
Right-click the Activities tab, and then click Edit, or in the toolbar in the top section, click Edit. The Edit Activity dialog appears.
-
Change the information as needed.
-
Configure agent assignments
-
Click the Agents tab. The Agents tab appears.
The licensing of agents affects what's displayed in the available agents list. For example, if an agent is already assigned to a shift and his license is removed, the agent's name is grayed out and the workgroups, interaction types, and skills are shown as <unlicensed>. In this case, the agent cannot be assigned to a shift.
There may be a delay in updating the tab of up to 30 seconds when you change an agent's license, workgroups, skills, or interaction types. If there is a delay in updating the tab after changing an agent's license and you assign the agent to a shift, licensing is checked and a message box appears indicating the agent cannot be assigned to a shift because the agent isn't licensed.
Tip: You can show or hide the columns on the Agents tab by right-clicking on a column header and clicking Choose columns...
Note: In the top section, the Agent Count doesn't reflect your changes until you click Save in the toolbar. Agent names that display in bold indicate a change was made but hasn't been saved. After you save your changes, the bold formatting is removed from the agent names and the grid is filtered to show only the agents assigned to the shift.
-
To filter the Agents view, do the following in the column heading to filter:

-
Click the icon in the left side of the column heading.
-
Select an option and then click in the column heading box.
-
Type the value to use to filter the view. The view is filtered based on your selection. You can filter by more than one column heading at a time.
-
To clear a filter, click the icon in the right side of the column heading for each filter you want to clear.
-
-
Do the following:
Note: Menu options and buttons are enabled or disabled based on what you are currently doing. For example, if you are editing a shift, the Add button is disabled. If you are assigning agents in the shift and you right-click an agent who is already associated to the shift, the Move selected to current shift button is disabled.
-
To assign an agent to the shift, click the agent name to assign to the shift and then click Move selected to current shift. The selected agent name is assigned to the current shift.
-
To remove an agent from the shift, click the agent name to remove and then click Remove selected from current shift. The selected agent is removed from the current shift.
Tip: You can multi-select individual agents by holding down the Ctrl key and clicking each agent to select. You can also multi-select a contiguous group of agents by clicking the first agent in the group, holding down the Shift key, and clicking the last agent in the group.
-
To see if there are any issues with agent assignments, click Show agent issues. The Agent Issue(s) dialog appears.
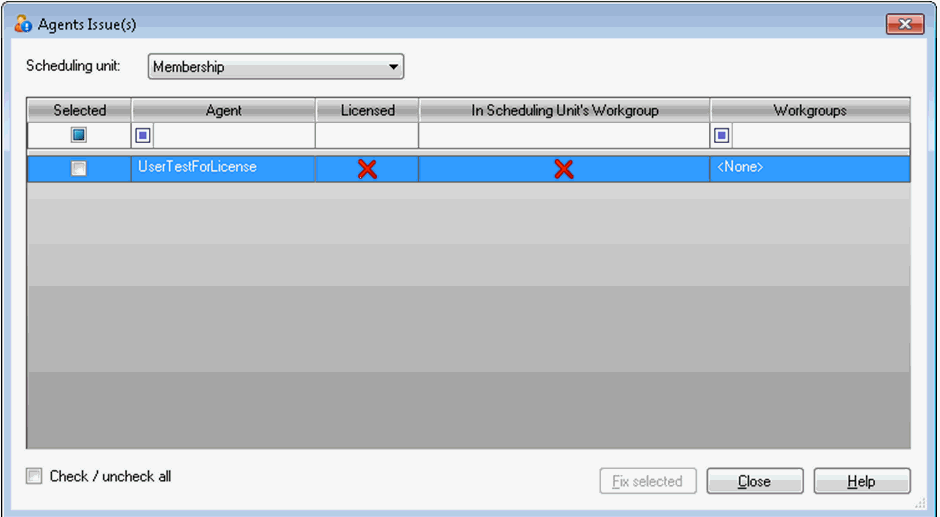
There are two types of issues that display in this dialog box. They are indicated by a red X in the corresponding column.
-
Licensed: When a red X displays in this column, it indicates the agent is not licensed to get a schedule. To solve the issue, assign a license to the agent; otherwise, the agent won't ever get a new schedule.
-
In Scheduling Unit’s Workgroup: When a red X displays in this column, it indicates the agent is not included in any of the workgroups associated to the scheduling unit. To solve the issue, assign the agent to a workgroup associated to the scheduling unit.
-
Click Save to keep your changes.
Delete a shift
-
In the top section of the view, click the shift to delete and then click Delete. The Confirm Delete dialog appears.
-
In the Confirm Delete dialog , click Yes.
Copy and paste a shift
-
In the top section of the view, click the shift to copy and then click Copy. The shift is copied to the clipboard.
-
Click Paste. The copied shift is pasted in the top section of the view.
