


- Contents
Interaction Connect Help
Configure Monitored Appearances
Requirements: For information about required rights, see Working with Monitored Appearances. Also, you should set up monitored appearances only for users at your site. You should not configure a monitored appearance for a user configured on a separate site (on another CIC server) or for multi-site users.
Use the Monitored Appearances property details pane to add, remove, and change the order of user queue in the Monitored Appearances view.
Tip: If you have the appropriate rights, you can also drag and drop a user from the Company Directory to the Monitored Appearances view to create a monitored appearance.
To add a monitored appearance:
-
Do one of the following:
-
-
If you have not yet configured a monitored appearance, open the Applications Settings dialog box.
-
If you already have one monitored appearance, in the Monitored Appearances view, right-click in the right side pane and select Configure Appearances.
-
-
If not already selected, in the Application Settings dialog box, click the Monitored Appearances node.
-
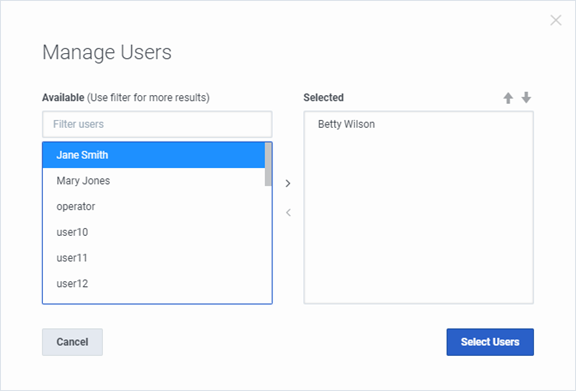
In the Application Settings dialog box, click Manage Users.
Result: The Manage Users dialog box appears.
-
Create a list of selected User queues by doing any of the following:
-
To add a user queue, In the Available list, select a name and click >.
-
To remove a user queue, in the Selected list, select a name and click <.
-
To rearrange the order in which the user queues appear in the Monitored Appearances view, select a name and use the up and down arrows in the Selected list.
-
When the Selected list contains the names of the user queues you want to monitor, click Select Users.
Result: The Application Settings dialog box reappears.
-
To change the name that appears on the Monitored Appearances view for a user, double-click its Label cell. Type a unique name for that monitored appearance.
-
To change whether this monitored appearance appears in the Monitored Appearance view, double-click its Active cell. Select the Active check box to display the Monitored Appearance, clear the check box to hide the Monitored Appearance.
-
To change the behavior of alerts for a Monitored Appearance queue, select a Monitored Appearance from the list and adjust its settings.
Note: If all the users who are monitoring a user queue and the monitored user are all in a Do Not Disturb status, CIC doesn't alert any station. The call goes directly to voice mail. If any of the monitoring users or the monitored user are in an Available status, only that agent's station rings.
|
Ring telephone for calls |
Select this to ring your telephone when a new interaction arrives on the monitored queue. Note: The Modify User Queues Access Control Right is required to enable the Ring telephone for calls or the Ring application alerting options for a monitored appearance. |
|
Ring application Ring when on phone |
Select Ring application to hear a ringing sound on your computer when a new interaction arrives on the monitored queue. Tip: If you also check the Ring when on phone check box, incoming calls for the monitored user ring on your computer even if you are already on the phone. For more information about the ways the CIC client can notify you of incoming interactions, see Answer an Incoming Interaction. |
|
Display desktop alerts |
Display a desktop alert for alerting interactions on this monitored appearance. Note: Desktop alerts are not supported for all browsers. |
|
Call Ring Sound |
Next to the Call Ring Sound text box, click the controls to select and then preview the distinctive sound played when new calls arrive on this monitored user queue. Note: This setting enables you to select a different sound for each of your monitored queues. |
-
After you finish configuring monitored appearances, click Save Settings.
Related Topics