- Contents
Interaction Desktop Help
Reply to an Email Message
Warning: In the current CIC client release, you cannot send an encrypted reply to a secure email message.
The tools available to you when replying to an ACD-routed email message depend on the format of the original email. The instructions in this topic apply to all email message replies. If the original ACD-routed email message is formatted using HTML, additional tools are available to you when composing your reply. For more information, see Reply to an HTML E-Mail Message.
E-mail Conversation
An email reply interaction can be associated with the original incoming email interaction in an Email Conversation.
Note: If you have the appropriate rights and your CIC administrator enabled the Threaded Email feature, you can see a list of all email messages that are related to one another. Related email messages have the same Conversation ID. For more information, see Use the Conversation History Tab.
Some important things about this relationship include:
-
More than one email reply can be associated with the original incoming email interaction.
-
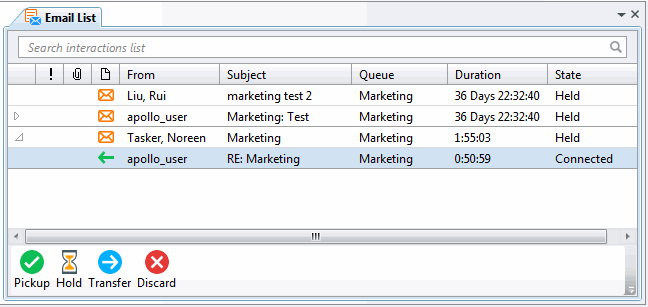
You can expand the original incoming email interaction to view the associated outgoing email interactions.
Email conversation in a queue view

Email conversation in an Email List

-
An email reply interaction disconnects automatically when you click Send.
-
You must disconnect the original incoming email interaction manually.
Tip: All of the associated outgoing email interactions must be disconnected or transferred before you can disconnect the original incoming email interaction.
To reply to an email message:
-
Pick up or reopen an ACD-routed email message.
Result: Depending on where you selected the email message and the views available in your Interaction Desktop workspace, the email interaction appears in the Email Editor or the Email Window for Incoming Messages.
-
Click Reply, Reply All or Forward.
Note: Responses to messages sent with an alternate "Reply-To" address are delivered to that address. If you select Reply All, replies are delivered to the "Reply-To" address and all of the original recipients, but not to the sender’s original address.
Result: A new outbound interaction appears in the Email List or the appropriate queue view and is associated with the incoming interaction as part of an Email Conversation.
-
Optionally, add addresses by doing one of the following:
-
-
In the To text box, type the addresses of the email message recipients, separating each address with a semi-colon (;).
-
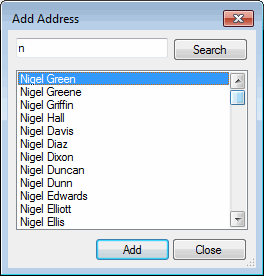
Click the To button. In the Add Address dialog box, type all or part of the address in the text box and click Search. From the results list, select the appropriate address and click Add.
-
Note: The Add Address dialog box enables you to search for an email address that is configured on your Exchange server — typically, your company’s employee email addresses.

Tip: You can copy and paste addresses from the email reply address fields to a third-party CRM system, if you need to look up customer records by email address.
-
Optionally, verify the email addresses used in this email message. Place your cursor on one of the addresses in the To or CC text box and do one of the following:
-
-
Click Check Names.
-
In the Email Window for Outgoing Messages, from the Actions menu, choose Check Names.
-
Note: All email addresses are automatically verified before the reply is sent. A verified address is underlined.
-
Type a message in the reply area.
Note: If you are appropriately licensed, you can use Response Management and Account Codes. For more information, see Use Response Management in an E-mail Message and Assign Codes to an Interaction.
-
Optionally, spell check your reply by selecting a language from the Spell check language drop-down list, then clicking the Spell Check button.
Note: You can configure the CIC client to spell check email messages automatically. For more information, see Email Configuration.
Result: If any misspelled words are detected, the Spell Check dialog box appears. Select the appropriate button and continue the spell check until all of the reply is checked.
-
Optionally, attach a file to the email message by doing one of the following:
Tip: Press and hold Shift to select and attach multiple files.
Note: Your system administrator configures the size limit for files you attach to an outgoing email message.
-
-
In the Email Editor, click the Attach button.
-
In the Email Window for Outgoing Messages, from the File menu, choose Insert Attachment. Or, if available, click the Attached button.
-
Note: The Attached button in the Email Window appears only after you use File > Insert Attachment to attach at least one file.
-
Optionally, to save the sender’s original attachments to a directory you choose, do one of the following:
-
In the Email Editor, right click next to name of the attached file and select Save as or Save All.
-
In the Email Window for Outgoing Messages, from the File menu, select Save Attachments.
-
-
Optionally, add notes to the email message.
Tip: For more information, see Add Notes to an Interaction.
-
Optionally, do one of the following to save this email message without sending it:
-
-
In the Email List, select the email message and click Hold.
-
Close the Email Window for Outgoing Messages to save this email message as a Held interaction.
-
-
Result: The email message is not sent, but is saved as a Held interaction in the appropriate workgroup queue. You can pick up this interaction later, make any necessary changes or additions and then send it.
Note: In the Email Window for Outgoing Messages, you can click File > Save response to save your work to this point. The email interaction remains Connected.
-
To send the email response, do one of the following:
-
-
Click the Send button.
-
In the Email Window for Outgoing Messages only, from the Actions menu, select Send Email.
-
Result: The email reply message is sent to the addressees. The interaction representing the reply disconnects.
Tip: The Email Window for Outgoing Messages closes automatically, if you select the No longer show email after sending option in Email Configuration.
Note: The original ACD-routed email interaction does not disconnect automatically.
-
Select the original ACD-routed email interaction and click Disconnect.
Tip: The Email Window for Incoming Messages closes automatically when you click Disconnect, if you select the No longer show email after disconnecting option in Email Configuration.
Related Topics


