


- Contents
Interaction Recorder Policy Editor Help
Creating a Security Policy
Create a Security Policy to specify which actions specific users are allowed to perform on selected recordings. Security policies apply to Agents and Roles. Security policies are created in Interaction Administrator under Interaction Recorder on the Policy Editor Configuration dialog, on the Security page. Here's how to create a Security Policy.
Start Policy Editor
-
From Interaction Administrator under Interaction Recorder, click Policy Editor.
-
In the Policy Editor pane, double-click Configuration.

-
The Interaction Recorder Policy Editor dialog is displayed.

-
Click the Security tab to display the page.
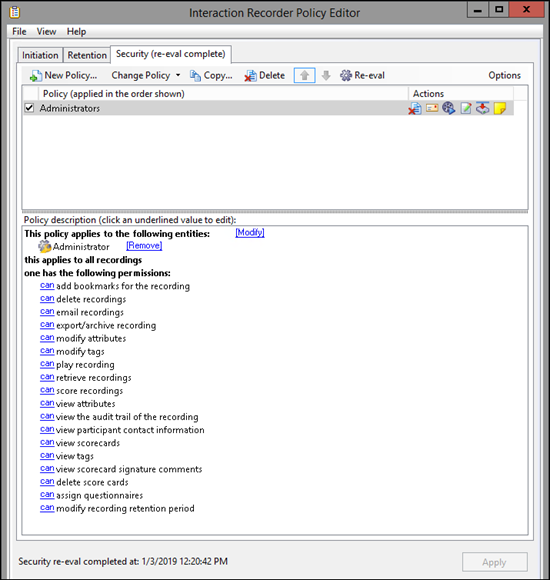
The Security page is displayed, showing the Administrators Security Policy. The Administrators security policy is provided, giving all Security permissions to users who are assigned the Administrator Role.
Create a New Security Policy
To create a new Security Policy, on the Security page toolbar, click
New Policy  .
.
The Edit Security Policy dialog
is displayed, beginning with Step 1.

Step 1: Applies to the following entities
Use this page of the Edit Security Policy dialog to apply the policy to entities. You can assign the following entities:
-
Agent
-
Role
Applying Policies to Entities
You can apply this policy to all available entities or you can select specific entities to apply the policy to.
Apply policy to all entities
To apply this policy to all entities:
-
In the Name field, type a descriptive name for the policy.
-
In the Step 1: Applies to the following entities box, the Filter legend lists the entity types and their icons. To apply this policy to all entities, select the Applies to all entities check box.
In the Policy description pane, the entity description, This policy applies to everyone is displayed.
Apply policy to specific entities
To apply this policy to specific entities:
-
In the Name field, type a descriptive name for the policy.
-
Be sure the Applies to all entities check box is clear.
-
In the Step 1: Applies to the following entities box, the Filter legend lists the entity types and their icons, Agent and Role. To reduce the number of entities returned in the search results, clear the check boxes for the entities you do not want to include in the search. For example, if you know the entity you are searching is a Role, clear the Agent check box.
-
To apply this policy to specific entities, click in the Search for entities field.
-
In the Search for entities field, begin typing an entity name, for example the name of an Agent or Role. Entity names that match are displayed in a pop-up window. Note that the entity type icon is displayed next to the entity name.
-
In the pop-up window, click the entity to apply this policy to. The entity is displayed in the entity list box.
In the Policy description pane, the entity is added below the This policy applies to the following entities descriptor. -
Continue adding entities using the Search for entities field.
Removing Entities from a Policy
To remove an entity from this policy, from the entity list box, select an entity and click Remove. The entity is removed from the list box and also removed from the policy descriptor This policy applies to the following entities in the Policy description pane.
Completing applying entities
The Policy description pane is updated as Security Policy settings are added and updated.
When the Policy description for applying Security Policies to entities is complete, click Next. The Edit Security Policy dialog, Step 2: Select criteria is displayed.

Step 2: Select criteria
Use this page of the Edit Security Policy dialog to select criteria for applying this security policy to specific recordings.
The criteria that can be selected to apply this policy to recordings are:
-
<attribute> contains the value <value>
-
the listed <attributes> are not set
-
recordings between <start date> and <end date>
-
agent matches the following <agents>
-
media location matches the following <media locations>
-
matches the following <workgroup>
-
media type is <Type>
-
Tracker participant is <participant>
-
tag matches the following <tags>
-
the listed <tags> are not set
-
matches the following <wrapup code>
-
recordings that are <more/less> than <period> old
-
recording is <older/newer> than <duration> <period> old
-
this is the agent's recording
-
is a snippet recording: <true/false>
-
social media type <any> platform <any> channel name <any> page <any>
Note: If no criteria are selected, the policy applies to all recordings.
Selecting Criteria for Recordings
Select the criteria for recordings, for this security policy, in the Step 2: Select criteria box.
To select criteria for interaction recordings:
-
In the Step 2: Select criteria box, select the check box for the criteria to use for applying security settings to recorded interactions.
In the Policy description pane, the criteria is added below the if the interaction meets the following criteria descriptor. -
In the Policy description pane, configure the criteria by clicking the variable. When you click a variable, a pop-up window is displayed to enter a value for the variable.
Note: When configuring a variable, to view a table with descriptions for the Criteria values, press F1 to display the Help. -
Continue selecting criteria check boxes and configuring them in the Policy description pane.
Completing Criteria Selection
When you have completed configuring the criteria settings, verify that the criteria you want for applying security settings to recorded interactions are listed in the Policy description pane under the if the interaction meets the following criteria descriptor. Also be sure that the value for each criterion is configured.
After you have verified your selections, click Next. The Edit Security Policy dialog, Step 3: Select actions is displayed.
Step 3: Select actions
Use this page of the Edit Security Policy dialog to select Actions for user security permissions for this policy. Actions define how a Policy executes. If an action is not defined for a security Policy, a warning message is displayed when you are creating the Policy. If no actions are defined for a Policy, an ERROR message is displayed in the Policy Editor status bar.
Available actions for this Security Policy are:
-
add bookmarks
-
delete recording
-
email recording
-
export/archive the recording
-
modify attributes
-
modify the tags
-
play the recording
-
retrieve the recording
-
score the recording
-
view attributes
-
view the audit trail of the recording
-
view participant contact information
-
view scorecards
-
view tags
-
view scorecard signature comments
-
delete scorecards
-
assign questionnaires
-
Modify recording retention period
-
stop processing more policies
Selecting Actions for a Security Policy
Select actions for security permissions to apply to recordings in the Step 2: Select actions box.
To select actions to apply to recordings:
-
In the Step 3: Select actions box, select the check box for the actions for the security permissions to apply to a recording.
In the Policy description pane, the action is added below the one has the following permissions descriptor. -
If a selected action requires configuring, a variable is displayed in the Policy description pane. To configure the value, click the variable and a pop-up window is displayed.
Note When configuring a variable, to view a table with descriptions for the Criteria values, press F1 to display the Help. -
Continue selecting action check boxes and configuring them in the Policy description pane.
Completing Action Selection
When you have completed configuring the action settings, verify that the actions for security permissions you want for recordings are listed in the Policy description pane under the one has the following permissions descriptor. Also be sure that the value for each criterion is configured.
After you have verified your selections, click Finished. The New Policy name is displayed and selected in the Policy pane, and the complete description is displayed in the Policy description pane.
Saving a Policy
When you have completed creating a new Security Policy, and there are no errors, click Apply to save the Policy. When you click Apply, the Policies are saved and the italics are removed from the name in the Policy list. The changes take effect immediately when the Security Policy is applied.
Next, see Updating a Policy for more information on configuring Policies.
Related Topics
Security Criteria Descriptions