- Contents
Interaction Recorder Policy Editor Help
Retention Policy
Use the Interaction Recorder Policy Editor Retention page to create a New Policy to configure where recordings are stored, when they should be archived, and how long they are retained.
On the Retention page, you can:
-
Create a new Retention Policy
-
Change an existing Retention Policy
-
Duplicate an existing Retention Policy
-
Delete a Retention Policy
-
Change the order for which Retention Policies are applied
-
Immediately re-evaluate the policies
-
View the Actions that are executed by a Retention Policy
-
View the Retention Policy configuration
-
Export Interaction Recorder Policies to or Import Polices from an external XML file
-
Troubleshoot errors in an unfinished Policy
Policy pane
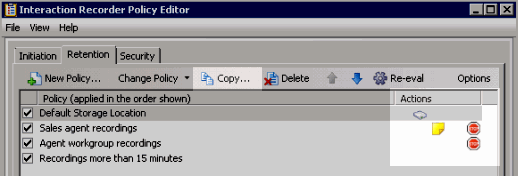
The Policy pane displays the Policies in the order in which they are applied. Retention Policies are applied, or re-evaluated, when an interaction is completed and de-allocates or when a recording retention expires.
Use the Policy pane to change the configuration of a policy, duplicate a policy, delete a policy, change the order in which policies are applied, re-evaluate policies, and quickly view the Actions that are executed by a Policy.

Policy description pane
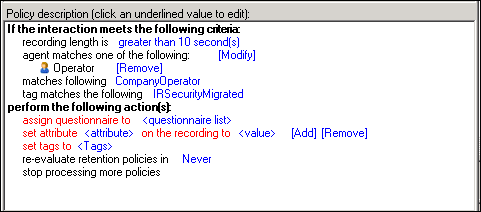
The Policy description pane displays the configuration of the Retention Policy. When you create a Policy in the Edit Retention Policy dialog, the configuration for each Step is displayed in the Policy description pane.

Create a New Retention Policy
To create a new Retention Policy, on the Retention
page toolbar, click New
Policy  . The Edit
Retention Policy dialog is displayed.
Complete the two steps in creating a new Retention Policy:
-
Step 1, select criteria for retaining recorded interactions. For a complete description of criteria variables to reference when setting values, press F1 on the dialog page.
-
Step 2, apply Actions to recorded interactions. Actions define how a Policy executes. For a complete description on configuring Action variables when setting values, press F1 on the dialog page.
When you have completed creating a new Retention Policy, and there are no errors, click Apply to save the Policy. When you click Apply, the Policies are saved and the italics are removed from the names in the Policy list.
Change a Policy
To update or make changes to an existing policy, select a policy in
the Policy pane, and on the Retention
page toolbar, click Change Policy
 .
.
On the Change Policy menu, click a command to update the policy. Available commands are: Edit Policy, Rename Policy, Activate/Deactivate Policy, and Show Errors. Also use the Change Policy menu to quickly add Actions to a Policy. For more information, see Updating a Policy.
Copy a Policy
If you want to duplicate an existing policy, click Copy
 . The Copy
Policy dialog is displayed. Type a name for the new Policy and
click OK. You might want to create
a copy of a Policy as a base to modify and test a new policy. When duplicating
a policy, note that the Actions that are configured for the policy are
displayed by their icons under Actions
in the Policy pane. Action icons can assist you in quickly seeing what
actions are configured for each policy. Here's an example of where the
policy Action icons are located in the Policy pane.

Delete a Policy
To delete a policy, select it in the Policy pane, and click Delete
 .
.
Change the Order Policies are Applied
Policies are executed in the order they are listed in the Policy
pane. To change the order in which policies are applied, in the Policy
pane select a Policy. Use the Up and Down arrows  to move the policy to another position in the list, changing the execution
order of the Policy.
Re-evaluate a Policy
Policies are re-evaluated from top to bottom when an interaction is completed and de-allocates, or when the recording retention expires. When you make a change to a Retention Policy you can immediately re-evaluate the policy by clicking Re-eval on the toolbar. For the Re-eval button to be available, all policies need to be saved. On the Re-evaluate retention policies dialog, select which recordings to apply retention policies to.
When policies are in the process of being re-evaluated, a progress indicator
is displayed at the bottom of the Policy Editor window.

While the progress indicator is displayed, the Re-eval button is replaced
with a Cancel button.

To stop the re-evaluation process, click Cancel.
Actions
Actions are applied to recorded interactions and define how a Policy executes. When you have completed applying Actions to a Retention Policy and click Finished, the Actions for the Policy are displayed under Actions in the Policy pane.
![]()
If an action is not defined for a Policy, a warning message is displayed when you are creating the Policy. If no actions are defined for a Policy, an ERROR message is displayed in the Policy Editor status bar.

For more information, see Actions.
Options
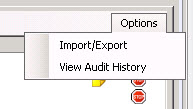
Click Options to:
-
Import policies from or Export policies to an external XML file
-
View Audit History

Notes:
-
If an import is successful, but an element is missing, such as an action, criterion, entity, or event, you will not be allowed to save the policy. A dialog appears providing options that need to be fixed before the policy can be saved.
-
If an import fails, a dialog appears and you are not allowed to continue. Information about the failure is available in the logs.
Activate/Deactivate a Policy
Use the Policy check box in the Policy pane to quickly activate or deactivate a Policy. Select the check box to activate the Policy. Clear the check box to deactivate the policy.
Apply
Use the Apply button to save the Policies in the Policy list. When you have completed creating a new Retention Policy, or modifying a Policy, and there are no errors, click Apply to save the Policy. When you click Apply, the Policies are saved and the italics are removed from the names in the Policy list.
Note If any policy in the Policy list has an error, the Apply button is not available.


