- Contents
Interaction Desktop Help
Transfer a Call After Consulting the Recipient
Transferring an interaction after speaking with the intended recipient is called a consult transfer. If the intended recipient does not answer the phone, you can resume your conversation with the caller, park the call on the intended recipient’s extension, transfer the call to the intended recipient’s voice mail, or try transferring to another person.
Warning: Perform a consult transfer only when you need to speak with both parties before completing the transfer. If this is not necessary, perform a blind transfer. Do not use a consult transfer or a conference call to transfer a call to an attendant profile, workgroup queue, or to an agent's voice mail. These are not supported features and may result in the original call being sent to the default attendant profile. For more information about blind transfers, see Transfer a Call Without Consulting the Recipient.
Operator Console: Operator Console users can also use the Rapid Transfer feature or the Call Transfer Shortcut Keys for blind transfers.
Tip: This procedure assumes you are transferring interactions from My Interactions, but you can transfer them from any queue you are monitoring. All users can place Consult Transfer Buttons on their Directory toolbars. For more information, see Customizing Toolbars.
To perform a consult transfer:
-
Inform the caller that he or she is going to be transferred.
-
While the call is still connected, do one of the following:
-
-
On the Queue Control toolbar, click the Transfer button.
-
Right-click the call and choose Transfer from the menu that appears.
-
Right-click a directory entry or right-drag a call to a directory entry to display the Transfer menu.
-
Click a directory entry and in the Directory toolbar, click a Consult Transfer button.
-
Tip: All the types of Consult Transfer buttons have a pair of figures in their icon. For a list of available buttons, see Directory Toolbar Buttons. For more information about adding buttons to a toolbar, see Customizing Toolbars.
Result: The Transfer dialog box appears.
-
In the Transfer To: field, type all or part of the recipient’s name or number.
Result: A drop-down list of choices appears.
Tip: If the drop-down list does not contain the contact you expected, check the search criteria selected in the Options drop-down list and adjust them if necessary.
-
From the drop-down list, do one of the following:
-
-
Select "Dial [your entry] as Digits" to convert a text entry into numbers.
-
Select the appropriate contact name and associated extension or phone number.
-
Result: If the intended recipient is a CIC user, status information for the selected CIC user appears. It shows whether the transfer recipient is logged onto a CIC client and is able to accept the transferred call. This can help you decide what kind of call transfer to use.
-
Optionally, if you selected a CIC user as a recipient, do one of the following:
- Select the Override Call Forwarding check box to transfer the call to the CIC user’s extension.
Result: CIC disregards any forwarding phone number set for this CIC user in Call Coverage options or Set Status Details.
-
-
Clear the Override Call Forwarding check box to transfer the call to the extension or phone number currently preferred by the CIC user.
-
-
Click the Consult button.
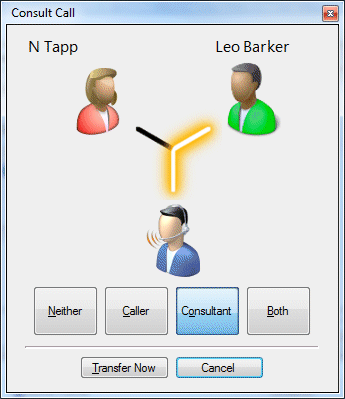
Result: The Consult Call dialog box appears. The original caller is placed on hold. A call is placed to the intended transfer recipient.
Note: The highlighted line indicates the parties who are connected and can speak to each other.

-
Do one of the following:
-
-
If the intended recipient (Consultant) answers his or her phone, and agrees to the transfer, click Transfer Now.
-
Result: The call is transferred to the Consultant and is removed from your queue.
-
-
To speak to the caller again without exiting the transfer operation, click Caller.
-
Note: This puts the call to the Consultant on hold. You might use this feature if the recipient is unavailable to take the interaction and you want to see if the caller would like to be transferred to someone else.
-
-
To speak to the Consultant again without exiting the transfer operation, click Consultant.
-
To enable a three-way conversation with the Caller, Consultant and you, click Both.
-
Note: This creates a conference call. You can now speak to both the Caller and the Consultant. If you later complete the transfer, the conference call is replaced by a standard two-party call.
-
-
To put both parties on hold, click Neither.
-
Tip: This enables you to talk to someone else or make another call without involving the caller or consultant.
-
-
If the transfer recipient does not answer the phone or does not agree to the transfer, click Cancel.
-
Result: The Consult Call dialog box closes and the Transfer dialog box reappears. The call is taken off hold, and you are reconnected to it.
Tip: If for some reason you can't perform a consult transfer, you can use the Transfer dialog box to choose another way to handle this call. Or you can transfer a call to another person’s voicemail, park a call on another person’s extension, or transfer a call without consulting the recipient.
Related Topics


