- Contents
Specify Customer Options
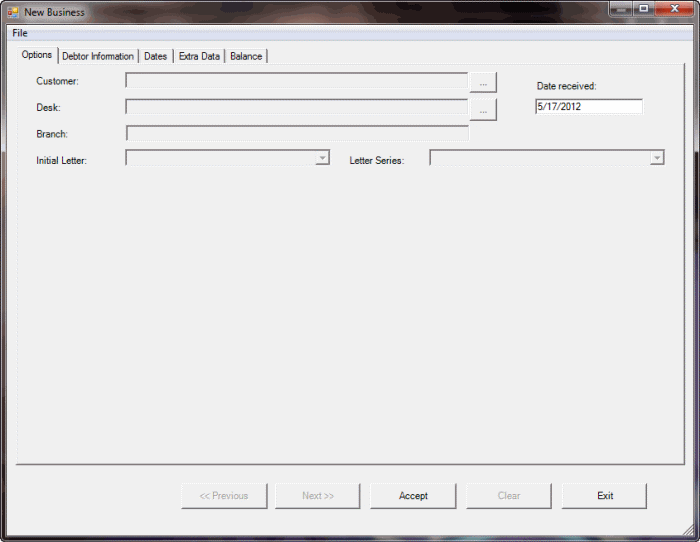
Use the Options tab to select a customer and desk for the debtor account and specify options for the other tabs in the New Business window. Select a customer before you enter information on any of the other tabs. Assign a desk to receive new accounts before you save the information.
To specify customer options
-
In the Main Menu window, from the Data Entry menu, click New Business. The New Business window appears.
-
Click the Options tab.

-
To select a customer, do the following:
-
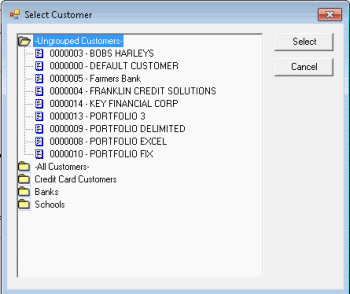
Click the ellipsis (...) next to the Customer box. The Select Customer dialog box appears.

-
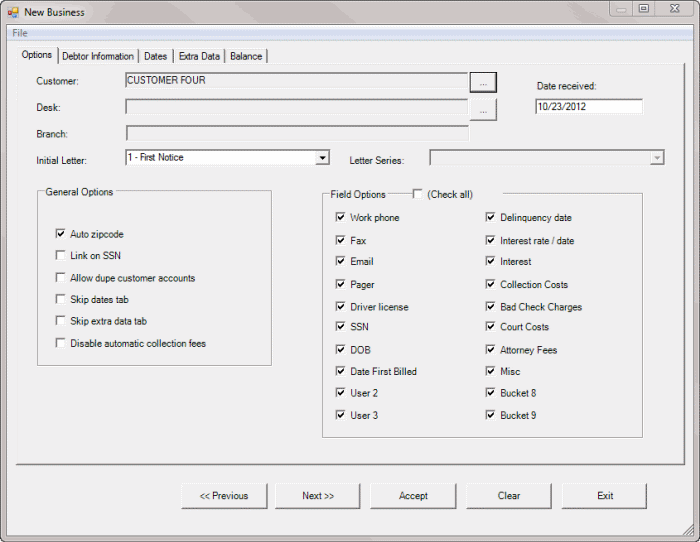
Click a folder to expand it, double-click the customer, or click the customer and then click Select. Latitude populates the New Business window with the selected customer's information and displays more information on the Options tab.

Date Received: Date your agency received the new business from the customer. The Date Received defaults to the current date.
Initial Letter: Initial letter to send to debtor accounts associated to the customer.
Note: The dunning-type letters available for the customer are based on how your agency defined the letters in Letter Console.
Letter Series: Series of letters to send to debtor accounts associated to the customer.
Notes:
-
The letter series available for the customer are based on how your agency defined the letter series in Letter Console.
-
Once you save the debtor account, the letter or letter series is available for printing from the Account Letters window in the Work Form or using Letter Console.
Auto zipcode: If selected, Latitude populates the City and State boxes when you specify a ZIP Code.
Link on SSN: If selected, Latitude asks if you want to link new debtor accounts to existing debtor accounts that have the same Social Security Number. If cleared, Latitude links the accounts without your approval.
Allow dupe customer accounts: If selected, you can add more than one debtor account for the same customer account number (specified on the Debtor Information tab). If cleared, you can only add one debtor account for a customer account number.
Skip dates tab: If selected, when you click Next (or press the Alt key plus the right arrow key), the system skips the Dates tab.
Skip extra data tab: If selected, when you click Next (or press the Alt key plus the right arrow key), the system skips the Extra Data tab.
Disable automatic collection fees: If selected, the system doesn't add collection fees set up for the customer (in the Customer Properties - Fees tab) to the account when entering balance information.
(Check all): Select to have Latitude select all check boxes in the Field Options section. Clear to have Latitude clear all check boxes in the Field Options section.
Work phone: If selected, allows you to specify a work phone number on the Debtor Information tab.
Fax: If selected, allows you to specify the debtor's fax number on the Debtor Information tab.
Email: If selected, allows you to specify the debtor's email address on the Debtor Information tab.
Pager: If selected, allows you to specify the debtor's pager number on the Debtor Information tab.
Driver license: If selected, allows you to specify the debtor's driver's license number on the Debtor Information tab.
SSN: If selected, allows you to specify the debtor's Social Security Number on the Debtor Information tab.
DOB: If selected, allows you to specify the debtor's date of birth on the Debtor Information tab.
Last three boxes in the first column: The labels for these check boxes are based on settings on the Account Titles tab of the Latitude - Control File Properties dialog box. If you set a value on the Account Titles tab, that value displays as a label on this tab. If you didn't set a value on the Account Titles tab, the label appears as either "User 1", "User 2", or "User 3." If any of these check boxes have a label other than "User 1", "User 2", or "User 3" and you select the check box, it allows you to specify a value on the Dates tab.
For example, "Date First Billed" displays instead of "User 1" if the User Date Title 1 box on the Account Titles tab of the Latitude - Control File Properties dialog box has a value of "Date First Billed." If you select the Date First Billed check box, you can specify the date that you first billed the account in the Date First Billed box on the Dates tab.
Delinquency date: If selected, allows you to specify the date you first noted the debtor account as delinquent (by the customer) on the Debtor Information tab.
Interest rate / date: If selected, allows you to specify your agency's interest rate and date of last interest on the Dates tab.
Interest: If selected, allows you to specify the interest amount for the debtor account.
Last seven boxes in the second column: The labels for these check boxes are based on settings on the Money Titles tab of the Latitude - Control File Properties dialog box. If you set a value on the Money Titles tab, that value displays as a label on this tab. If you didn't set a value on the Money Titles tab, the label appears as either "Bucket 3," "Bucket 4," "Bucket 5,,"Bucket 6," "Bucket 7," "Bucket 8," or "Bucket 9." If any of these check boxes have a label other than "Bucket" plus a number and you select the check box, it allows you to specify a value on the Balance tab.
For example, "Collection Costs" displays instead of "Bucket 1" if the Money1 box on the Money Titles tab of the Latitude - Control File Properties dialog box has a value of "Collection Costs." If you select the Collection Costs check box, you can specify a collection cost amount in the Collection Costs box on the Balance tab.
-
To select a desk, do the following:
-
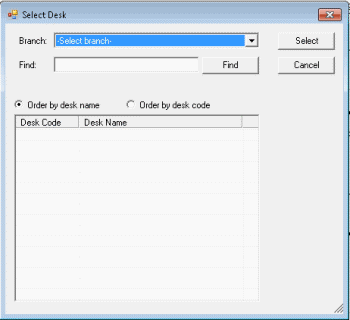
Click the ellipsis (...) next to the Desk box. The Select Desk dialog box appears.

-
Do one of the following:
-
If your agency has multiple branches and you want to display desks associated to a branch, in the Branch list box, click the branch. The desks associated to the branch appear in the search results.
-
To search for a desk by desk name, in the Find box, type at least one character and then click Find. Desks that match the search criteria appear in the search results.
-
Do one of the following:
-
To sort the search results by desk name, click Order by desk name.
-
To sort the results by desk code, click Order by desk code.
-
In the search results, double-click the desk, or click the desk and then click Select. Latitude populates the Desk and Branch boxes in the New Business window.
Note: Many agencies assign new business to an inventory desk, then use the Account Mover tool to distribute accounts among collector desks after performing new business actions on the accounts. For example, after running credit reports.
-
When finished with this tab, do one of the following:
-
To save the information and display the next tab, click Next>>.
-
To save the information and close the New Business window, click Accept.
Related Topics:
Balance


